Components
- 1 countryside board
- 1 scoreboard
- 6 storage tiles
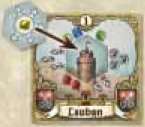
- 6 town tiles
- 6 town/Hussite cards
- 5 wagon tiles
- 5 horse tiles
- 50 civic leader cards
- 35 guard cards
- 18 hexagonal tax tiles
- 37 wooden blocks in four colors
- 5 Figures in five colors
- 10 Tokens in five colors
- Rulebook
Object of the Game
The game consists of 6 turns representing six years. Each player takes the role of a tax collector visiting one of the 6 towns.
The goods collected are placed in the royal stores or civic stores, thus giving the players influence in the court of King Sigismund (either directly or through the support of various civic leaders).
The winner is the player who gains the most influence.
Setup
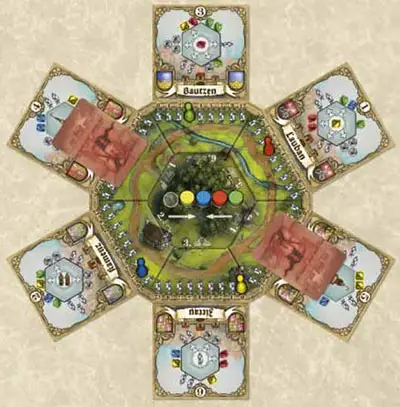
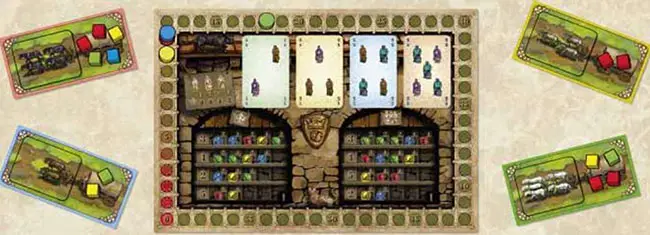
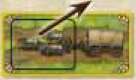
Set the countryside board in the center of the table and randomly arrange the six town tiles around it as shown. Use the side of the town tile that has the number on a white background.
Set the scoreboard nearby where everyone can reach it.
Each player chooses a color and takes the two markers and the figure in that color. Each player places one marker on the scoreboard on the space with the crown: i.e., each player starts with 10 points of influence.
The other marker is placed in one of the circles in the center of the countryside board. Place each player's marker on one of these circles at random (only one marker per circle). This determines the order that you will play in initially. This order will change during the course of the game.
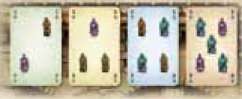
From the civic leader cards - with pictures of clergy, aristocracy, or burghers - set aside those with gray background and place them face up where everyone can reach them. Sort the other civic leader cards according to the number of figures on them to make 4 piles of 6 cards. Shuffle each pile and place it on the corresponding spot on the scoreboard, face down.
Each player gets 3 guards at the beginning, that is, three cards, each with one guard on it. (A card with 3 guards represents 3 guards all by itself; don't use any of these, yet). Put the remaining guard cards where everyone can reach them. Cards are held in the hand. Even the number of cards held should be kept secret from the other players.
Each player takes the wagon tile in his or her color. Your wagon tile is placed in front of you. It will be used to hold the goods that you collect.
Arrange the six storage tiles so that the side numbered I is face up. (The numeral is in the lower right corner). Shuffle them and divide them into 2 piles of 3. Place these piles on the indicated areas of the scoreboard.
Shuffle the hexagonal tax tiles and place them in a pile face down. Put the blocks where everyone can reach them. These represent goods that can be collected.
Game Play
The game consists of 6 rounds, each representing one year. Each round has 6 phases. The order of the phases is depicted in the center of the countryside board:
Setup - Turn up the civic leader cards, determine which towns are under siege, and place the tax tiles.
Choosing towns - Players choose which towns they will collect taxes from (in order, according to the phase 2 arrow).
Reordering - Players' markers are reordered based on how many guards they used while collecting taxes.
Tax collection - Players decide what form their taxes will take (in order, according to the phase 4 arrow).
Storage - In order, based on how many horses they collected, players decide which stores to fill, giving them points and bonuses.
Cleanup - Storage tiles and tax tiles are set aside.
1. Setup
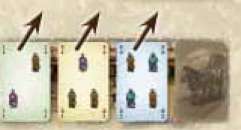
Turn up the top card of each of the four civic leader decks on the scoreboard.
Shuffle the six town cards and draw cards at random to determine which towns are attacked by Hussites this round.
Players will not be able to collect taxes in these towns. There should remain one town for each player: in a 5-player game, you draw 1 card; in a 4-player game, you draw 2 cards; in a 3-player game, you draw 3 cards.
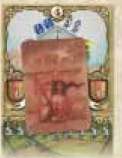
Set the cards on the corresponding town tile face down (so that the Hussite side is up).
Put a hexagonal tax tile in the center of each town without Hussites. (If you run out of tax tiles, shuffle the used ones into a new deck).
2. Choosing Towns
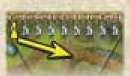
In order, each player chooses a town to collect taxes from. The player whose marker is on the space with the fewest guards starts (as indicated by the phase 2 arrow).

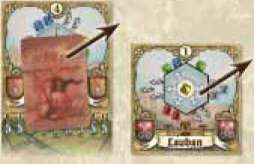
In round 1, players don't have their figures on the countryside board yet. The first player chooses a town with no Hussites and puts his or her figure on the 0 guards space next to it.
Players choose in the order indicated by the phase 2 arrow. You cannot choose a town that is under attack by Hussites. If you choose a town that no one else has chosen yet, put your figure on the 0 guards space.
If you choose a town with another player, you must "offer the services" of your guards to escort the other player to another town: place your figure on a space with a higher number than your opponent's space. This indicates how many guards you are offering.
At this point your opponent has two choices: either to accept the offer or to offer you more guards. This offer is made by placing his or her figure on an even higher number. Players take turns increasing their offers until one player accept:. The counter only goes up to 12, so 12 guards is an offer you can't refuse.
When an opponent accepts your offer, you must give him or her that many guards. If you don't have enough, you can ask the king for more.
Pay 2 influence points for each guard you have to take from the bank (move your marker back 2 spaces on the scoreboard) and give the guards to your opponent. You are not allowed to move your marker below zero, so you can't offer more guards than you can give.
When you accept an opponent's offer, you move your figure along the road to another town. You can't collect taxes from towns besieged by Hussites, but you can travel past them.
When traveling, you must return 1 guard to the bank for each town you come t . (So to move to an adjacent town, you pay 1, and to move to the opposite side of the board, you pay 3). If you need additional guards, you can pay for them with 2 influence points each.
When you enter the new town, proceed as before: if no one is there, put your figure on the 0 space. If another player is already there, the conflict is dealt with immediate you put your figure on a higher number than your opponent's and the two of you make increasing offers until one player accepts. This process could occur several times. The next player in line does not get to go until all previous players are in separate towns.
In the end, each player will be in a separate town, and every town will have either Hussites or a player's figure.
It is possible to visit the same town multiple times. You might take one player's offer and move to an adjacent town. The player there might overbid you, and you could take his offer and go back to the first town. But don't forget that you lose 1 guard each time you move to an adjacent town.
After round 1, you have to travel to the town where you want to collect taxes. You start with your figure on the road in front of the town where you collected taxes the previous turn.
Figures on the road don't conflict with those wanting to collect taxes in the town. Only figures on the guard counter can cause a conflict. When choosing a town, you must pay 1 guard for each town you come to just as you do when traveling after a conflict.
If you don't want to go to a different town, you still must pay 1 guard to move from the road to the guard counter. In other words, it costs you 1 guard to move to an adjacent town or to stay where you are, 2 guards to move past an adjacent town, and 3 guards to move to the opposite end of the board.
Otherwise, rounds 2 through 6 are the same as round 1.
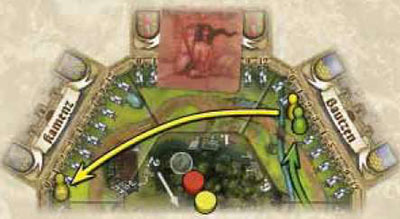
Example: Red starts. Lauban looks like the most interesting town to him. so he places his figure on the 0-guards space outside Lauban. Yellow does not want to fight with Red, so he goes to Bautzen and places his figure on the 0-guards space there.
Green decides that she also likes Lauban, so she offers S guards to Red for the privilege of collecting taxes there (and indicates this by pacing her figure on the 2-guards space).
Red accepts the offer, takes 2 guards from Green, and goes to Bautzen (spending 1 guard to move there). At Bautzen he offers Yellow 1 guard.
Yellow counters by offering 2 guards to Red if he will go somewhere else. Again, Red accepts. He travels back to Lauban (again spending 1 guard to move) and offers 3 guards to Green.
Green accepts Red's offer and travels to Bautzen (spending i guard) where she offers 3 guards to Yellow. Yellow accepts the offer and goes to unoccupied Kamenz, spending 2 guards to move there.
Blue has yet to play. She can now go to Lauban or Bautzen and offer 4 guards, but she only starts with 3 guards, so it would cost her 2 influence points to get the fourth guard from the King. She could fight with Yellow over Kamenz by offering 1 guard, or she could go to unoccupied Zittau for free.


3. Reordering
Reorder the markers according to where the figures stand on the guard counters. The player who spent the most guards places his or her marker on the space with the highest number of guards. The player who spent second most places his or her marker on the next space, and so on.
In case of ties, the player in the higher numbered town places his or her marker first.
Example: Green and Red each spent 3 guards for the privilege of collecting taxes. Blue spent 1, and Yellow did not spend any.
Green's town is number 3 and Red's Is number 1, so Green's marker goes on the circle with the most guards depicted.
Red is next, then Blue, and finally Yellow on the circle with only one guard depicted. The first player to collect taxes (i.e., choose ihe orientation of her hexagonal tax tile) will be Green.
4. Tax Collection
Players collect taxes in order, starting with the player whose marker is on the space with the most guards. The order is indicated by the phase 4 arrow, which points in the opposite direction of the phase 2 arrow.

Around the sides of the hexagon in each town is a depiction of the goods, horses, and guards that can be collected there. The hexagonal tile in the center has several arrows. You can turn the tile in your town so that the arrows point to the things you want.
For each guard symbol pointed to, you collect a guard from the bank. Some guard cards represent 3 guards. You can take one of these instead of taking 3 single-guard cards. You can always exchange a 3-guard card for 3 single-guard cards and vice versa.
You don't get anything for the silver horse symbols right now, but the player who collects the most horses will have the fastest carts and thus will be the first to choose where to put goods in phase 5.
The other symbols denote goods. For each symbol, you get 1 block of the corresponding color. Place these on your wagon tile.
You also collect the goods, guards, or horses depicted in the center of the tile. This tax tile might also have 2 figures representing clergy, aristocracy, or burghers. If so, take the corresponding cards from the face up civic leader deck (the cards with the gray background).
Just as with guard cards, you should keep your civic leader cards close to your chest so that other players can't tell how many you have.
Players collect taxes in the order indicated by the phase 4 arrow. This allows later players to make their decisions based on what the others have collected.
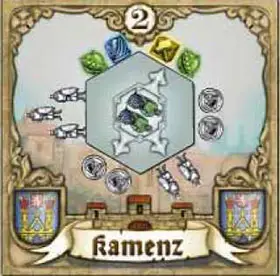
Example: Blue places her hexagonal tax tile as shown in the illustration.
She gets two guards, one green block, and one yellow block.
The two burgher symbols in the center of the tile mean that she gets a gray civic leader card depicting two burghers.
She also has two silver horse symbols. These will determine which horse team tile she takes at the beginning of the next phase.
5. Storing Goods
Players store goods in order according to how many horses they collected. The player who collected the most horses gets the 5-horse team tile. The player who collected second most gets the 4-horse team tile and so on.
If two players collected the same number of horses, the player who collected taxes in the higher-numbered town gets the card with more horses. Place your horse team tile on your wagon tile so that the horses can haul your goods away for storage.
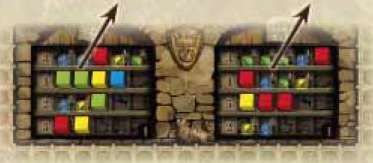
There are two storage tiles on the scoreboard: the royal stores, with the crown above, are on the left and the civic stores, with the figures above, are on the right. The player who collected the most horses chooses one row on one of the two tiles.
If you have any of the goods depicted in the row you chose, you must put those goods in the corresponding spaces in the row. For each block placed, score the number of influence points denoted in that space. You must fill in every space you can.
If you can't fill the entire row, then the other players get a chance to fill it, starting with the player on your left and continuing clockwise. Each player must fill in every space he or she can and collect the points for it. Continue until everyone has had a chance or until the row is filled.
If the players fill a row, the player who chose that row gets a bonus even if he or she could not contribute a single block. In the royal stores (on the left) this bonus is the number of influence points denoted to the left of the chosen row.
In the civic stores (on the right) the number to the left of the row determines which civic leader card can be taken. The player can take 1 face up civic leader card from one deck with that many figures or fewer. Don't turn up a new card on the pile you take from. If all eligible face up cards have already been taken, the player does not collect any bonus.
The player who collected the second most horses selects a new row to fill, and so on. Of course, you can't select a row that has already been selected.
Players continue selecting rows and trying to fill them until no one has any goods that could go anywhere. If everyone has had a chance to select a row and there are still places the players could put goods, the player who collected the most horses gets to choose a second row, and so on.
Goods that cannot be stored during this phase score no points. They are returned to the bank and cannot be saved for the next round.
Example: Green got the 5-horse team, so she will be the first to choose a row to fill. She has 2 red blocks, i green block, and i yellow block. She chooses the row in the royal stores with bonus 4.
She places 1 green block and 1 yellow block, giving her 4 influence points which are scored immediately. The player to her left only has yellow and green, so all she can do is place one green block, which is worth 1 point.
There is still room for one blue block. The next player has a blue block, so he must place it. This gives him 1 point. Because the row has been filled, Green, the player who chose the row, gets 4 bonus points.
Red has the 4-horse team, so he will be the next one to choose a row to fill.
6. Cleanup
-
Pick up the besieging Hussites and mix those cards back in with the other town cards. Pick up the tax tiles and put them in the discard pile.
-
Move everyone's figures from the towns to the adjacent sections of road.
-
Remove any face up civic leader cards still on the scoreboard. These cards can be returned to the box; they are no longer needed.
-
Return the horse tiles to the bank.
-
Remove the goods from the storage tiles.
-
Remove the top storage tile from each pile. Next round, you will use the next tile in each pile. At the end of round 3, you will be out of tiles. Make two new piles as before, except this time the side labeled II should be face up.
You will also be out of tiles at the end of round 6, which indicates the end of the game.
End of the Game
The game ends at the end of round 6.
This will be easy to recognize. Each civic leader deck on the scoreboard starts with 6 cards, so in round 6, the last card of each deck is revealed. At the end of the round, the last storage tiles will be discarded.
Scoring Civic Leader Cards
Once the last round is done, players reveal their civic leader cards. Each card counts as a certain number (1 to 4) of either clergy, aristocracy, or burghers. Points for civic leader cards are depicted in the table in the upper left corner of the scoreboard.
For example, the player with the most clergy gains 9 influence points, the player with second most gets 6, the player with third most gets 4, and the player with fourth most gets 2. Points for the most aristocracy and burghers are scored the same way.
Exception: In a three-player game, don't give out points for first place. Thus, the player with the most gets 6 points, the player with second most gets 4 points, and the player with the least gets 2 points.
Ties are broken in favor of the player with more guards in hand. If this fails to break the tie, all tied players get the lowest point value. (In a five-player game, two players tied for first will get 6 points - as though they both got second place. Three players tied for third will get 0 points - as though they all got fifth place).
In a three- or four-player game, you can be last in a category and still score points, as long as you have at least one card of that type. Players who don't have any civic leader cards of the appropriate type don't get any points, regardless of how many the other players have
The Winner
The player with the most influence points wins. Break ties in favor of the player with the most guards left in hand.
Continue Reading