Components
- One player board
- 4 player boards
- 28 discs to track shifts and training
- 4 certification meeples and 4 worker meeple
- 20 player lock tiles
- 4 Player aid sheet
- 1 pink worker pawn
- 1 pink cylinder to track the week count
- 1 white cylinder to track the production cycle
- 1 white wooden car to track the production cycle
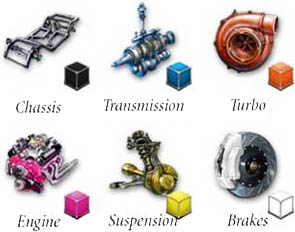
- 6 cubes to trace car parts value
- 9 cubes x 6 colors representing car parts
- 8 wooden car tokens x 5 colors (green, blue, yellow, red and black)
- 1 two sided production track overlay for 2 and 3-player games
- A big huge white wooden token to signal the meetings (building shaped)
- 12 kanban cards to order parts
- 32 CEO goal cards
- 7 blueprints x 5 models
- 44 seat tiles (24 red and 20 in player colors)
- 12 factory goal tiles
- 5 kanban tiles for cars demand
- 20 plaque award tiles
- 16 book tiles
- 12 wild cube tiles
- 6 final score tiles
- Rulebook
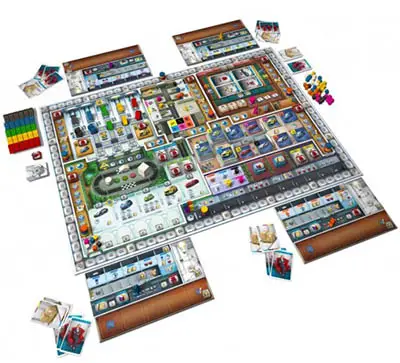
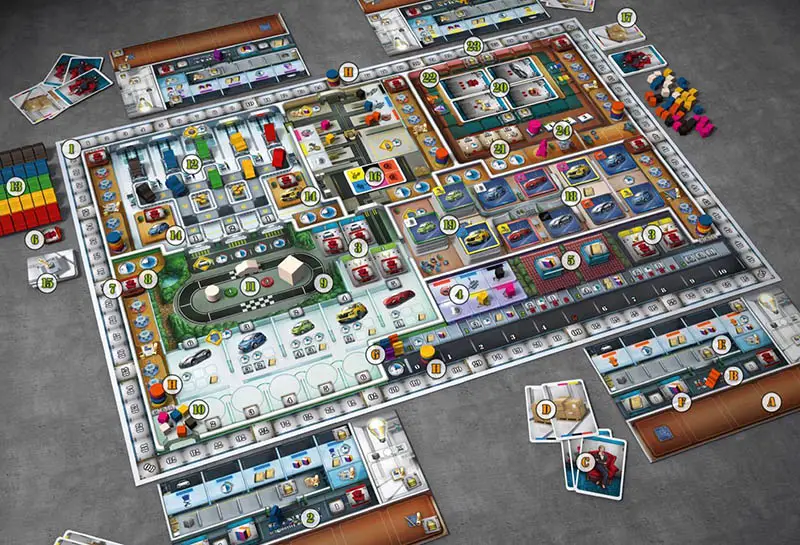
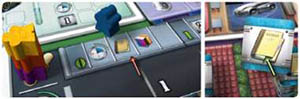
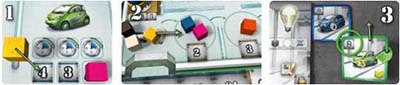
Board Description

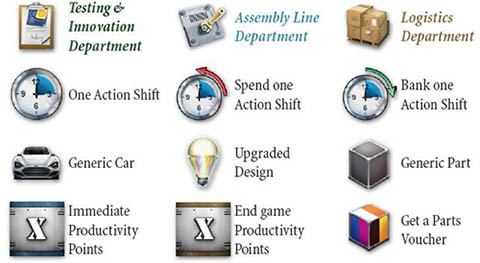
- Testing & Innovation Department
- Assembly Line Department
- Logistics Department
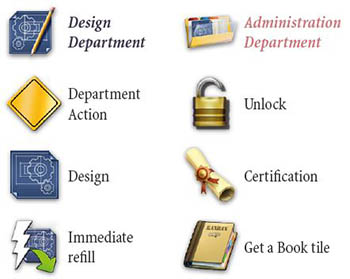
- Design Department
- Administration Department
- Recycling
- Human Resources
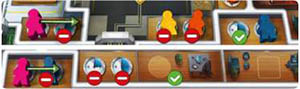
Departmental workstations = Action Spaces
- Testing and Innovation
- Assembly Line
- Logistics
- Design
- Administration
- Sandra's Action Space at Administration
Note: Turn order is resolved left-to-right, which will be A-to-F. i.e. The left space of A is the first to play. Sandra's movements also follow the same direction.
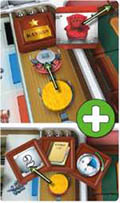
Player Boards
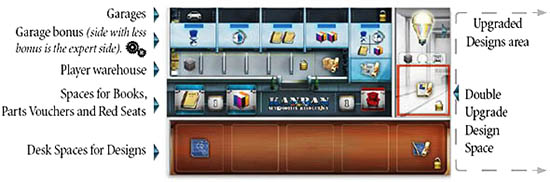
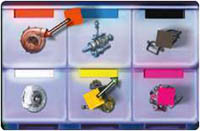
Car Parts
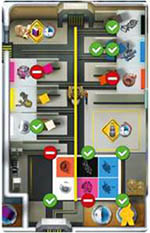
Game Symbols
Setup
1 Place the gameboard in the middle of the table.
2 Choose A Color, Then:
ATake a matching Player Board and decide which side you want to use (expert side of the board, offers fewer benefits in garages than the other, to create a challenge for experienced Players).BTake a meeple, and a mini-meeple.CShuffle the deck and take 3 Performance Goal cards.DShuffle the deck and take 2 Kanban order cards into your hand.EPlace a Lock tile on each of the 4 "unlocked" symbols printed on your Player Board.FTake a Parts Voucher tile, and put it on the appropriate space on your Player Board.GPlace your Certification mini-meeple to the left of the 0 space of the Certification Track in Human Resources.HPlace 1 disc on... the bottom desk of each of the 5 department training tracks, the 0 space of the Shift Bank in Human Resources, the Productivity Points (pp) track.
Put your disc on the 0 space. Things are only going to get better!
Put it on the 15 space. I'm sure you'll find a way to damage your record. At least you can't sink below zero.
3 Shuffle the Factory Goal tiles, and place one, face-up, at a time in their proper places until all spaces are occupied. Put the lower-numbered tile of each pair in the left space, and the other in the right. Then place 2 Red Seats on each tile, for a total of 12 Seats on Factory Goals. (3p: 2 on the easier goal of each pair; 1 on the harder goal. 2p: 1 on each tile).
4 Place 3 random Car Parts of 3 different types in the appropriate spaces of the Recycling pool.
5 Put the Parts Voucher and Book tiles on the roof spaces.
6 Set aside all other Red Seat tiles near the gameboard.
For each training track in the 5 departments:
7 Shuffle all Award Plaques, and place 3 face-down above the top space of the training tracks. (2-3p: 2 Plaques, instead of 3). Put the remaining Award Plaques back in the box without looking at them.
8Place 1 Red Seat over the 5 Award Plaques piles.
In the testing & innovation department
9 (3p: Cover the Test Track printed on the gameboard with the Test Track Overlay showing the side with 3 cars. 2p: Use the 2-car side of the Test Track Overlay).
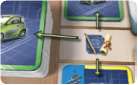
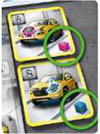
10 Place 1 Car Part of each of the 6 different types to the left of first space of the Design track, in order to track the values of upgraded Car Parts.
11 Place the Pace Car (white car) in either checkered space on the testing track, the Meeting token (big white cube), in the middle of the track, and the production cycle marker (white cylinder) on the '0' space of the Meeting track.
At the assembly line department
12 Place 1 Car of each color in the matching conveyor in the top row of the Assembly Line and fill the second row the same way.
13 Put all others near the board, where the number remaining is clearly visible to all Players.
14 Shuffle the 5 Demand tiles and place one, face-up, in each of the 2 places at the end of the line. Place the number of Red Seats indicated on the 2 tiles.
15 Make a little face-down deck with the other 3 Demand tiles.
In the logistics department
16 Shuffle the left-over Kanban order cards, turn the top card of the deck faceup, and place all 6 Car Parts indicated on it in their related warehouses.
17 Return the card to the bottom of the deck and place it face-down near the board.
In the design department
18 At random, place 1 face-up Design tile in each of the 8 rightmost spaces.
19 Shuffle the remaining 27 Design tiles, make 3 face-up decks with 9 tiles each, and place them in the 3 leftmost spaces of the department. The leftmost deck is called the 'Central' deck.
In the administration department
20 Shuffle the remaining Performance Goal cards and place 4, face-up, on the conference table. Place the deck face-down near the board.
21 Place a random Final Goals tile in its proper space. Put all the other Final Goals tiles back in the box.
22 Place all Seats in the Players' colors face-down in their proper places, then turn face-up one Seat tile (without certificate) per player.
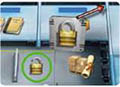
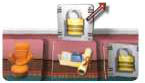
23 Place a Lock tile over each of the 4 seats with a certificate.
24 Place the pink round marker in the 0 space of the Week track, and the pink meeple in the circle at the bottom right of the department.
Object of the Game

Use your working hours (action Shifts) as efficiently as possible throughout the game, and you will win. The idea here is hours worked versus value produced. Efficient use of time is measured as Productivity Points (pp).
Game Play
After setup, there is a starting round.
Choose the first Player at random, and then in clockwise order, place your Certification Meeple on one of the 4 spots in the 0 space of the Certification Track in Human Resources, then receive the benefit printed on that spot.
Not only are you choosing a benefit, but the position you choose is significant too, because the order in which you get starting items is right-to-left on this track; this is also the turn order for the first Department Selection Phase of the game.
Next, in Certification Track order (right to left), take one available Car Part from Logistics Department, and a Design tile from Design Department, ignoring any benefits printed on the board.
Any Design tile may be taken, even from locations that normally require certification (tops of the decks). Place each collected item in the appropriate space on your Player Board.
At the end of this round, slide tiles to the right in order to fill the gaps. Fill the empty spaces at top and bottom rows, respectively, with tiles from the top and bottom decks on the left.
Do not replenish the Car Parts.
Game Turn
Each round represents a workday in the factory. Each round comprises two phases. During the first phase, you will take turns choosing a workstation in the department in which you'd like to work that day.
During the second phase, you will spend your Shifts working and/or training as you please in the department you chose. I will also participate in these phases.
1. Department Selection Phase
At the start of each day, from left to right on the floor plan, all players (including myself) will take turns selecting our next workstation.
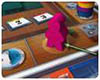
Company cross-training policy prohibits us from working in the same department two days in a row, so you must pick a new department each day. Simply place your worker meeple on the empty desired workstation. One worker per workstation!
My standard operating procedure is to move to the first available workstation of the next department to the right (or my desk, if that's Administration).
For the very first Department Selection Phase, in which we enter the factory, I will go to my desk in Administration, and the order in which you choose workstations is right-to-left on the Certification Track.
For every Department Selection Phase after that, the order in which we choose our workstations is left-to-right in "Workstation Alley" itself. That is to say that if you are at the left workstation of Testing & Innovation today, tomorrow you will have first choice.

So the choice you make today affects your priority for choosing tomorrow. It's company policy! From my desk, I start back at the leftmost available space.
2. Working Phase
Left-to-right in Workstation Alley, we do our tasks. The number of Shifts you can do is determined by the workstation you chose (2 or 3 everywhere except Administration, where it's 1 or 2). Most tasks can be completed in a single 3-hour Shift; however, a few take several Shifts to complete.

If you have Shifts banked at the Shift Bank in Human Resources, you may spend some of those in order to work more; however you are never allowed to work more than a total of 4 Shifts in one day. Certain tasks and rewards let you bank Shifts for use on later turns.
After you do your day's work, be sure to get a good night's sleep! Lay your worker meeple down at its workstation; this makes it much easier to see who hasn't moved yet in the next Department Selection Phase.
When my turn comes around, I will assess the department I'm in, and perform my tasks (see p. 9). Remember, on the very first day, I have paperwork to deal with, so although I will be at my desk in Administration, I will neither be assessing performance nor advancing the week. After everyone has worked their Shifts, we can start a new day's Department Selection Phase.

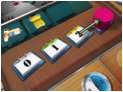
For you newbies who can't remember how many Shifts you've banked during a workday, I've provided three tiles to act as place-holders until you can add the Shifts to the Shift Bank.

A Parts Voucher can be used in cunning ways, because it allows you to acquire any one Part you need, precisely when you need it. Don't spend them frivolously: You will be rewarded for unused vouchers....
General Rule
Company policy disallows using any benefits the same day you receive them. Books, Banked Shifts, and Parts Vouchers are all credited to you at the end of the workday, and are not available until the next day.


Recycling
At any time during your turn, you may take a Car Part from your board, and trade it for another one in the recycling pool. Only 1 Part of the corresponding type can be in each space.
Only 3 Parts are allowed in recycling at the same time. The use of recycling is free. You can use this free move as many times as you wish and can.

Recycling cannot be used during Meetings. Always take advantage of recycling. It saves you time, and minimizes waste!
Human Resources
Factory Goals
There are 3 areas of the factory where Sandra wants to see some objectives fulfilled:
- Getting the depicted number of Certifications;
- Claiming the depicted number of Cars;
- Upgrading the depicted number of Designs;
You will note that each of the three areas has a display with a pair of Factory Goal tiles, each of which has one or two Seats on it, depending on the number of players.
The first (or second) person to reach that goal (e.g. getting your 3rd certification, claiming your 4th car, or upgrading your 5th design), immediately receives one Seat, which you can use later to impress Sandra during a Meeting (see Meetings). The same person could claim one Seat from both goals in the same day! Flip the Factory Goal tile once it has no more Seats on it.
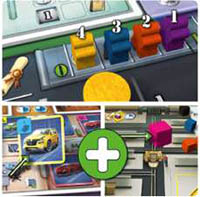
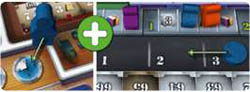
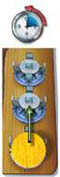
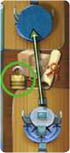
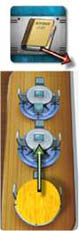
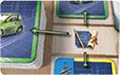
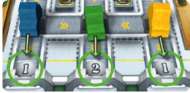
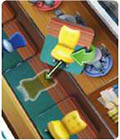
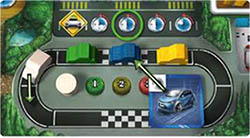
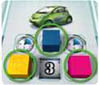
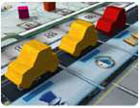
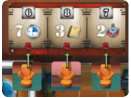
Shift Bank

When a task or reward lets you bank a Shift, your marker moves to the right; when you spend a banked Shift, your marker moves to the left. It's as simple as that. In the image Yellow player has 3 banked Shifts.
At the end of the game, you are rewarded for how many Shifts you still have banked.

You can use the Banked Shift tiles to remind you to take banked Shifts at the end of your turn; when your turn ends, add the Shifts to the Shift Bank, and return the tiles to the supply.

When I assess your performance in a department, if I think you deserve a reward, that reward will be a number of Productivity Points equal to the Shifts you have banked.
Time management is an important skill! Of course, if you haven't started your training, you can't get a reward!

When I assess your performance in a department, if I see that you need some motivation, I will penalize you 1 Productivity Point for each Shift fewer than 5 you have banked.
Good time management will excuse you, because it is clear that you have allocated time for those tasks later.
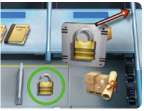
Training And Certifications
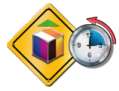
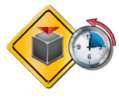
Each department has its own training track. When you work in a department, one of the tasks available is training in that department. Each stage of training requires 1 Shift to complete, and advances your marker up to the next desk.
If you reach the same stage of training as a coworker, stack your marker on top of his; you are considered to be ahead of him. Once you get past the 3rd stage of training in a department, you will be certified in that department.
This typically unlocks a new portion of your board, and some provide a benefit within the department itself. Discard the lock tile from the matching portion of your board, (or Administration), then choose a benefit in the next space of the Certification Track in Human Resources, move your certification meeple to it, and get the benefit.
The other benefit of certification is that the order in which the Players get to score in Meetings is right-to-left on the Certification Track. The more certified you are,
the more we want to hear what you have to say!
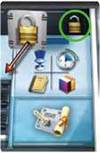
Certification Benefits
Testing & Innovation Department

Unlocks the Special Upgrade Design Space on your board. When you upgrade a Model Part, you may choose to put the Design tile on that space in order to advance the Design value of that Part twice, instead of once.
You can only do this once in a game, with one Design, and no 2 Players may do this with the same type of Car Part. Immediately score pp equal to the Car Part's new value.
Assembly Line Department

Unlocks your 5th garage on your board. When you park a car there, choose any two different, single benefits from those.
(e.g. 1 Seat and 1 Shift; or 1 Book and 1 Parts Voucher) or claim a Seat if you are playing the expert side of the player board.
Logistics Department

Unlocks the 6th storage bin for Car Parts on your board. Grants you access to the Get a Parts Voucher action.

Design Department

Unlocks the 5th Design space on your board. Grants you access to the three "fresh Design" tiles on the top of the 3 Design decks.
Administration Department

Unlocks your 5th chair space at the conference table, which allows you to have a 5th Seat, for a 5th scoring opportunity during Meetings.
Homework
There is one other very effective way to train: Take the books home, and learn more in your spare time. Certain tasks and rewards allow you to take training books onto your board.
Each book you spend while you are working in a department increases your training in that department by 1 stage but does not take any time out of your workday.
Books may be spent at any time on your turn, so you could spend a book to train, then work your normal shifts, spend banked shifts, and then spend any number of books to train some more!
Advanced Training
Even after you are certified in a department, you may continue to train until you are an expert - i.e. until you reach the final space of the department's training track (the red desk).
The first person to become an expert gets a Seat. When you become an expert, you can also take an Award Plaque of your choice from those remaining, and return the rest face-down to the space.
Earning an Award Plaque has one of the following immediate benefits: Bank 1 Shift in the Shift Bank, gain 2 Productivity Points, take 1 Book, take 1 Parts Voucher.
After you get the benefit, you can discard the plaque, or you can mount it on your wall; either way, it won't do anything else for you.

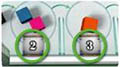
Scoring For Training
At the end of the game, you can earn pp for your relative position on each department's training track. If you are first, you get 5 pp; second gives you 3 pp; third 1 pp. Ties will be broken by stacking order;
When you reach an occupied space on the training track, stack your disc atop the other(s), which puts you ahead of those below you in the stack.
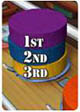
Example: At the end of the game, Yellow, Blue, and Purple occupy the first position, but Purple got there later, so his disc is on top. Thus, he is in the lead, Blue is 2nd, and Yellow 3rd.
Note: Players who failed to make any progress on a departmental training track don't earn any pp for it.
Factory Manager

If this is your first time working at the factory, I would be delighted to motivate you with rewards for training diligently while juggling your other responsibilities. You can see my tasks for each department below, but just use the Player aid I sent you.
When I visit a department, I am going to review the most studious individual or individuals, i.e. whoever is farthest along the training track. Stacking order only matters for end game scoring.
If they also have maintained sufficient performance in that department, I will check the number of Shifts they've banked in the Shift Bank. If you've managed to impress me this way, I will reward you with 1 pp for each Shift you have banked. I hope you will find this motivational! But remember; If you haven't started your training, no reward!
If you are already familiar with this plant, or you have a lot of experience with operations of this complexity, I know you are going to need negative reinforcement: I will motivate you with demerits for training more slowly than is appropriate, should you shirk your other responsibilities, as well.
When I visit a department, I am going to audit the slacker or slackers who have trained the least in that department, i.e. whoever has made the least progress on that training track - especially if they haven't even started.
If they also have subpar performance, I will check to see how many Shifts they've banked in the Shift Bank . If I catch you slacking off like this, I will penalize you 1 pp for each Shift fewer than 5 you have banked. Maybe that will kick your lazy butt into action!
| Department | Requirement to Receive pp Reward | What Makes You Deserve pp Penalty | My Departmental Task After the Evaluation |
|---|---|---|---|
| Testing and Innovation | Have at least 2 upgraded designs (upgraded side). | Have 2 or fewer upgraded designs (upgraded side). | Advance the Pace Car 1 step. |
| Assembly Line | Have at least 2 cars in your garage. | Have 2 or fewer cars in your garage. | Clear Car Part from all assembly spaces. |
| Logistics | Have at least 2 Car Parts (cubes) in your board. | Have 2 or fewer Car Parts in your board. | Remove all but 1 Car Parts from each warehouse. |
| Design | Have at least 2 designs (blueprint side) on your board. | Have 2 or fewer designs (blueprint side) on your board. | Return the oldest 4 tiles to the 'Central' deck (leftmost deck), and shuffle it. |
| Administration | Have at least 2 certifications. | Have 2 or fewer certifications. | Advance the Week marker, and evaluate your End-of-Week score as follows: For each car in your garage:
|
Design Department
The research and development process produces designs for new upgraded Parts, as well as tests that should be run on existing designs.
You will eventually take the Designs you select to Testing & Innovation Department. Most Designs depict a Car Part upgrade that Innovation can make, others have nothing in the top left; however, all Designs allow you to claim the depicted car from the test track.
More about that in the Testing & Innovation Department chapter. You can use Recycling to get the Parts you need!
Action: Select a Design
To take a Design to your Player Board, you must:.
-
Spend 1 Shift per Design you take from the display (You can only take designs from the decks if you are certified). You must have an available space on your Player Board for each Design you take; you cannot discard designs from your desk spaces.
-
Place the selected Designs on the desk on your Player Board.
-
Once you have finished spending your Shifts here, slide all Designs in both rows to the right to fill any gaps. Place new Design tiles from the top and bottom decks, on vacant spaces of the same row.
When any of those decks is depleted, fill empty spaces with tiles from the 'Central' Deck. If both are exhausted first fill the top row, then the bottom.
Well-researched Designs

The rightmost four spaces of the display hold the Designs that have spent the most time getting kicked around the department. Because more of the kinks have been worked out, taking one of these Designs saves you time and effort later.
This will either be a Shift banked in the Shift Bank, or a Book to allow you to train without spending a Shift to do so. Remember, you get all benefits at the end of the workday, and can't use them until the next day!
Certification Benefits


You gain access to the Cutting-Edge Designs.
This also enables you to work on 5 Designs at once, instead of just 4: Unlock the fifth Design space on your Player Board.
Cutting-Edge Designs
If you are certified in Design, you may also select brand new Designs from atop of any of the 2 leftmost decks and 'Central' Deck.

Every time you take the last Design from the leftmost decks of the top and bottom row, immediately fill the space with the top Design from the 'Central' deck.
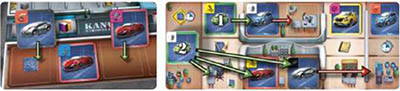
Logistics Department
Collect the Car Parts you need, and stock the warehouses with a Kanban order, if you need to.
You will eventually take the Car Parts you collect to Testing & Innovation Department or the Assembly Line. Innovation can upgrade that Part in a Model. The Assembly Line uses the Car Parts to complete cars.
Action: Issue Kanban Order
You may issue 1 Kanban Order per day. It takes time, but saves time later.
-
Spend 1 Shift, but bank 1 Shift in the Shift Bank.
-
Select a Kanban Order from your hand.
-
Position the Kanban Order on the Kanban space horizontally such that 4 of its symbols are on one side of the line, and 2 are on the other. You choose whether the left or the right gets the 4 symbols.
-
For each symbol that matches a warehouse on its side of the line, you must add 1 Car Part to the appropriate warehouse from the general supply.
-
Return your Kanban Order to the bottom of the deck and draw another one.

Action: Collect Car Parts
To take Car Parts to your Player Board, you must:
-
Spend 1 Shift per warehouse from which you want Car Parts. (i.e. 1 Shift per type of Car Part you want).
-
Take any number of Car Parts from each of those warehouses. You must have an available space on your Player Board for each Car Part you take. You cannot discard Parts from your board.
-
Place the collected Car Parts on your Player Board.

Certification Benefits

You are now trusted to request 1 Parts Voucher per day as a logistics action.
This also enables you to keep track of a sixth Car Part: Unlock the sixth Car Part space on your Player Board.
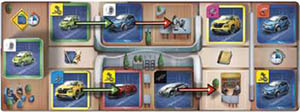
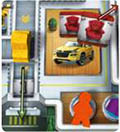
Assembly Line Department
Provide the Parts needed to complete assembly of cars, and watch them roll down the line!
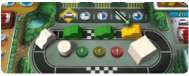
The Assembly Line is made up of Assembly Spaces that we load with Car Parts, and the Conveyors that move the cars down the line as they're built. Eventually, they roll out to the Test Track.
First: Clean Out Assembly Spaces
At the start of your turn in this department, empty all of the Assembly Spaces for any Models whose Assembly Spaces are all filled. Return those Car Parts to the supply.
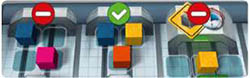
Action: Provide Needed Parts
Your delivery of the necessary Parts, just in time, allows the Assembly Line to keep moving.
-
Spend 1 Shift to move a Car Part from your Player Board to an Assembly Space for a Model.

Remember: You can use Recycling and/or spend a Parts Voucher to provide any Part from the supply, instead of a cube from your board.
The Car Part must differ from any others currently in the Model's Assembly Spaces.
 If the Model has had any of its Parts upgraded (see Testing & Innovation- Action: Upgrade Parts), you must provide all the upgraded Parts first; however, the order does not matter.
-
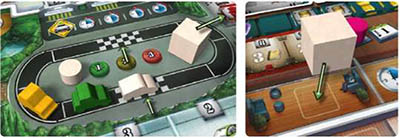
Move the car at the top of this Model's Assembly Line one position along the arrows. When it gets there, it displaces that car along the path of your choice (respecting the arrows), and so on, until no further cars can be displaced.
-
Place a new car of this Model from the supply at the beginning of this line. If the top space of the line is empty, and there are no more cars of that Model to place in the beginning of a line, no more Parts can be placed in that line's Assembly spaces.
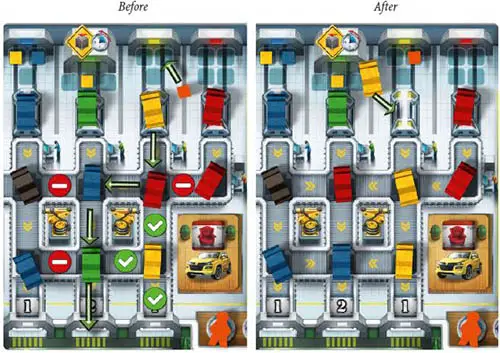
A Car rolls off the Line
When a car reaches the end of the line, its assembly is complete, and it rolls onto the Test Track.
-
You receive 1 or 2 pp, depending on which conveyor delivered the car.
-
Move the car to the first empty space behind the Pace Car on the Test Track.
Only 4 cars (in addition to the Pace Car) can be on the Test Track at once. So, each time a 5th car enters the Test Track, remove the car directly behind the Pace Car, and Shift the others forward to fill the gap. Return the removed car to the supply.
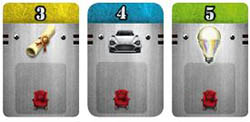
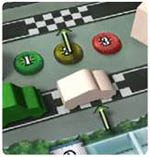
Demand Tiles
Whenever you complete assembly of 1 of the 2 Models currently in demand (i.e. whose Demand tiles are face-up on the board near the end of the Assembly Line), you earn a Seat at the conference table:
-
Take a Seat from the matching Demand tile, if it has any left on it.
-
If you have any Seats left face-down at the conference table, discard the Red Seat, and flip a Seat of your color at the conference table face-up; otherwise, place the Red Seat on the appropriate space on your Player Board.
It will automatically become a Seat of your color after the next Meeting.
Use this procedure anytime you earn a Red Seat.
Finally: Demand for Models Met

At the end of your turn, if either of the 2 Demand tiles in this department has no more Red Seats on it, the Demand has been met.
Discard the tile from the board draw a new one from the Demand deck, and place the appropriate number of Red Seats on it.
After replacing the empty Demand tile(s), shuffle the discarded tiles into the deck.
Certification Benefits
This enables you to park a fifth car: Unlock the fifth garage on your Player Board.
On one side of the board, when you park a car in the new garage (it needn't be your fifth car), choose any two different, single benefits from those depicted below the garage. e.g. 1 Seat and 1 Shift; or 1 Book and 1 Parts Voucher.
If you are playing with the expert side of your board, the only benefit available is 1 Seat.
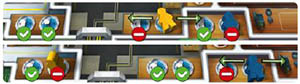
Testing & Innovation Department
Claim cars from the Test Track, taking them into your garage for final testing, and/or deliver Car Parts and Designs to upgrade the Parts.

Action: Claim Cars
To claim a car, you must have a Selected Design on your desk that depicts the Model you want. This is how you claim cars:
-
Return the Selected Designs, which depict the Models you want (you must use one Design per car), from your Player Board to the bottom of the 'Central' deck.
-
According to the initial position before claiming the first car, spend the appropriate number of Shifts to take the matching cars from behind the Pace Car:
- The first car behind the Pace Car requires 1 Shift.
- The second and third car behind the Pace Car requires 2 Shifts.
- The fourth car behind the Pace Car requires 3 Shifts.
-
Advance the Pace Car a number of spaces along the Test Track equal to the number of cars you took.
-
Advance the other cars to close the gaps behind it.
-
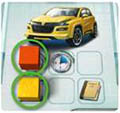
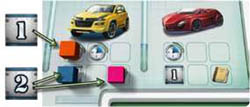
Place each car in any empty garage of your choice on your Player Board, and receive the benefit depicted on each garage you filled.
Note: To speed up game pace, and because choosing a garage may take some time, keep your claimed car(s) next to your Player Board until the end of your turn. Only then proceed with the last step. At the end of the game, cars in your garage will be worth pp (see Final Scoring).
No More Garages
If you already have all 5 of your garages occupied, then and only then, you can replace an old car, returning it to the supply; however, you don't get to take the garage's benefit again.
Meeting Time
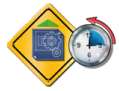
When the Pace Car reaches or crosses the next checkered space, we have enough test data, and we schedule a Meeting at the end of the day. Move the Meeting token from the Test Track to the Administration Department to remind yourselves to hold the Meeting at the end of the day (See Meetings).
Action: Upgrade A Design

To upgrade the Design of a Part in a Model, you must have a Selected Design depicting the Model and the Part, as well as the Car Part itself:
-
Spend 1 Shift to move the Car Part from your Player Board to any empty Upgrade Space for that Model in Innovation.
- Remember: You can use Recycling and/or spend a Parts Voucher to take the Part from the supply, instead of a cube from your board.
- Receive the benefit depicted in the Upgrade Space you filled (if any is depicted).
-
Increase the Car Part's value one step. (The first upgrade moves it into the first space, and the highest value is 6).
-
Flip the Selected Design over to show the Upgraded Design, which depicts the upgraded Part in the car. Place the Upgraded Design to the right of your Player Board and earn 2 pp (indicated on the Upgraded Design side of the tile).
Tested Designs

Any Upgraded Design you have, for which you have a matching car in your garage, is considered to be a Tested Design. Tested Designs score you pp at the end of each week and at the end of the game!
The value of a Tested Design differs for End-of-Week Scoring and Final Scoring:
-
End-of-Week Scoring:
You get pp for testing upgrades of the factory Models.
-
Final Scoring:
You get pp based on the Car Part value of your tested Designs.
Certification Benefits

You gain the one-time ability to double-upgrade a Design. When you do this, you increase the Car Part's value 2 steps, instead of just 1, and immediately score the value of that new space, as a bonus.
Place the Double-Upgraded Design on the Special Upgrade space on your Player Board, rather than to the right of it.

Restriction: Each type of Car Part can only be double-upgraded 1 time; that is to say that 2 Players cannot double-upgrade the same Car Part.
Administration Department
From here, you can put your fingers in any department.
Action: Micro-manage
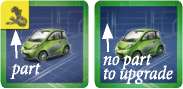
Work and/or train in another department. (e.g, spend your Shifts in logitics). You can only micro-manage one department each day. Shifts to work and/or train in another department.

In this department I have my own desk, so I never use the workstations. Here, I advance the week marker 1 space, and proceed with End-Of-Week scoring.
Note: The only task available in Administration is training. You can still train (using Shifts and/or Books) in Administration, even if you use Shifts to work and/or train in another department.
Certification Benefits

You have mastered Meeting efficacy and synergy of acronyms, jargon, and buzzwords: Unlock your fifth Seat space at the conference table.
Meetings
As you'll recall, when the Pace Car reaches or crosses a checkered space, we move the Meeting marker to Administration in order to schedule a Meeting for the end of the day.
Once everyone, has taken their turns for the day, the Meeting begins. This is a tense situation, so there's no time to visit Recycling during the Meeting!
Once we have enough test data, we will meet to discuss our findings. In practical terms, that's your opportunity to score pp by showing off your accomplishments. In order to do so, you will need Seats of your color at the Meeting. Each Seat will allow you to crow about a different achievement.
Remember, we've talked about several ways you can get Seats:
- Being the first person to complete any given Training Track.
- Reaching the 2nd and 4th spaces of the Certification Track in HR.
- Accomplishing Factory Goals.
- Completing assembly of Models in Demand.
- Parking a car in your leftmost, or possibly the unlocked fifth garage. At any time, except during a Meeting, you may exchange a Red Seat for a Seat of your color at the conference table.
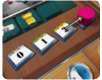
On the table, there are four Performance Goals we will be considering. You also have three in your hand:
- One is your 'petproject' on which you must report.
- One will be your recommended Performance Goal for the next Meeting.
- One just stays in your hand.

You must present your pet project, no matter how pitifully you failed to do it.
You will take turns showing your accomplishments, until you no longer have or want to use any Seats from the conference table. You are not allowed to use any Red Seats during Meetings.
Meeting order will be determined based on the most certified to the least certified Player, which more specifically is from right-to-left on the Certification Track.

When your turn comes around, either:
Speak:

-
Place the pet project from your hand face-up in front of you, making it available for anyone to score, just like the ones on the conference table. You must do this once, and only once, per Meeting.
-
Take 1 of your face-up Seats from the conference table, and put it on a Performance Goal of your choice, in order to score pp against that Performance Goal.
(If you choose to Speak, you must do one or both of the above options).
or
Pass, if and only if you have already placed your pet project face-up (you can jump back in, later in the Meeting).
Scoring Against Performance Goals
The factory manager is keenly interested in Performance Goals; however, she grows less interested in a Goal the more she hears about it. You are only allowed to speak about a particular Performance Goal once.

A number of Seats depicted near the bottom indicates how many Players may 'speak' in this goal.
Each Performance Goal card shows a number of pp in the upper-left corner, as well as a multiplier in the upper-right that indicates the number of times you can score the pp in the upper-left... if you're the first person to talk about that Performance Goal.


The next person to discuss it can score one time fewer; the next, still one fewer. At that point, Sandra is completely sick of hearing about it, and nobody else can score against that Performance Goal.
Once everyone passes consecutively, the Old Business portion of the Meeting is complete; on to New Business:
-
Return used Players' Seats face-down to the spaces around the conference table. Keep unused seats at the table face-up.
-
Flip as many of your Seats at the conference table faceup as possible: For each Red Seat you discard from your Player Board, flip 1 face-up.
-
Discard all remaining face-up Performance Goal cards.
-
Establish next Meeting's Performance Goals:
-
Each player places 1 of his 2 cards face-down on an empty space on the conference table. Then, reveal all the cards.
-
If there are fewer than 4 Players, fill the remaining spaces from the deck.
-
-
Each Player draws 2 new cards from the deck.
-

Move the Meeting token back to the infield of the Test Track and advance the Production Cycle token 1 space.
End-of-week Scoring
At the end of the week, during my turn and when I am at my desk, I will reward you for Testing upgraded designs in the factory Models.
For each car in your garage, score the upgrades to that Model:
- 2 pp for each upgrade you made (these are your Tested Designs for that Model).
- 1 pp for each upgrade someone else made.
Example: You have 2 yellow and 1 red car in your garages. Innovation has a total of 3 upgrades in the yellow Model, 2 of them were made by you. You know that, because you have those upgraded designs next to your Player Board.
Looking at the yellow Model in Innovation, you see 3 upgrades. So, you receive 4 pp for testing the upgrades you made (2x2), plus 1 pp for testing the upgrade made by someone else. Because you have 2 yellow cars, you duplicate this result, granting you a total of 10pp.
The red Model doesn't have any upgrades, which also means you did not test anything, so you get no pp.
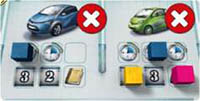
The black, blue and green Models also have upgraded designs, but since you don't have any of those cars in your garage, you were not able to test them to get pp for those.
End of the Game
The Production Cycle marker and Week marker track the end of the game. When 1 of them is on the 3rd space and the other is on the 2nd, this triggers the end of the game.
Finish the day, including a possible Meeting or possible End-of-Week Scoring, or both, and then proceed to Final Scoring. Until then, just keep playing.

Final Scoring
At the end of the game you perform the Final Scoring as follows:
Move all of your face-up Seats from Administration to the Seat space on your Player Board.
-
Spend 1 Seat per achievement you wish to score on the Final Goals tile. They are non-exclusive: Each Player may score each goal.
-
Earn 1 pp per Shift you have banked in the Shift Bank.
-
Earn 1 pp per Seat, Book, or Parts Voucher on your Player Board.
-
For each car you have in your garages, earn pp equal to the value depicted on the wall between the Test Track and Innovation.
-
For each of your Tested Designs, earn pp equal to the Car Part's value. Remember, a Tested Design is an Upgraded Design for a car you have in your garage; The number of cars you have does not matter, one car is enough to test all upgraded designs of the same Model.
-
Score relative positions on each department's training track: First: 5 pp, second: 3 pp, third: 1 pp. Ties go to the disc on top of the stack - the one that got there later. Players that fail to make any progress score 0 pp.
In the event of a tie for total score, the tie-breakers are as follows:
- The most Cars;
- The most Tested Designs;
- The most Shifts in the Shift Bank;
- The most Certifications;
- All tied Players are winners.
Continue Reading