As the head of an ancient monastery, you strive to provide the people with Over several rounds, you compete with your opponents for resource tiles and monk tiles to improve your cloister's garden. You must balance buying new tiles and taking the scoring discs that let you reap the rewards of those tiles.
This is no easy task, as you all compete for the same tiles and the same, very limited, scoring discs. The player who plans her cloister's garden most carefully, developing the most synergies among her resource, monk and shed tiles, has a good chance of winning.
But winning is only possible if you manage to balance your resources and the progress of your brewmaster so that by the end of the game you have filled lots of barrels with high-quality beer.
Components
- 1 main board
- 100 resource tiles (20 of each color)
- 24 monk tiles 6 of each type front back
- 4 player boards
- 12 large barrels with 12 different goals
- 12 small barrels with the same 12 goals as the large ones
- 49 shed tiles
- 4 brewmasters, 1 of each player color front
- 20 privilege cards
- 20 resource markers
- 36 scoring discs
- 27 ducat coins
- 24 ducat cards
Setup
Main Setup
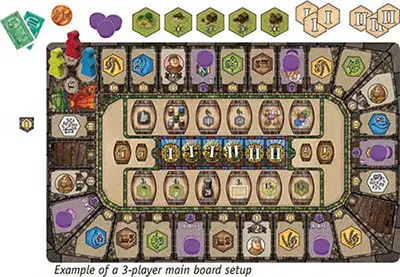
Place the main board on the table within every player's reach.
Place the ducats and scoring discs next to the main board as reserves.
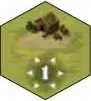
Separate the resource tiles and place them face down into two piles: one pile containing all the tiles that have a "I" on their back, the second pile containing all the tiles that have a "II" on their back. Then place 1 resource tile with a "l" on its back face up on to each of the 15 resource spaces
 on the main board.
Place the shed tiles next to the main board. As the shed tiles are double sided and come in different types, divide them for convenience by their 5 types into 5 approximately equally large piles before placing them next to the board.
Separate the 24 monk tiles according to their back (I and II). Shuffle the 12 I-monk tiles. Then place a stack of 4 of them face down on to each of the spaces in the centre of the main board showing a
 .
. In a 2-player game, return all the II-monk tilesto the game box, they are not needed.
In a 3-player game, shuffle the 12 II-monk tiles and then place a stack of 4 of them face down on to the leftmost space showing a
 . Return the remaining II-monk tiles unseen to the game box, they are not needed.
In a 4-player game, shuffle the 12 II-monk tiles and place a stack of 4 of them face down on to each of the spaces showing a
.
Take the leftmost stack of monk tiles and place 1 of them face up on to each of the 4 monk spaces (
) on the main board.Place 1 scoring disc (
 ) from the reserve on to each of the 6 scoring disc spaces
  on the main board.
Take the 12 small barrels and place 1 face up on to each barrel spot on the main board. Then place each of the large barrels on top of its matching small barrel.
Player Setup
Each of you choose a player color and do the following:
- Take the 1 player board, 5 privilege cards and 1 player figure of your player color and place them in front of you.
- Take 25 ducats from the reserve. How much money a player has is public knowledge.
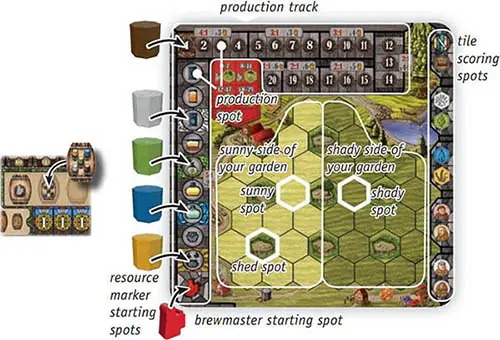
- Take the brewmaster of your color and place it on the brewmaster starting spot on your player board.
- Take 1 of each of the 5 resource markers and place them on their starting spots on your Starting area player board.
Starting Player
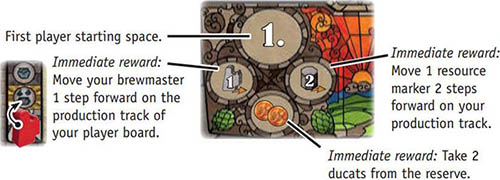
Determine a starting player by using your favorite house rule. The starting player then places her player figure on the "First player starting space" in the starting area.
Then, going counterclockwise, each other player places her player figure on to one of the remaining starting spaces and takes that space's immediate reward.
Starting Area
Game Play
The game is played over a certain number of rounds:
- 3 rounds in a 2-player game,
- 4 rounds in a 3-player game,
- 6 rounds in a 4-player game.
The starting player begins. Play then continues to her left with the players tak ing their turns in a clockwise direction.
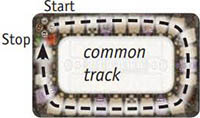
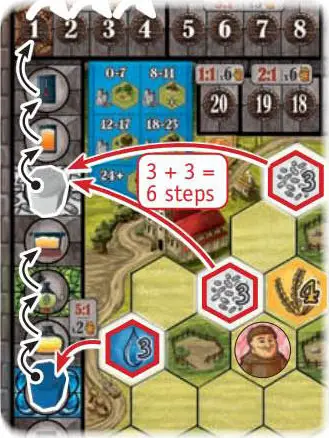
On your turn, move your player figure forward (clockwise) on the common track of the main board any number of spaces, but not further than the starting area (see the box on the right).
Then you must take the action of the space you have moved to. Then it is the next player's turn.
There are four types of action space:

Each type of space allows a specific action, which will be explained below. Further rules:
- You may never move your player figure backwards nor stay with it where you are.
- You may move to an action space occupied by other player figures.
- You may never move to any space whose action you are not able to perform. This means you may not move to a resource or monk space where there isn't any tile, nor may you move to a scoring disc space where there isn't any scoring disc. Similarly, you may not move to a barrel space if you have not achieved any barrel's goal.
Moving To The Starting Area
If you enter the starting area with your player figure, place it on any of the empty spaces of the starting area. A starting space is empty if no other player figure is placed there. If this space has an immediate reward, take it now.
Once you have placed your figure in the starting area, you are out of this round. For the rest of this round your turn is skipped, while the remaining players continue with their turns as usual. Once all the players' figures are in the starting area, the round ends. Then prepare the next round. If it was the last round for both cases).
Important: If all the other players have already moved to the starting area and the "First player starting space" is still empty, the last player to enter the starting area must place her figure on the "First player starting space".
Resource Spaces

If you move your player figure to a resource space, you must buy at least 1 of the resource tiles on it. (FROM the second round a space may contain more than one tile). You may buy as many resource tiles from that space as you can afford.
The cost of each resource tile depends on its fertility number and on which side of your player board you place it.

If you are going to place it on the shady side of your player board, pay as many ducats to the reserve as the fertility number on the resource tile indi cates. Then place it in any empty shady spot.
If you are going to place the resource tile on the sunny side of your player fertility board, pay twice as many ducats to the reserve as the fertility number on the number resource tile indicates. Then place the resource tile in any empty sunny spot.
Resource tiles may never be placed on shed spots: 
Attention: If the placement of a resource tile leads to the enclosure of a shed spot (be cause there is a tile in each of the six spots adjacent to it), carry out the shed tile proce dure described on page 6 immediately.
/Example Peter moves his player figure to a resource space that contains one yellow resource tile with a fertility number of 3 and one green resource tile with a fertility number of 5.
Peter buys the green tile (with a fertility number of 5) for 5 ducats and places it in a shady spot on his player board. Then he buys the yellow resource tile (with a fertility number of 3) for 6 ducats and places it in a sunny spot.
Monk Spaces

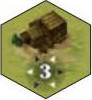
If you move your player figure to a monk space, you must buy at least 1 of the monk tiles there. (FROM the second round a monk space may contain more than one monk tile). You may buy as many monk tiles from that space as you can afford.
The cost of the monk tile depends on the monk cost number and A monk tile may never be placed in a on which side of your player board you place it.
If you are going to place it on the shady side of your player board, pay as many ducats to the reserve as the monk cost number on the monk space indicates. Then place it in any empty shady spot.
If you are going to place it on the sunny side of your player board, pay twice as many ducats to the reserve as the monk cost number on the monk space indicates. Then place it in any empty sunny spot.
A monk tile may never be placed in a shed spot:
Attention: If the placement of a monk tile leads to the enclosure of a shed spot (because there is a tile in each of the six spots adjacent to it), carry out the shed
Scoring Disc Spaces

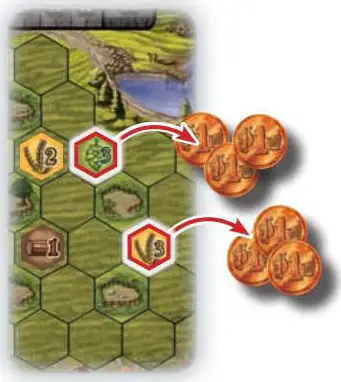
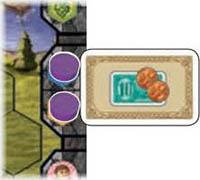
You must activate the tiles you place on your player board in order to reap their rewards. This is most commonly done by moving to a scoring disc space and taking a tile scoring action.
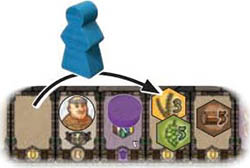
If you move your player figure to a scoring disc space on the common track, take 1 scoring disc from that space, place it on an empty tile-scoring spot of your player board and perform that spot's specific tile scoring action. The space from which you take the disc (A, B, Cor A/B/C) determines which scoring spot you may place it on.
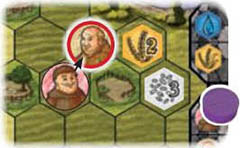
If you take a scoring disc from disc scoring space A, place it on the x-tile scoring spot of your player board (provided it is still empty). Now nominate one fertility number (1 to 5) and activate all resource tiles on your player board that show that exact fertility number. Each resource tile you activate this way grants you an activation reward (see the box on the right).

Peter moves his player figure to scoring disc space A, takes its scoring disc and places it on his x-tile scoring spot. He chooses to score fertility number 3 and this activates each of his resource tiles that has a fertility number of 3 (highlighted by a red border).
Activation Rewards Of Resource Tiles
Each resource tile that is activated grants you a reward that depends on which side of your garden you placed it on:
-
When you activate a resource tile on your garden's shady side, take as many ducats from the reserve as the tile's fertility number.
-
When you activate a resource tile on your garden's sunny side, move your resource marker of that tile's colour as many steps forward on your production track as that tile's fertility number.
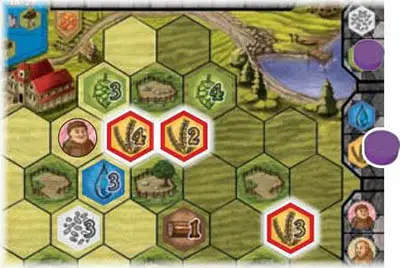
If you take a scoring disc from disc scoring space B place it on one of the empty monk tile scoring spots on your player board. This triggers all monk tiles on your player board of that spot's type of monk. Each monk tile triggered this way activates each resource tile directly adjacent to it.
A triggered monk also activates any monk tiles adjacent to it. When a monk tile is activated this way, it grants you the reward described in the box to the right.
Note: To make sure that things don't get mixed up, if you have several monks of the triggered type you should trigger them one after the other, by collecting all activation rewards granted by one of them before triggering the next monk of that type.
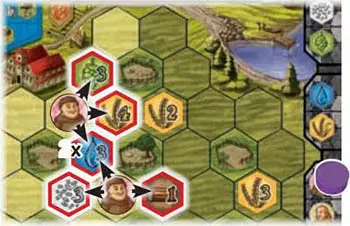
Peter places a scoring disc on the tile scoring spot of this monk. Thus each of his monks of this type is triggered and activates each tile directly adjacent to it (highlighted by a red border). The blue re source tile is activated twice.
Activation Rewards Of Monk Tiles

For each of your activated (rather than triggered) monk tiles, move your brewmaster one step forward on your production track. (REGARD less of whether the monk tile was placed in a sunny or shady spot).
When Peter triggers the - monk , the adjacent monk is activated. This allows him to move his brewmaster 1 step forward on the production track of his player board.
If you take a scoring disc from scoring disc space C place it on one of the empty resource tile scoring spots on your player board. This activates all resource tiles on your player board that match that spot's type of resource (granting its usual activation reward).
Peter moves to scoring disc space (E and decides to place the scoring disc on his yellow resource tile scor ing spot. This activates all yellow resource tiles on his player board (highlighted by a red border). Note that he isn't allowed to place the scoring disc on the green resource tile scoring spot, as it is already occupied by a scoring disc.
If you take a scoring disc from a Further rules scoring disc space A/B/C, place it on any empty tile scoring spot on your player board:
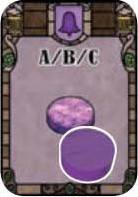
If you place it on the x-tile scor ing spot, carry out the scoring procedure described for scoring disc space A.
If you place it on a monk tile scoring spot, carry out the scoring procedure described for scoring disc space B.
If you place it on a resource tile scoring spot, car ry out the scoring procedure described for scoring disc space C.
Further Rules
You may never move on to an empty scoring disc space, nor may you move on to a scoring disc space whose tile scoring spots you can't use. (You can't use a tile scoring spot if it is already occupied by a disc or if it scores a type of tile that is not present on your player board).
In the final round of 2- and 3-player games, there may be more than one scoring disc on a scoring disc space (see page 7). However, a player who moves there can still only take 1 scoring disc.

If a resource marker reaches the production spot numbered 20, it moves no further. For each subsequent step you would take, instead take 1 ducat from the reserve.
After you have placed a scoring disc on a tile scoring spot and have carried out the scoring procedure, check if you have completed a privilege pair.
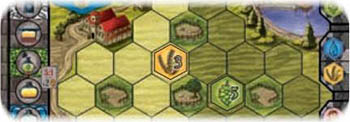
Barrel Spaces

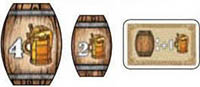
The 12 barrels in the centre of the main board display goals that you may achieve. If you have achieved one or more of these goals, you claim the corresponding barrels when you move to a barrel space. Barrels grant additional victory points at the end of the game.
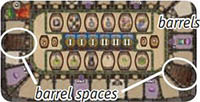
When you move your player figure on to one of the two barrel spaces on the common track, take from the centre of the board all remaining barrels whose goals you have achieved.
Each goal has a large and a small barrel. If the large barrel of your goal is still available, take it, and not the small one. If only the small barrel is available take that, provided you don't already have its large counterpart. You can't take other players' barrels. See page 8 for a list of the goals and an extended example.
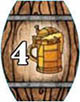
At the end of the game each large barrel is worth 4 victory points.
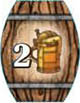
At the end of the game each small barrel is worth 2 victory points
You have two more tools to achieve your aim of brewing the best beer: the 7 shed spots and the 5 privilege pairs on your player board.
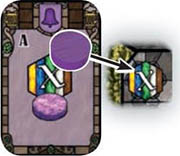
Enclosing A Shed Spot

Each time you completely enclose one of the 7 shed spots on your player board (because there is now a tile on each of the 6 adjacent spots), carry out the following procedure:
Sum the fertility numbers of all resource tiles that are directly adjacent to shed spot the enclosed shed spot. The result is your shed fertility sum. Note that monk tiles have no fertility value, so they don't add to the shed fertility sum.
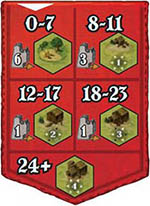
This sum determines your reward, as shown on the reward table:
-
Move your brewmaster as many steps forward on your production track as is indicated in the reward table (0 to 6 steps).
-
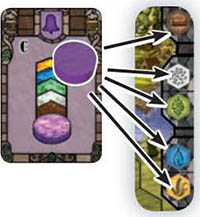
Next, take from the reserve the shed tile shown in the reward table and place it on the enclosed shed spot. Each shed tile activates a number of adjacent tiles immediately. Each resource and monk tile activated this way grants its usual activation reward:

Activates no tile.

Activates 1 adjacent tile of your choice
Activates 2 adjacent tiles of your choice. The two tiles must lie at opposite edges of this shed tile (marked by arrows of the same color).
Activates 3 adjacent tiles of your choice. They may not lie next to one another (marked by arrows of the same color).

Activates 4 adjacent tiles of your choice.
Completing a Privilege Pair
The 10 tile scoring spots on your player board make up 5 privilege pairs.
Whenever you complete a privilege pair on your player board (because both of its tile scoring spots now contain a scoring disc), you may place one of your privilege cards next to it and resolve its reward.
If you choose not to place a card at this time, you may not place one there later.
Emergency Coin Rule

At any point in your turn, you may return to the game box any of your privilege cards (that you have not yet The back is used as placed next to a privilege a reminder of this pair) to immediately take 3 option. ducats from the reserve.
The back is used as a reminder of this option.
Preparing The Next Round
Take the next pile of monk tiles from the centre of the main board and add 1 monk tile from it face up to each of the 4 monk spaces on the main board.
Add 1 resource tile from the reserve face up to each resource space on the main board. As long as there are resource tiles with I on the back, use these to refill the resource spaces. Once you run out of resource tiles with I, begin placing resource tiles with II on their back.
Refill the scoring disc spaces so that each contains exactly 1 scoring disc.
Attention: Carry out the steps in the box on the right if the upcoming round is the final round of a 2- or 3-player game. The final round of the game is the one for which you took the last pile of monk tiles.
The player who placed her player figure in the "First player starting space" of the starting area begins the new round with her turn. Play then continues clockwise as usual.
End of the Game
The game ends after the last round, as soon as the last player has moved her player figure to a space of the starting area and has taken its immediate reward (if any). Now you each work out your victory points as follows:
Check which production spot your brewmaster is on and which resource exchange rate and victory point value it has unlocked.
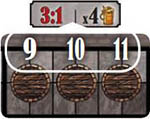
For example, if your brewmaster is on any of these spots, it has unlocked the rate 3:1 and the value 4.
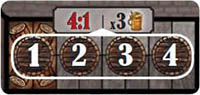
If it has only advanced to any of these spots, it has only unlocked the rate 4:1 and the value 3.
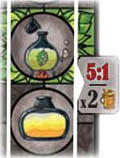
If it has not even reached the upper part of your production track, the resource exchange rate is 5:1 and the victory point value is 2.
Next, even out the positions of your resource markers on your production track:
First, apply your unlocked resource exchange rate to move your resource markers closer together: The rate determines how many total steps you have to move any of your resource markers backwards in order to move your least advanced resource marker 1 step forward.
Continue applying your exchange rate until none of your resource markers can be moved forward without decreasing the value of another marker to below that spot.
Then, for every 10 ducats you return to the reserve, move any one of your resource markers 1 step forward on your production track.

Finally, calculate your victory points as follows:
-
Check which of your 5 resource markers is furthest behind on your production track and which spot it is on. Multiply the number in this spot by the victory point value your brewmaster unlocked.
If any of your resource markers has not reached a brown production spot (numbered "1" to "20"), your result will be 0, as you will have to multiply your victory point value by 0.
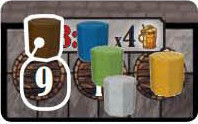
After applying the resource exchange rate, the brown resource marker has reached the production spot numbered "9" and is thus the marker that is the furthest behind on Peter's production track. Peter's brewmaster unlocked the victory point value 4. Thus his production score is: 9 x 4 = 36 victory points.
-
Add to that result 4 points for each large barrel and 2 points for each small barrel you have collected. If you have placed your barrel privilege card next to one of your completed privilege pairs, add 1 victory point to your score for each barrel you have collected.
-
Finally, if your player figure is on the "First player starting space", add 1 victory point to your result.
The player with the most victory points wins the game. If tied all the players with the most victory points share the victory.
Continue Reading