Components
- A map of Europe
- 1 summary card
- Playing pieces 4 colors
- 1 player board;
- 16 hidden objective cards
- 16 scenario tiles
- 12 plastic fiefs
- 12 matching fief cards;
- 6 seals to mark the flourishing regions
- 1 Gonzaga bonus tile
- 1 Last Turn card
- 6 plastic rings
- 1 scoring marker
- 11 planning cards:
- Rulebook
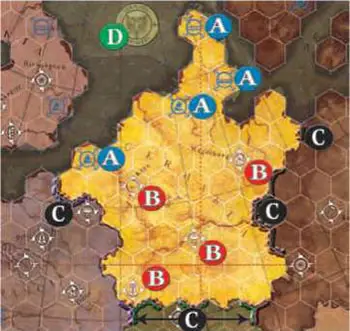
Each region has four harbors A and four cities B. Each city is marked with a symbol. There are eight different symbols in all.
Each sea is bordered by four harbors, all sharing the same symbol and connected by sea routes.
Note that the harbors of the same sea can be in different regions (for example, Mare Germanicum has 2 harbors in Britannia, and 2 in Germania).
The borders of some regions have barriers C. Near each region is the seal D for that region. The map is covered with a grid of hexagons, which regulate the placement of pieces.
Object of the Game
In order to dominate Europe, your family must create the largest and most valuable dominions. You can earn victory points by claiming cities and harbors with your fiefs, by creating sea leagues with control of harbors, and by donating to the church.
At the end of the game, you can earn a bonus by claiming as many of the cities on your hidden objective card as possible, and by holding the Gonzaga tile.
Setup
(Before your first game, carefully remove the tokens from the frames).
Set the board in the middle of the playing area. Pick a random scenario, based on the number of players (discard the others for this game).
Place the matching seal for each of the regions listed in the scenario face-up (i.e., with the golden ring) on their matching seal spaces. These are the flourishing regions for this scenario. Place the seal face down in all other regions. These are the inactive regions.
Choose a color and take all the matching pieces and cards. Remove the cards for the inactive regions and return them to the box. If you choose to play in one of these regions, you will use your inactive regions card.
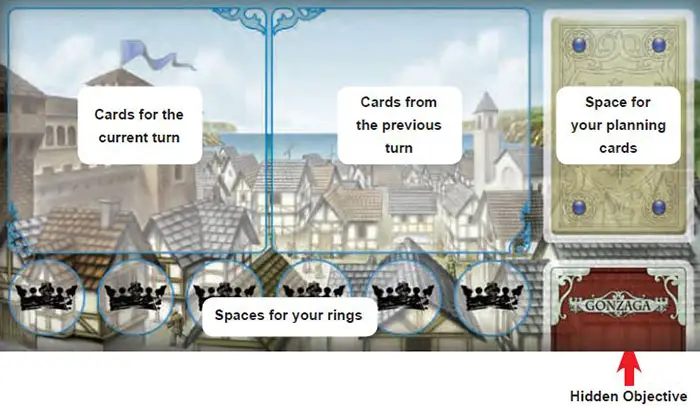
Put your scoring marker in the "0" space of the scoring track. Shuffle all twelve of your fief cards and place them face down in front of you. Place your planning cards on the right hand space of your player board. Place one of your rings on each of the six ring spaces of your player board.
Give the Last Turn card to the oldest player (note that there is no advantage to holding this card!). Place the Last Turn card exactly half way down your fief card deck, i.e., under the 6th card.
Shuffle the Hidden Objective cards, and deal one randomly to each player. Return all unused cards to the box without revealing them. You may examine your own objective card at any time, but keep it hidden from your opponents!
You can keep it face down by slipping part of it under your playing board. Your objective card shows six cities (all three cities that share one symbol, and all three cities with a second symbol; each card shows both matching symbols). At the end of the game, you will score bonus victory points based on the number of these cities you control.
Place the Gonzaga tile beside the board. Keep the summary card handy.
You are now ready to begin!
Game Play
Gonzaga is played in a series of rounds. Each round is divided into four phases:
-
Take your Fief
All players must turn over the top card of their fief decks, and take the matching fief tile;
-
Plan your Move
All players must secretly plan their moves and place their planning cards;
-
Determine Turn Order
Planning cards are revealed, and the turn order is determined;
-
Place your Fief
In turn order, each player places a fief on the map and scores points.
1. Take your Fief
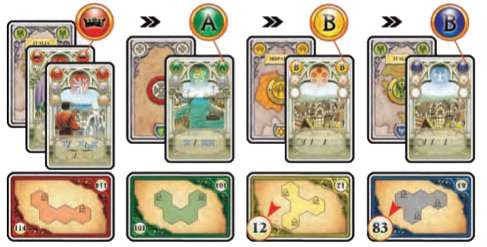
At the beginning of each round, you must turn over the top card from your fief deck. Find the matching fief tile and place it on the card.
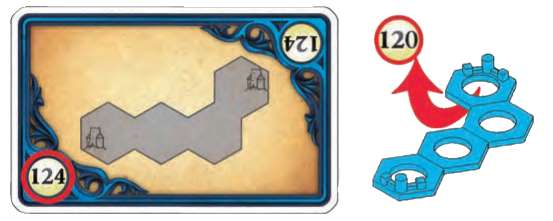
Many fiefs look the same. If you are not sure that you have taken the right fief, look at the number on the bottom. The number must match the "tens" digit of the card number. For example, fief 50 matches card 52. Fief 120 matches card 124, and so forth.
2. Plan your Move
Now you must choose how you will play your fief by using your planning cards.
You have two types of planning cards: region cards and action cards. You must choose one of each type of card each round. The region card shows where you will place your fief, and the action card shows how you will place it.
Place your chosen cards face down in the left box of your player board. Return your unused cards face down to the right box.
How do I plan my move?
Your region card shows where you can play your fief tile (all or part of the fief must be played in the region shown). Your inactive region's card allows you to play anywhere in the inactive regions.
Important: You may play your fief on more than one region! But, you must cover at least one hexagon of your chosen region when you play your fief.
You are not required to cover a city or harbor in the chosen region (though you may choose to). Any space will do.
Your action card shows what spaces you can cover with your fief:
-
Action A - Harbors
your fief tile must cover at least one harbor - but no cities.

-
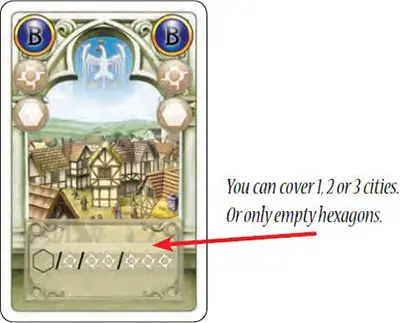
Action B - Cities
Choose one:
- your fief tile must cover at least one city - but no harbors; OR
- You can cover 1, 2 or 3 cities. Or only empty hexagons.
-
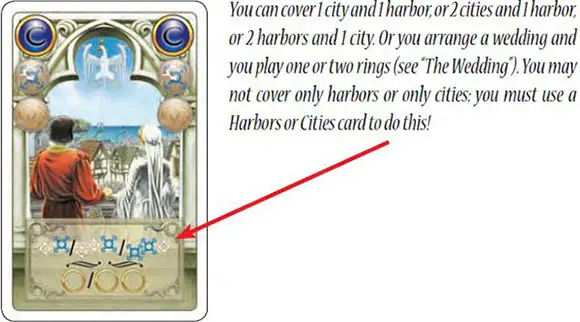
Action C - Alliance
Choose one:
- your fief tile must cover cities and harbors; or
- you arrange a Wedding.
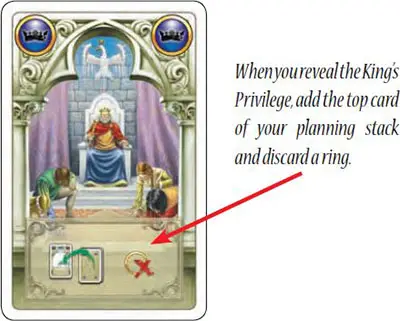
King's Privilege: This card allows you to take your turn earlier than normal. When you play this card, you must also choose one of your other action cards and place it face down on top of your stack of unused planning cards.
Place the King's Privilege and your chosen region card in the left box of your player board. This way you have two cards in the box, just like everybody else, and no one will know that you are using your privilege card!
Important: In order to play the King's Privilege, you must discard one of the rings from your player board (see "3. Determine Turn Order"). You may not use this card if you have no rings to spend.
3. Determine Turn Order
When all players are done planning, it is time for the next phase:
All players reveal their planning cards at the same time. If you played the King's Privilege card, you also reveal the top card of your planning stack and add it to the left box, then you must discard one of your unused rings.
Now take the face-up cards from the middlebox of your player board (which you played in the previous turn) and return them face down to your planning stack. Note: You can skip this step during the first round because no one has any face-up planning cards yet.
The action cards determine the order you will take your turns. The order of actions are:
The King's Privilege >> then Harbors (Action A) >> then Cities (Action B) >> and last, Alliance (Action C).
If more than one player has played a King's Privilege card, the tie is broken by checking their other action card. If that card is also the same, then the player who turned over the fief card with the lowest number plays first.
The number on the fief card is also used to determine turn order if there is a tie on the other action card types.
Example: Catherine has played her King's Privilege and an Alliance card. Günter played a Harbors card. José and Piotr both played Cities cards. Catherine will play first, then Günter. José's fief card is number 12, and Piotr has number 83, so José will play after Günter, and Piotr will play last.
4. Place your Fief
During this phase, each player will act in the turn order you determined during phase 3. When it is your turn, choose which of the options of the action card to use, and place your fief tile on the map.
After placing your tile, return your fief card to the box (you will not need it any more this game). Then, move your scoring marker on the track to show any victory points you have earned.
Finally, move your face up planning cards (including your King's Privilege if you used it this turn) to the middlebox of your player board. Leave these cards face up, so that everyone can see them. You won't be able to use these cards on your next turn! You will return these cards to your planning deck during phase 3 of the next round.
You will have to plan carefully so you have the right planning cards available when you really need them!
You are not forced to place your fief tile. If you find that you cannot play, (or if you choose not to) you may donate to the church instead. Place your fief in the church space on the board, and score 3 victory points.
After all players have finished their individual turns, the current round ends and a new one can begin.
Placing your fief
When you place your fief, you may rotate it any way you wish. You may always "test" your fief by trying it in different positions on the board before you must choose where to play it.
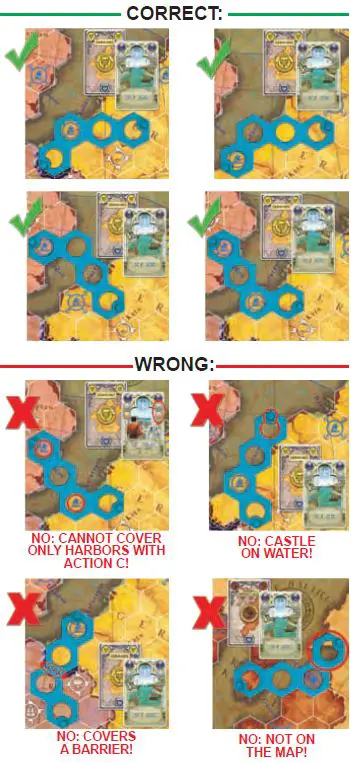
When you place your fief, you must obey these rules:
You must follow the planning cards you played earlier in the round.
All parts of the fief tile must lay directly on the map, matching the lines of the hexagons, whether on land or at sea. You cannot place it on top of any fief tile already played. You may play your tile on the same spaces as rings that belong to the other players (see "The Wedding").
All castles must be played on land hexagons.
You may not place it over any barriers.
Note: Once a fief has been placed on the map, it cannot move and cannot be taken off the board. If you place two (or more!) of your fiefs so that they touch on at least one hexagon side, those fiefs become connected.
Important note: barriers only apply when you place your fief. Two touching fiefs are adjacent, even if there is a barrier between them!
Scoring Points
When you score points, remember to move your scoring marker on the scoring track. During the game, you can earn points in three ways:
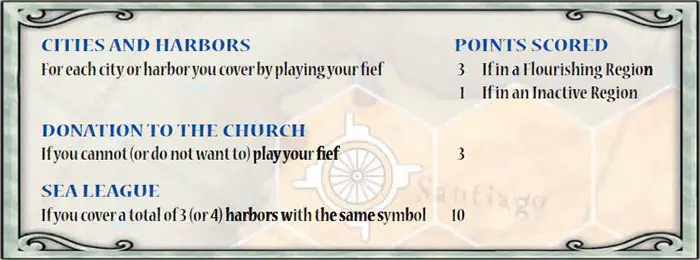
Important Notes: You can create one Sea League in each sea area. You can only score points for each Sea League when you first create it. In other words, if you increase your harbors from 3 to 4, you do not score those points again.
The harbors that form your Sea League do not have to be connected. To help you find the matching harbors, all harbors with the same symbol are connected by a sea route on the map.
The wedding: a fief of 1 or 2 rings instead of the normal fief
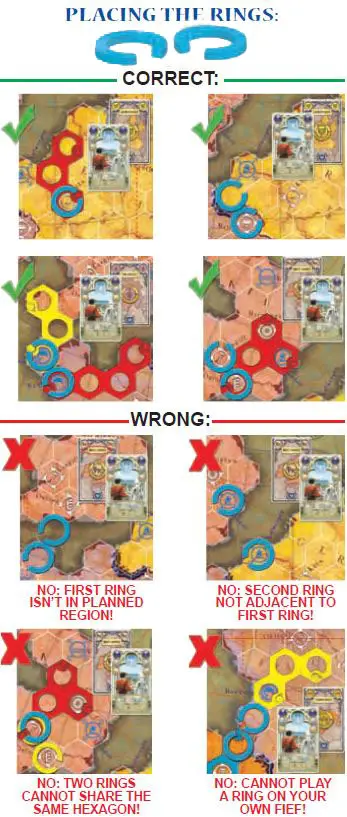
If you play your Alliance card, when it is your turn you can choose to take the Wedding action. The Wedding allows you to place on the map one or two adjacent rings, instead of your normal fief tile. Each ring counts as one fief.
To play a Wedding:
- Discard your current fief tile to the box;
- Take one ring from your playing board, and place it anywhere in your planned region;
- You may choose to play a second ring adjacent to the first one. This second ring may be played on land, at sea, and even on the other side of a barrier!
Placing a ring is the same as placing a fief made up of one hexagon. So, you score points if you play a ring on a city or harbor, form a Sea League, etc. However, rings may not be donated to the church.
You can place a ring directly on the map, or on top of a fief that belongs to another player. You may not place a ring on your own fief, or on a hexagon that already has another ring on it.
If a ring and a fief are both played on the same hexagon, that hexagon belongs to both players for all purposes: the owner of the fief, and the owner of the ring. It is not mandatory that your first ring is adjacent to one of your fiefs, but it must be in the planned region.
Important note: each hexagon on the map can only have at most 1 fief and 1 ring (of different colors).
If you place a ring directly on the map, then another player could later place a fief there. If this happens, simply pick up the ring, place the fief tile, and then return the ring to the top of the fief (taking care that it lays on the same hexagon!).
Hint: you only have a total of 6 rings to play for the entire game! You need rings to form Weddings and to play the King's Privilege. Once played, rings cannot be recovered. Plan your ring use carefully! Any unused rings at the end of the game are worth zero points.
End of the Game
After the 6th Round, the player with the Last Turn card on top of his fief deck counts the total number of cities and harbors still uncovered in the flourishing regions:
if there are three or fewer, he declares that the next round is the last round of the game, and discards the Last Turn card;
if there are four or more, he moves the Last Turn card under the top card of his fief deck.
In both cases, play proceeds as normal with the next round. If this is not the last round of the game, then the player with the Last Turn card repeats this check at the end of each round.
It is possible that the game will continue until all players run out of fief cards and tiles (not counting rings). If this should happen, then the game ends at the end of the round!
You should have been tracking your points during the game. To make sure no mistakes were made, we recommend that you recount the points for each player.
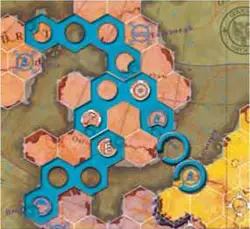
The player with the highest number of connected fiefs receives the Gonzaga token and scores 15 bonus points. In case of a tie, all tied players score the 15 bonus points.
When you count the number of connecting fiefs, remember that each ring counts as one fief. In the image to the right, the blue player has 5 connected fiefs.
Now, it's time to reveal your hidden objectives! Turn over your card and count the number of cities shown you have covered with your fiefs and rings.
These cities do not have to be connected. The points you score depends on the total number you have covered:

The player with the most points wins the game!
In case of a tie, the winner among tied players is the one who has covered the most cities and harbors. In case of a further tie, the tied players rejoice in their shared victory!
Continue Reading
