Game Components
- 48 unique recruit cards
- 36 artifact cards
- 6 ethical dilemma cards
- 1 game board
- 24 worker dice
- 6 heart-shaped morale tokens
- 6 face-shaped knowledge tokens
- 45 resource tokens
- 72 commodity tokens
- 4 progress tokens
- 3 miner meeples
- 60 star-shaped authority tokens
- 16 unavailable territory markers
- 18 unique square market tiles
- 6 multiplier markers
- 8 circular allegiance bonus markers
- 3 unavailable action space markers
- Rulebook
Setup
Unavailable Territory Tokens: Place the unavailable territory tokens on each territory star so that the remaining spaces equals the number of players. Thus for a 4-player game, 2 tokens would be placed on each territory.
Resources and Commodities: Place the various commodity tokens (energy, food, water, and bliss) next to their respective commodity-gathering areas (Generator, Farm, Aquifer and Cloud Mine). Also place the various resource tokens (gold, clay, and stone) next to their respective tunnels in Euphoria, the Wastelands and Subterra.
Ethical Dilemma Cards: Shuffle the 6 ethical dilemma cards and deal one to each player. You may look at your card. These are kept face down (reference side up) in front of each player.
Player Tokens: Each player places 1 heartshaped morale token on the far left of the morale chart and 1 faceshaped knowledge token on the +  on the knowledge chart.
Worker Dice: Each player starts the game with 2 worker dice in their player color. Group all additional dice together by the side of the board to form a pool of recruitable workers.
Exclusive Action Spaces: Place 1 unavailable action space marker at the end of each tunnel.
Construction Site Setup: Shuffle the market tiles and place 6 of them face-down on the construction sites on the board-place the tiles within the guidelines of the square frames.
The Icarites (the zeppelins in the sky) have pre-built markets and don't need market tiles. Set aside the remaining market tiles face-down-they won't be used in this game.
Progress tokens and Miner Meeples: Place progress tokens on the word "Start" on the allegiance track at the bottom right of the board and place 1 miner meeple on each of the "Start" spaces on each of the three tunnels.
Authority tokens: Each player places the 10 star-shaped authority tokens in their player color next to their reference card.
Starting the Game
Each player rolls their 2 worker dice to determine the starting player (highest roll wins; tiebreaker goes to the older player). The starting player position matters very little in Euphoria.
Keep the dice as they are-the numbers represent the starting knowledge of your workers.
Object of the Game
Place all 10 of your authority tokens to win the game.
Game Play
Your turn consists of exactly one of the following options (#1 or #2, not both, nor may you pass).
1. Place one available worker on the board: You may place exactly one available worker on the board (worker placement is explained in an upcoming section). An available worker is a worker under your control that is not currently placed on the board. When you place a worker, you immediately gain the benefits of that action.
Exception: When you have available workers that share the same knowledge (a pair, three of a kind, or four of a kind) at the beginning of your turn, you may place all of these workers on the same turn. In doing so you get multiple plays on the same turn, one after another. Thus, if a worker becomes available mid-turn (from recruiting a new worker, bumping your own worker, or constructing a new market), that worker cannot be used until your next turn.
You may also use your turn to reveal your ethical dilemma card once per game.
2. Retrieve Any/All Workers: Instead of placing a worker, you may use your turn to retrieve any number of your workers from the board (min. 1 worker). Pay the retrieve (your choice; see key on board) and immediately roll all retrieved workers.
-
Gain 2 morale: Pay either
 or
or  to retrieve any or all workers and gain
  . The cost does not change depending on the number of workers-if you retrieve 1 worker, it's . If you retrieve 4 workers, it's still for all of them.
 -
Lose 1 morale: Pay nothing. Retrieve your workers for free and lose
. You may do this even if you have 1 morale.
Note: The costs to retrieve are in grey squares, while the benefits are in white circles. Those squares and circles are used across the board to denote costs and benefits.
When you finish your turn, the player to your left takes their turn, and so on clockwise around the table. Player order never changes. After a few rounds the original starting player becomes irrelevant. Play starts to vary more and more as players add workers, retrieve at different times, and occasionally place multiple workers on the same turn thanks to fortuitous rolls.
Morale & Knowledge charts
Morale Chart
The morale of your workers is tracked on the morale chart in the upper left corner of the board. Your morale affects your hand size (artifact cards). When you gain morale, you increase the number of cards you can have in hand. When you decrease your morale, your hand size decreases. Thus if you draw an artifact card that increases your hand beyond the limit or if an adjustment on the morale track puts you over your maximum hand size, you have to choose a card to discard (draw first, then discard).
Note: If you are at the far right of the morale chart, you may still place workers on action spaces that would normally increase your morale. The same applies for the far left of the chart when retrieving workers-you can retrieve for free when you're at 1 morale.
However, if a recruit card gives you the choice to lose morale in exchange for a benefit, you must have enough morale to make the exchange.
Knowledge Chart
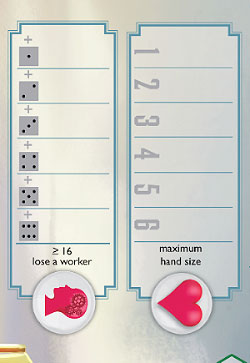
The knowledge of your workers is tracked on the knowledge chart in the upper left corner of the board. Knowledge represents your workers' level of awareness of their world. If their collective knowledge gets too high, they will run from the dystopia.
When you retrieve workers from the board, immediately roll them to determine their collective knowledge. If the sum of the knowledge on all of your available workers (not just the ones you rolled) plus your current level on the knowledge track is greater than or equal to 16, you immediately lose the available worker with the highest knowledge (if there is a tie, only lose 1 worker).
Move that worker to the pool of recruitable workers. You can lose a maximum of 1 worker per turn this way.
Note 1: Only available workers count towards your knowledge total. Workers you've already placed on the board don't contribute to that sum. You only look at your collective knowledge when you roll at least 1 worker.
Note 2: If you are at the far right of the knowledge chart, you may still place workers on action spaces that would normally increase your knowledge. The same applies for the far left of the chart. However, if a recruit card gives you the choice to gain knowledge in exchange for a benefit, you must have low enough knowledge to make the exchange.
Knowledge Checks
Whenever you remove dice from the board for any reason, roll that die or dice and do a knowledge check. Here are the situations in which you will be rolling a die or dice:
Retrieving dice from the board (roll only the retrieved dice).
Making a new worker (roll only the new worker).
Your worker is bumped off the board by another worker (roll only the bumped worker die).
Any dice that were on a construction site when a market is completed (roll only those dice).
Example: You control 3 workers. 1 of them is an available worker on the side of the board with knowledge 5, and the other two are placed on the board. You decide to use your turn to retrieve all dice from the board and roll them. One of them shows 3 knowledge and the other shows 5 knowledge. You add the totals of all three available workers to calculate their collective knowledge, which is 13. But wait-you need to add in your level on the knowledge chart. Currently you're at + , so your total knowledge is 16. Your workers realize they're in a dystopia, and you must discard one of the 5-knowledge workers.
Locations
There are a number of different locations on which you can place your workers. Here is an overview:
Worker Activation Tank
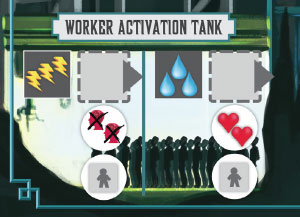
You start the game with 2 workers, and during the course of the game you may increase the number of workers to a total of 4. You can add a worker by placing a worker on one section of the Worker Activation Tank. The two options are as follows:
Pay 3 energy: Gain
 and lose thanks to the shock the worker receives when he's activated.
Pay 3 water: Gain
and gain thanks to the fresh blast of water the worker receives when he's activated.
After you've paid the price and adjusted your morale or knowledge, immediately roll the new worker and place it among your available workers.
Note 1: You may place a worker on the Worker Activation Tank to increase morale or decrease knowledge even if you already have the maximum of 4 workers. The Worker Activation Tank is not in Subterra.
Commodity Areas
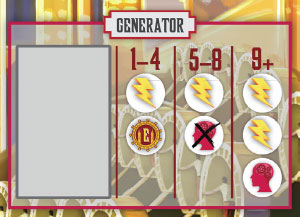
Commodity areas are where you collect  (Generator),
  (Aquifer), (Farm), and (Cloud Mine). Each commodity area has the same ratios. The number of commodities you collect when you place a worker on one of these areas is determined by the total knowledge of all players' workers on that area after you place your worker. As with all worker placement in the game, you gain the benefit of the action only when you place your worker (not on subsequent turns if your worker remains on that action space).
Total Knowledge between 1 and 4: Gain 1 commodity and advance the allegiance track by 1 level.
Total Knowledge between 5 and 8: Gain 1 commodity and lose
 .
.Total Knowledge 9 or Greater: Gain 2 commodities and
.
Notes
Resources and commodities are not limited based on the number of tokens in the game. Use the multiplier cardboard markers if you run out of tokens.
You may place a worker on a commodity area at the 9+ level to gain the 2 commodities and even if you're at +  on the knowledge chart. Similarly, if you're at +
  on the knowledge chart, you can still place a worker on the 5 - 8 level.
Taking allegiance points is not optional at the 1 - 4 level. There may be times in the game when you don't want to take allegiance points, lest you help out another player, but you don't have a choice.
Trading: You may trade with other players during your turn. A trade is an immediate exchange of resources, commodities, and/or artifact cards. You must give the person what you said you were going to give them, and you can share as much information as you'd like before the exchange happens (the number of resources, commodities, and artifact cards you have is public knowledge, but the type of artifact cards you have and private information on your hidden recruit and ethical dilemma is for you to share as you wish).
Allegiance Track
The allegiance track is not a place where workers can be placed, but rather a way to track the strength of each faction. Each faction has an allegiance progress token that begins the game on top of the word "Start" on the allegiance track. When any player gains an allegiance point, that player moves that allegiance's progress token forward 1 level on the corresponding row of the track. Only players who have active recruits of that allegiance gain the bonuses from that allegiance's track.

Tier 1: Once this tier has been reached, gain an extra commodity when visiting the respective commodity area. Sometimes you will place a worker on a commodity area to gain 1 commodity and 1 allegiance point, and that allegiance point will push you forward on the track so that the +1 commodity bonus is activated. You don't gain that bonus until the next time you place a worker on that commodity area.
To help you remember to take that bonus from then on, take the allegiance bonus marker and place it on the corresponding commodity area on the board.
Note: Allegiance track bonuses are cumulative- even after the progress token moves beyond the 1st and 2nd tiers, you still gain those bonuses.
Tier 2: Normally when you place a worker on a tunnel, you gain  or
or  . When the second tier has been reached, placing a worker on the corresponding tunnel now gives you and . The Icarites do not have a tunnel, so their bonus is that you draw after you place
 in Icarite Territory. Use allegiance bonus markers to remember these bonuses.
Tier 3: When an allegiance track reaches the third tier of a row, players who have a hidden recruit of the corresponding faction must activate it. For all following turns, you may use your newly activated recruit's special abilities and gain the bonuses from that recruit's allegiance track. If both of your active recruits share the same allegiance, you do not get twice as many bonuses from the allegiance track (levels 2-7).
Tier 4: When an allegiance progress token reaches the final tier of a row, each player places 1 authority token on each active recruit card they have of that allegiance. Players may continue to place workers on action spaces that add to allegiance, but the allegiance progress token cannot move beyond the fourth tier.
If you use your ethical dilemma to gain a new recruit, that recruit is immediately activated if the corresponding faction has reached the third tier of the allegiance track. Place an authority token on it if the allegiance track has reached the fourth tier.
| Allegiance | First-Tier Bonus (level 2 and beyond) | Second-Tier Bonus (level 5 and beyond) | Third-Tier Bonus (level 8 and beyond) | Fourth-tier bonus |
|---|---|---|---|---|
| Euphorian | When you place a worker on the Generator, gain 1 extra . | When you place a worker on the Euphorian Tunnel, gain  and (not "or"). and (not "or"). | Activate all hidden Euphorian recruits. | Place on each of your active Euphorian recruits. |
| Subterran | When you place a worker on the Aquifer, gain 1 extra . | When you place a worker on the Subterran Tunnel, gain  and (not "or"). and (not "or"). | Activate all hidden Subterran recruits. | Place on each of your active Subterran recruits |
| Wastelander | When you place a worker on the Farm, gain 1 extra . | When you place a worker on the Wastelander Tunnel, gain  and (not "or"). and (not "or"). | Activate all hidden Wastelander recruits. | Place on each of your active Wastelander recruits. |
| Icarite | When you place a worker on the Cloud Mine, gain 1 extra . | When you place in Icarite Territory, draw . | Activate all hidden Icarite recruits. |
Place |
Tunnels
All of the various factions (except for the Icarites) are trying to tunnel into one other area of the world to gain access to their enemy's commodities. Along the way, they collect resources and unearth artifacts. If they reach their goal and complete the tunnel, players with recruits of that faction gain special access to their enemy's commodity.
Tunnel Action: Any player-regardless of their allegiance-may place a worker on the temporary use action space on a tunnel and pay the cost to the left of the action space. Gain
or draw as indicated below the action space. To indicate that you have advanced the tunnel, move the miner meeple one step further along the track.
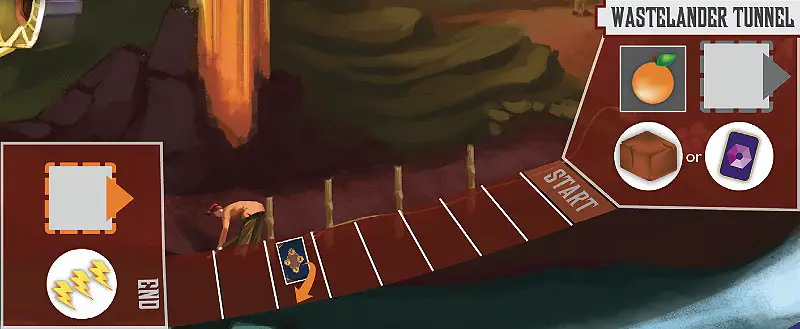
Activate Hidden Recruits: When the miner meeple gets moved to the 6th level of the tunnel all players activate hidden recruits that correspond to the faction associated with that tunnel, regardless of which player moved the miner meeple. The players then have access to the bonuses from their newly active recruits for the rest of the game.
Completing a Tunnel: When the miner meeple reaches the end of the tunnel (the 9th level), a new exclusive action space becomes available. Remove the "unavailable" action space token from it. From then on, players who have an active recruit of the corresponding allegiance may place workers on the exclusive action space. This space does not count as part of the tunnel.
Note: Because of the abundance of resources and artifacts underground, you may continue to use the Tunnel action space even after the tunnel is complete.
Note: You don't have to contribute to a tunnel to reveal a hidden recruit. If you have a hidden Wastelander recruit and other players are digging the Wastelander Tunnel, you could let them dig and reap the benefits when they reach the right level.
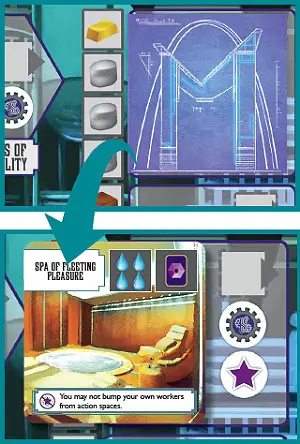
Construction sites
To contribute to the construction of a market, place a worker on an unoccupied one-time use action space to the left of that face-down market and pay the resource in the middle of that action space. For a market to be constructed, a number of one-time use action spaces to the left of the construction site must be simultaneously occupied by workers based on the chart below:
| 2 - 3 players | any 2 spaces |
| 4 players | any 3 spaces |
| 5 - 6 players | all 4 spaces |
Note: If a player removes one of their workers from a construction site before construction is complete, another worker must replace it and pay the resource again for that portion of the construction to be complete.
Completion: When the required number of action spaces next to a market are occupied, the market is complete. Flip the market tile and slide it to the left to reveal the temporary use action space it was covering. In sliding the market tile, it bumps the workers that helped construct it off the board and back to their respective players, who then roll those workers.
Each player who contributed at least 1 worker to the construction of the market places exactly 1 authority token on that market (regardless of the number of workers they contributed to the construction). Place those tokens on top of the market art. All players who do not have an authority token on a constructed market incur the penalty indicated on the market tile.
Artifact Markets
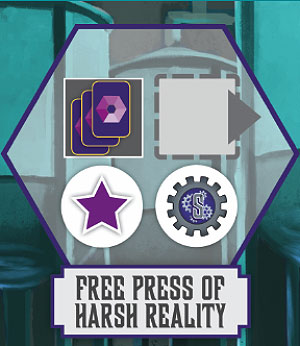
Unlike other markets, artifact markets come pre-built at the start of the game. They have a hexagonal shape to echo the shape on the back of each artifact card. Each of them requires you to pay (discard) any 3 artifact cards (). The allegiance associated with the artifact market advances 1 level, and you place 1 of your authority tokens () on one of two places:
The corresponding star-shaped territory (just like visiting a constructed market).
A corresponding constructed market tile that does not already have one of your authority tokens on it. If you choose this option, it is as if you helped to construct that market, so its penalty no longer applies to you.
Bonus: Instead of paying any  , you may pay 2 identical (i.e., 2 books) at the artifact markets.
For example, the Free Press of Harsh Reality (right) requires you to pay any . In return, you gain to place on an available space on the Subterran Territory (or a constructed market in that area that doesn't have any of your authority tokens on it), as well as 1 Subterran allegiance point.
Constructed Markets
Once a market is constructed, you can exchange various goods for plots of land in that faction's territory. Any player can visit the market, not just those who built it.
Visiting Markets: To visit a market, place your worker on the temporary-use action space at the top right of the market and pay the cost on the market tile. Thus for the Spa of Fleeting Pleasure, the price to visit the market is and . Then place on an empty space on the star-shaped territory in that area of the board and advance the corresponding allegiance track (in this case, in Subterra).
Thus if the building you're visiting is in Subterra, the only territory you have access to is the star-shaped territory in Subterra. If there are no empty spaces remaining in that territory, no additional may be placed there, but you can still place workers on the market and pay the market fee to advance the allegiance track.
Personal Freedoms: All players who do not have on a constructed market incur the penalty indicated on the market tile.
Academy of Mandatory Equality: The penalty on this market refers to the unique ability on the left side of each recruit card. Players still get enhanced abilities from the allegiance track for their recruits' faction(s).
Laboratory of Selective Genetics: This penalty says that you may add a second worker if you only have 1 worker, but you can't add a third or fourth worker.
Note: Several of the markets have penalties that require you to lose a commodity or resource when you roll a specific number. You incur that penalty for every worker die that shows that number after you roll it (i.e., rolling two 4s would force you to lose two resources and/or commodities).
Icarus
Due to their insidious motives and trader mentality, the Icarites act a little differently than the Euphorians, Subterrans, and Wastelanders. Their key method of advancing in the game is to trade resources and artifacts. Authority tokens may not be placed on Icarite markets.
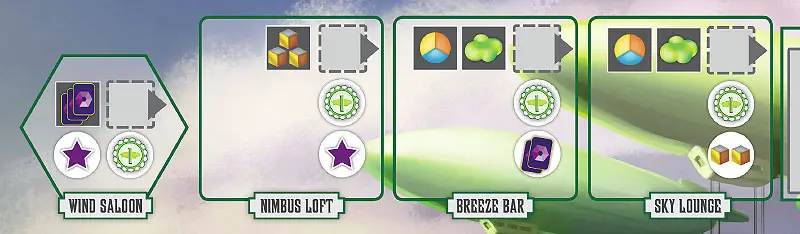
Wind Saloon: Pay any (or 2 of the same artifact card) to advance the Icarite allegiance by 1 level and place 1 of your authority tokens on the star-shaped territory in Icarus.
Nimbus Loft: Pay (any combination) to advance the Icarite allegiance by 1 level and place 1 of your authority tokens on the star-shaped territory in Icarus.
Breeze Bar: Pay 1 of any non-bliss commodity and to advance the Icarite allegiance 1 level and draw  .
.
Sky Lounge: Pay 1 of any non-bliss commodity and to advance the Icarite allegiance 1 level and gain (any combination).
Activating Hidden Icarite Recruits: Because the Icarites attract a steady flow of paying customers, they have no desire to "dig" into any of the other areas. Thus there is only one way to activate hidden Icarite recruits: reach the 8th level on the Icarite allegiance track.
A Few Notes About Recruits
Many recruits allow you to make an exchange (i.e. gain to draw ). This is a limited transaction-it does not mean you can exchange any amount of knowledge for any number of cards.
Some recruit cards allow you to sacrifice workers. You may not use that ability if it would result in you having 0 workers. If you sacrifice a worker, place it to the side of the board with the other workers, all of which are available for you to add later.
Some recruits ask you to compare a worker's knowledge to other workers on a certain area of the board. If the worker needs to have the "highest" or "lowest" knowledge, it must be in sole possession of that position (i.e., not tied for the highest/lowest).
Some recruits change the way you draw artifact cards (i.e., draw , discard ). You may not combine those types of abilities-you must choose one.
Some recruits give you a bonus when you use a worker to bump another worker. When that happens, the bump (and any exchange involved) happens first, then everything else related to that action space happens.
Some recruits refer to whether or not you currently have . This is not referring to exactly 1 resource-rather, this should read, "If you do not have any resources, gain this bonus.
Ethical dilemma Cards
Each player begins the game with 1 ethical dilemma card that they may choose to complete once per game on their turn. You may not place or retrieve workers on the turn when you complete your ethical dilemma.
To complete an ethical dilemma, flip your ethical dilemma card and discard either the exact artifact card displayed OR any 2 artifact cards, and then make a game defining choice: do you fight the establishment or contribute to the dystopia?
If you fight the establishment (the left side of the card), your reward is to draw 2 recruit cards and discard 1 of them. Place the selected card face-down in front of you as a hidden recruit. If recruits of that faction have already been activated, immediately activate the new recruit. If the final tier of the allegiance track for that recruit has already been reached, you immediately place on that recruit.
If you contribute to the dystopia (right side), you immediately place on the ethical dilemma card (not on the board).
End of the game
The game ends when a player has placed all 10 of their authority tokens (). That player is the winner, therefore gaining control of the dystopia. However, ties are possible in Euphoria, as multiple players can place their final at the same time due to the construction of a market or by reaching the end of an allegiance track.
These are the various places you can place authority tokens:
On a constructed market (max 1; place an authority token here by helping to build the market or by placing a worker on the corresponding artifact market).
On a territory (between 2-6 authority tokens per territory depending on player count, no limit per player until space runs out in the territory).
On a recruit card (max 1 per recruit; place an authority token here once that recruit's faction reaches the end of the allegiance track).
On a completed ethical dilemma card (max 1).
Tiebreaker:
- Higher morale wins.
- Lower knowledge wins.
- Most markets with your authority tokens on them.
- Most territories with at least one of your authority tokens on them.
- Die roll of all your active workers until tie is broken (lowest total wins).
Continue Reading
