The Roman Empire has fallen, the centuries that created a societal transformation. Lords sought to claim lands, build their domain, and foster growth in science and the arts. The beautiful Iberian peninsula stands as a model of prosperity of the European continent.
It's during this era, that Spain built some of the most beautiful cathedrals in the world. With advances in science, monasteries and hospitals worked in unison to assist the sick and poor. As a lord, there will never be a better time to grow your prestigious domain and reputation.
In Era: Medieval Age, players compete as lords in building their domains. As the game progresses, players develop medieval cities customized with highly detailed buildings and structures.
With new building, players may also acquire another die to add to their pool. Players will be challenged with where to build - insuring the building's safety behind city walls or risking it the countryside where there is more room to grow. Players will discover no games will ever be the same!
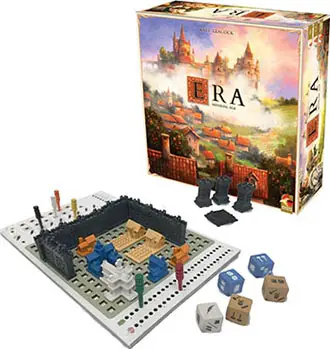
Components
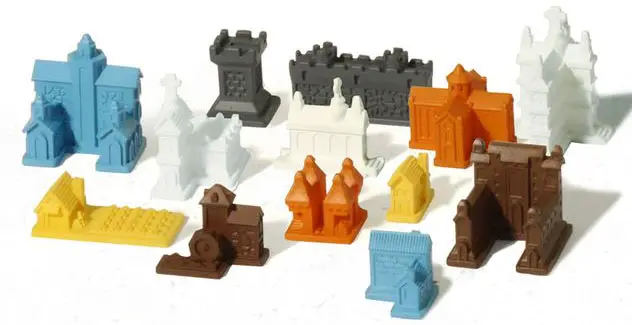
- 71 Buildings
- 32 walls & 27 scorched areas
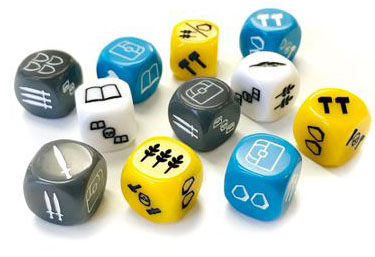
- 36 Dice
- 25 Pegs
- 5 Tracking tokens
- 4 Player boards
- 1 Pad of score sheets
- 4 Screens
- Instructions
Setup
-
Form the supply by sorting the buildings by type, the walls by length, and the dice by color. With 2 players, return 1 building of each type and 1 die of each color to the game box.
Place a number of tracking tokens next to the supply, blank side up.
- With 4 players, use all 5 tracking tokens.
- With 2 or 3 players, use only 3 tracking tokens. (Return the 2 extra tokens to the game box).
-
Each player takes 1 player board , 1 screen and a set of 6 pegs, which are set on the player board as follows:
-
Each player takes 3 yellow dice (peasants) and 1 gray die (noble).

-
Each player takes 1 keep and places it in the exact middle of their domain.
-
Each player takes these structures:
- 3 longhouses
- 1 farm
- 3 walls (each 4-units long)
-
Each player takes a number of scorched areas, depending on the number of players:
- None with 4 players.
- With 3 players, each player takes one scorched area
- With 2 players, each player takes two scorched areas.
-
Each player then designs their starting domain secretly and simultaneously behind their player screen, placing their farm, walls, longhouses, and any scorched areas they have however they like. When everyone is ready, players reveal their domains.
-
Each player rolls their gray die. Whoever rolled the most swords is the starting player and takes the black starting player peg.
This player then sets this peg in the
 (Roll) spot on their player board.
Object of the Game
In ERA: Medieval Age, players roll dice to collect resources which they use to build the safest, most prosperous, and most glorious medieval city they can. The player who scores the most points wins the game!
Overview
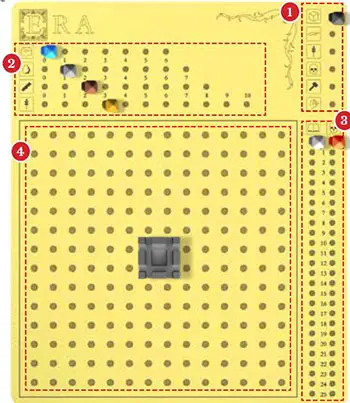
Player Board
The player board is divided into 4 sections:
1 Step track:
Where the starting player in this round keeps track of the steps with the black peg.
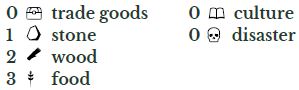
2 Resource track:
Here players collect and spend their resources (trade goods , stone O, wood f and food * ) to feed their dice and build structures.
3 Culture and disaster track:
Where players gain culture and disaster points.
4 the domain:
All structures a player builds are placed here.
Steps
The game is played over a series of rounds made up of 6 steps. Each step is carried out completely by each player before the starting player announces the next step, moving the black peg downwards.
Step "1. ROLL" is carried out simultaneously by all players. During each other step, play proceeds clockwise around the table, beginning with the starting player.
Game Play
 1. Roll
Dice provide you with resources and culture, let you build, and give you other special actions and abilities (check the Appendix for all of the possible dice results).
In this step, players simultaneously roll all their dice behind their player screen. This is each player's first roll.
Now, each player must set aside (behind their screen) any of their dice showing a skull; dice showing skulls generally can't be rolled again. Each player may then roll a second time, optionally rerolling any of their dice not showing a skull.
After this second roll, each player once again must set aside any of their dice showing a skull (adding them to any dice showing a skull from the first roll).
They may then perform a third (and final) roll, rerolling any number of their dice that do not show a skull. the first roll if they don't show a skull.
Once everyone has rolled up to three times, all players lift their screens to reveal their results.

Note: White dice that now show a feather may be rerolled openly in player order. Optionally with another one of this player's dice, even one with a skull on it.
 2. Collect
Add the trade goods  , stone
  , wood
  , food
  and culture
  shown on your dice to your player board by advancing the appropriate pegs.
Note: Culture can only be gained through white and blue dice. Skulls on the dice are not added to a player's disaster track.
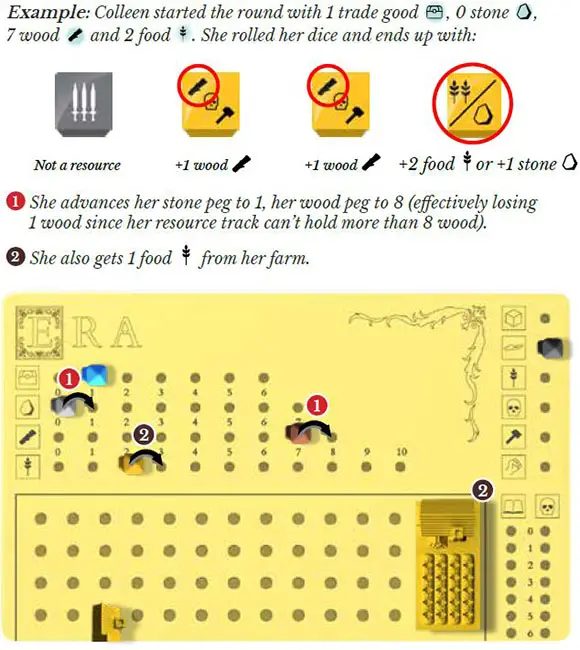
Afterwards, add 1 food to your resource track for each of your farms (you start with one farm). Add 2 wood to your resource track for each lumber mill you have in your domain.
If you don't have room on your resource track for all of the new resources, the excess is lost.
Exception: If you run out of room when advancing the peg on your culture track, record "+25" on the score sheet under your name, then reset the peg to zero and continue tracking culture points from there.
 3. Feed
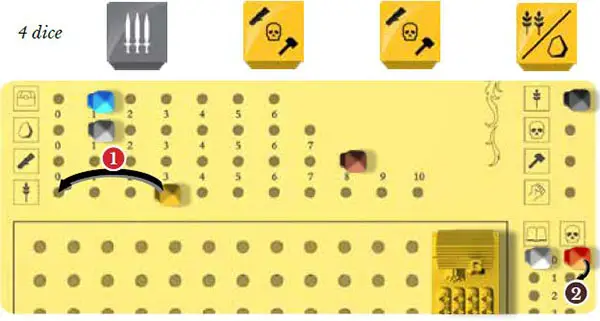
In this step, players feed their population. Subtract 1 food from your food track for each of your dice. Dice, representing your population, that you cannot feed suffer famine. Advance the peg on your disaster track  once for each die you cannot feed.
Example: Colleen has 4 dice but only 3 food on herfood track.
1She moves her food peg back to zero02and advances the peg on her disaster track once.
 4. Disasters
If a player's dice show one or more skulls, a disaster occurs, according to the table in the Appendix. The starting player resolves their disaster first, then proceed clockwise.
Note: You always add all your own skulls together. Each player causes at most one disaster in this step.
 5. Build
During the Build step, players can build walls and buildings to improve their domain, using the resources on their player board. The starting player builds first, then proceed clockwise.
You may build 1 wall (of any length) or 1 building for each hammer  that you have rolled. Subtract the required materials from your resource track, then take the wall or building from the supply and place it in your domain in any orientation of your choice (provided it fits).
If you don't have the required resources, you can't build the wall or building. You may only build walls and buildings which are still available in the supply.
If you take the last building of a type from the supply, flip over a blank tracking token to its X side (not for walls). When all the tracking tokens show an X, the game will end at the end of the current round. 
Note: You may build multiple copies of the same building and their benefits are cumulative (e.g., 2 monasteries = set 2 dice; 2 universities = bonus points for each of them).
Walls and buildings that are placed diagonally to each other are not considered adjacent. Walls placed diagonally to each other do not enclose an area.
Buildings placed diagonally to each other are not considered clustered when determining which buildings will be affected by the disease.
Note: Buildings are considered walled if they are built in an area that is completely surrounded by orthogonally adjacent walls and keeps. There is no wall around the perimeter of your domain. If you want walls there, you need to build them yourself.
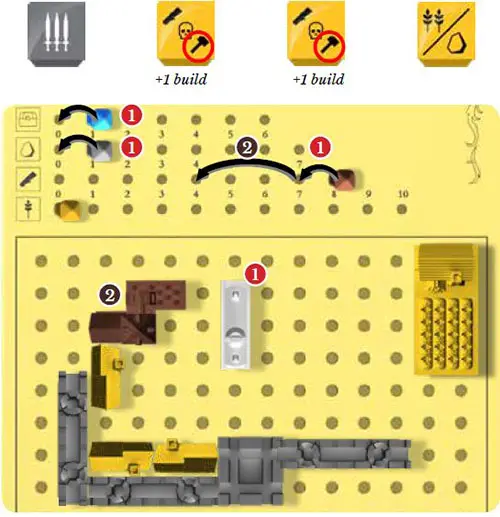
Example: Colleen rolled 2 hammers during the Roll step, so she can build up to 2 buildings (or walls).
1She decides to spend 1 trade good, 1 stone and 1 wood on a church, which she places in her domain.2Also, she spends 3 wood on a lumber mill and places it there as well. Since it was the last lumber mill in the supply, she flips a blank tracking token over to reveal an X.
 6. Extort
In the Extort step, nobles rattle their swords, demonstrate their strength at arms, and demand resources from their weaker opponents. The starting player extorts first, followed by the other players in clockwise order.
To extort, demand 1 resource of your choice from every other player with fewer swords/showing. Do this in player order around the table. For each affected player, you can demand one food , wood , stone , or trade good (provided the other player has it on their resource track).
If a player doesn't have any resources to give or refuses to pay the bribe, they must advance their disaster peg twice for each resource they fail to hand over.
Players who rolled a number of shields  that match or exceed the number of swords / rolled by another player, are protected and do not have to pay a bribe to that player.
Advancing on the Disaster Track
If you run out of room when advancing the peg on your disaster track record "-25" on the score sheet under your name, then reset the peg on your disaster track to zero and continue tracking disaster points from there. (There is no limit to the number of disaster points you can gain).
Round End
Important: Check to make sure you have the correct dice at this time!
If you have built any buildings that provide you with a die (e.g., keeps, longhouses, townhouses and churches) make sure you take all the associated dice now. If you had to remove any of those buildings (e.g., due to a disaster), be sure to return the corresponding dice now to the game box.
If all of the tracking tokens now show an X, the game is over. Follow the rules for the Game End. Otherwise, the player that currently has the starting player peg passes it to their left. The new starting player sets it into the (Roll) spot of their player board to track the new round.
Continue playing rounds in this manner until the game ends.
End of the Game
Players compare their final scores. The player with the highest score wins!
In the event of a tie, the tied player who has the most trade goods remaining wins the game. If players are still tied, the tied player with the most stones remaining wins the game. If still tied, check wood , then food . If tied players have the same amount of every resource, they smare the victory.
Players tally their scores on a score sheet:
-
Buildings: Score points for each of the buildings in your domain. Walled Buildings (buildings built in a walled area) are worth double points.
-
Bonus Points: Score points for any markets, guildhalls, universities, and cathedrals in your domain.
-
Culture: Score 1 point for each culture
on your culture track. The player (or, if tied, players) with the most culture (at least 1) scores  bonus points.
 -
Walled area: The player (or, if tied, players) with the largest walled area (number of spaces inside) scores
 bonus points. If you have more than one walled area, add their areas together.
Spaces occupied by buildings (except keeps) that are completely enclosed by (orthogonally adjacent) walls are counted in the number of spaces for the largest walled area.
Spaces occupied by scorched areas are not counted in the number of spaces for the largest walled area.
-
Disasters: Subtract 1 point for each skull on your disaster track
.
Continue Reading
