Components
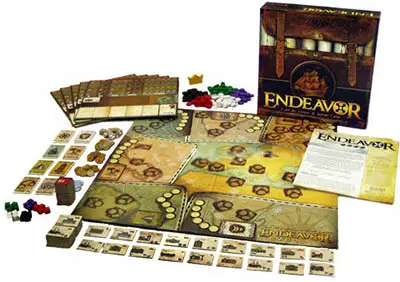
- Game board
- 48 Asset cards
- 95 Trade tokens
- 26 Large scoring chips
- 5 Player boards
- 45 Building tiles
- 150 Population markers (wooden discs)
- 20 Status track markers (wooden cubes)
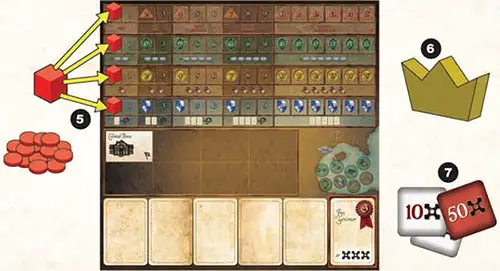
- 1 First player marker (wooden crown)
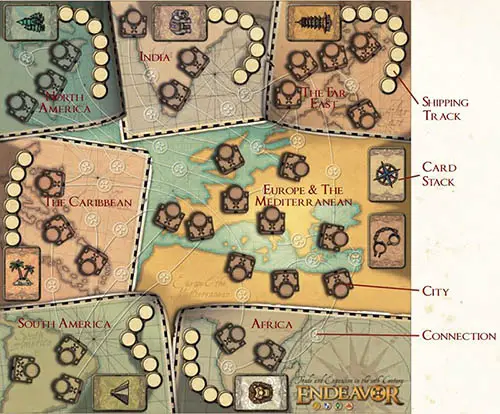
Game Board
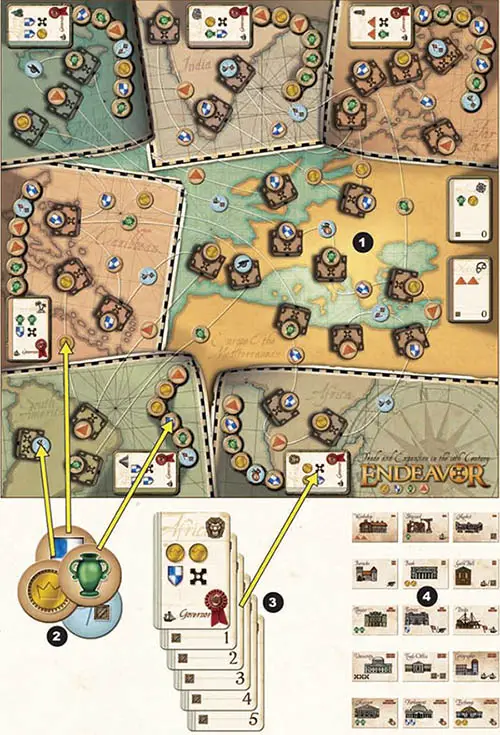
The main playing area is divided into seven regions which are distinguishable by their color and by the map borders that separate them; Europe & the Mediterranean, the Far East, India, North America, the Caribbean, South America, and Africa.
Each region has cities with connections to other cities, a Shipping Track, and a place for a stack of cards.
Europe & the Mediterranean is often referred to as the starting region of the game. It is unique in that it has two card stacks, and has no Shipping Track.
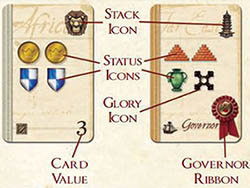
Asset Cards
There are eight different six-card decks of Asset Cards; one deck for each region plus a Slavery deck. Asset Cards will grant Status Track increases and/or Glory points to the player who holds them, corresponding to the icons displayed on the card. Each card has a stack icon to show which stack it belongs to.
Most decks contain a Governor card, which has special properties. Governor cards are obtained differently from the other cards, and are marked with a Governor ribbon to distinguish them.
Trade Tokens
There are eight different types of Trade Token. The tokens with brown backgrounds grant Status Track increases to the player who holds them. The tokens with blue backgrounds may be spent during the game to perform the featured action.
All tokens have a  Glory icon printed on the reverse. Tokens remain glory-side down until the game is over, at which point they are flipped glory-side up and used as scoring chips.

Player Boards
Each Player Board allows the players to track their status in Industry, Culture, Finance, and Politics. Players also build Buildings here and organize their Population Markers, Trade Tokens, and Asset Cards.
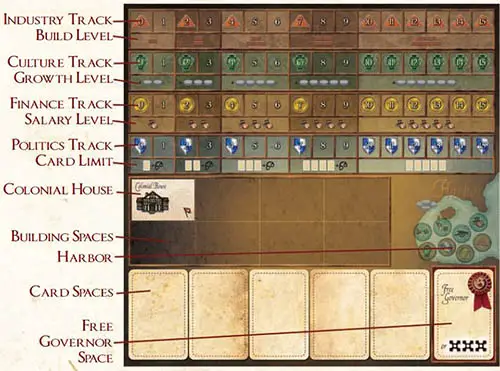
Building Tiles
There are fifteen different Building Tiles. Each building offers different status track bonuses and/or actions to the players who construct them. A building's Build Level indicates how difficult it is to construct.
Object of the Game
The goal in Endeavor is to earn the most glory for your empire. Players earn glory by increasing their scores in Industry, Culture, Finance, and Politics, as well as by occupying cities, controlling connections between cities, and by holding certain Asset Cards and Building Tiles.
Short-term goals of constructing useful buildings, gathering Trade Tokens, and obtaining Asset Cards must be balanced with the overall goal of attaining glory as you compete for control over the various regions of the world. The game only lasts seven rounds, and when it is over you want to be the one who has earned the most Glory points!
Setup
1 Place the game board in the middle of the table.
2 Randomly distribute the Trade Tokens across the board, placing one token glory-side down on every Shipping Track space, City, and Connection.
3 Separate the Asset Cards by type, and stack them face-up in their appropriate place on the board. Each stack should be ordered from the bottom up as follows: 5-4-3-2-1-Governor. (or 5-4-3-2-1-0 in the case of the Slavery and Europe & The Mediterranean decks, which do not have Governor cards).
4 Make stacks of identical Building Tiles. There should be:
5 of each Level 1 Building (Market, Shipyard, and Workshop)
4 of each Level 2 Building (Bank, Barracks, and Guild Hall)
3 of each Level 3 Building (Docks, Fortress, and I heater)
2 of each Level 4 Building (Cartographer, Trade Office, and University)
1 of each Level 5 Building (Exchange, Museum, and Parliament)
Arrange the stacks in a stockpile near the board, keeping stacks of matching levels together. This will make it easier for players to choose which buildings they want to build during the game.
5 Give each player 1 Player Board, all 4 Status Markers and all 30 Population Markers of one color. Return unused Player Boards, Status Markers, and Population Markers to the box. Each player places their Player Board in front of them, places their Status Markers on the "0" spaces of the four Status Tracks on their Player Board, and creates a supply of Population Markers near their Player Board.
6 Randomly select a first player and give them the First Player Marker.
7 Set aside the large Scoring Chips for now; they will not be needed until the end of the game.
Game Play
The game lasts seven rounds, each consisting of four phases. The player with the First Player Marker goes first during each phase, with the other players following in clockwise order. During the first three phases each player gets to act only once, but during the Action Phase play continues around until all players have passed.
Phase 1: The Build Phase
Phase 2: The Growth Phase Phase 3: The Salary Phase
Phase 4: The Action Phase
Phase 1: The Build Phase
In turn order, each player builds one building.
During the Build Phase, each player must choose one Building Tile from those available in the stockpile, and add it to an empty building space on their Player Board. Each player's Jk Industry score determines their Build Level. Each building belongs to one of the five Build Levels, indicated by an icon on its tile. Players may only choose a building if it is from a Build Level equal to or lower than their current Build Level. (If no such building remains, players may choose a building that is from the next Build Level up).
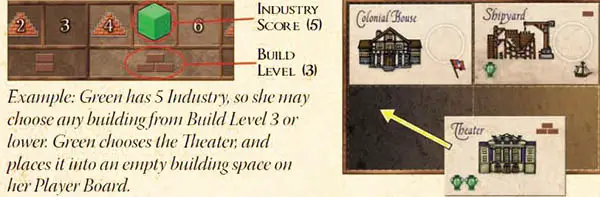
Players may build duplicates of buildings that they already have.
Players may not choose any building from Build Level 5 if they have already built a Level 5 building.
Some buildings feature one or more Jk Industry, Culture, Q Finance, and Politics icons. When buildings featuring such icons are built, the player increases their score in the corresponding track by pushing the Status Marker on that track up by the amount of icons shown.

Once each player has built one building, go to the next phase. Note that if the building spaces on the Player Boards became full this round, this is the seventh and final round of the game!
Phase 2: The Growth Phase
In turn order, each player gains Population Markers.
During the Growth Phase, each player adds Population Markers from their supply to their Harbor. Each player •• score determines their Growth Level. Each Growth Level shows the number of Population Markers that are added from the supply.
If a player does not have enough Population Markers in their supply, they add as many as they can.
Once all players have added their Population Markers, go to the next phase.

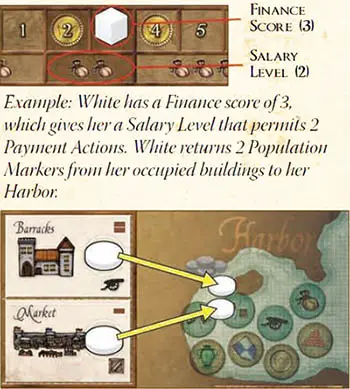
Phase 3: The Salary Phase
In turn order, each player performs Payments.
During the Salary Phase, each player performs a number of Payments. (A player performs a Payment by returning a Population Marker from one of their buildings back to their Harbor). Each player's ' Finance score determines their Salary Level. Each Salary Level shows the number of Payments that it permits.
If a player has more Population Markers on Buildings than permitted Payments, they may choose which of the Population Markers will return to the Harbor, and which will remain on buildings.
If a player has more permitted Payments than Population Markers on Buildings, all Population Markers are returned and the excess Payments are lost.
Paying salaries and returning markers in this way will allow buildings to be activated in the Action Phase, since a building with a Population Marker on it cannot be activated.
Note: During the first round of the game, no players will have any Population Markers on their buildings, so this phase will have no effect in that round
Phase 4: The Action Phase
Each player performs one action at a time, starting with the First Player and continuing clockwise around the table until all players have passed (because they are not willing or are not able to perform any more actions).
Basic Rules Of The Action Phase
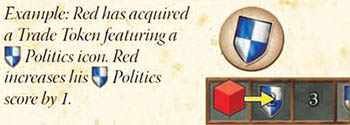
During the Action Phase, players may acquire Asset Cards and Trade Tokens featuring JlL Industry,^ Culture,^ Finance, and ^l Politics icons. When tokens or cards featuring such icons are collected, the player immediately increases their score in the corresponding tracks by pushing the Status Marker on those tracks up by the number of icons shown.
Players may never trade or give cards or tokens to other players.
Players may not discard cards or tokens at will. (However players may be forced to discard cards once they have passed, as described below).
Once a player passes, they may take no further actions this phase; the turn order continues as normal, skipping that player.
Once all players have passed, the phase-and the round-is over. Go to the End Of The Round section.
Taking Actions
There are two methods by which a player may take an action.
Method A: Activate A Building
The most common way to take an action is for a player to activate one of their buildings. To activate a building, a player moves one of their Population Markers from their Harbor to the empty Activation Space of a Building Tile. (A building can not be activated if it already has a Population Marker in its Activation Circle, or if it does not have an Activation Circle). They may then perform the action(s) featured on that Building Tile.
Method B: Spend A Trade Token
Some Trade Tokens (the ones with blue backgrounds) feature Action icons instead of Track icons. A player may spend such a token from their Harbor to perform the featured action. The Trade Token is discarded once spent.

The Actions
Ship
The player moves a Population Marker from their Harbor to the Shipping Track of a Region, taking the unclaimed space on the track that is farthest from the stack of cards. The player gets the Trade Token that was in that space as a reward, which they place face up in their Harbor.

A player may still Ship to a Region even if the Shipping Track there is full - the Population Marker is placed beside the Shipping Track and no Trade Token is rewarded.
The central starting area of Europe & the Mediterranean cannot be Shipped to; the two card stacks in that region do not have Shipping Tracks.
Opening A Region
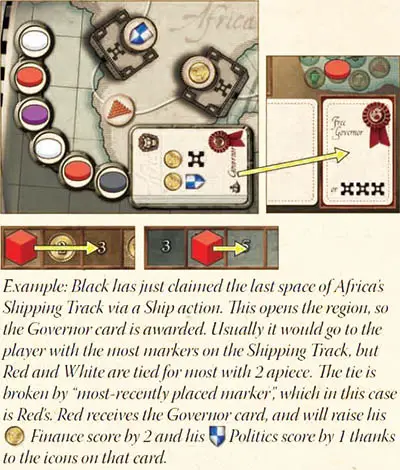
When the last unclaimed space on a Shipping Track is taken in a Region, the Region becomes open.
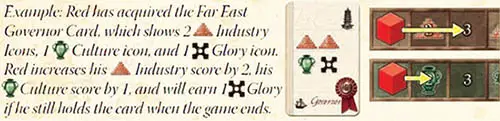
The top card of the Asset Card stack, called the Governor, is awarded to the player that placed the most Population Markers on the Region's Shipping Track. (If two or more players are tied for most, then the Governor is awarded to the tied player with the marker closest to the deck of cards-thus the most recently placed marker). This is the only way a player can receive one of the 6 Governor Cards.
When a player is awarded a Governor card, it is placed in either the "free Governor" slot or in one of the normal card slots on their Player Board (or nearby if no slot is available) and the player immediately receives the Status Track increases granted by the card's icons.
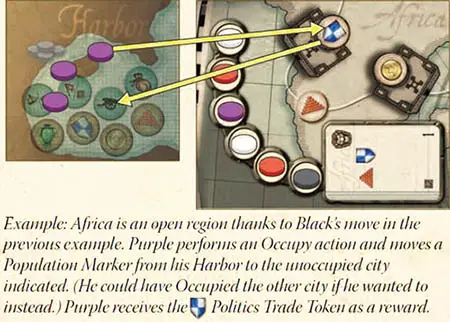
Once a Region is open, Occupy, Draw, and Attack actions may take place there. The starting area of Europe & the Mediterranean is considered open from the start of the game.
Occupy
The player moves a Population Marker from their Harbor to an unoccupied city. The player collects the Trade Token that was in that city as a reward, which they place face up in their Harbor.
Only cities in open Regions may be Occupied.
To Occupy a city, the player must already have presence in that Region. This means they need to have at least one Population Marker already in the Region. (In other cities or on/beside the Shipping Track). All players are considered to have presence in Europe & the Mediterranean regardless of whether they have any markers there or not.
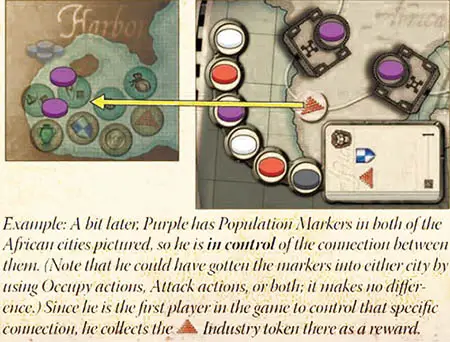
Controlling Connections
Many of the cities in the game are connected to other cities. When a player has Population Markers in both cities at either end of a connection (via Occupy and/or Attack actions), they are considered to be controlling that connection.
All connections begin the game with a random Trade Token placed on them; the first player to control a given connection during the game immediately collects its token as a reward and places it face up in their Harbor.
Note: Even after its token has been claimed, control of the connection remains valuable because it will be worth a Glory point at the end of the game.
Attack
This action costs 2 Population Markers. The player first removes a Population Marker from their Harbor and places it in their supply. Then the player selects a city that is already occupied by an opponent's Population Marker, and replaces the opponent's marker with a second Population Marker from their Harbor. (The displaced marker is returned to the opponent's supply). At the end of the Attack action, the attacked city is considered to be occupied by the attacker.
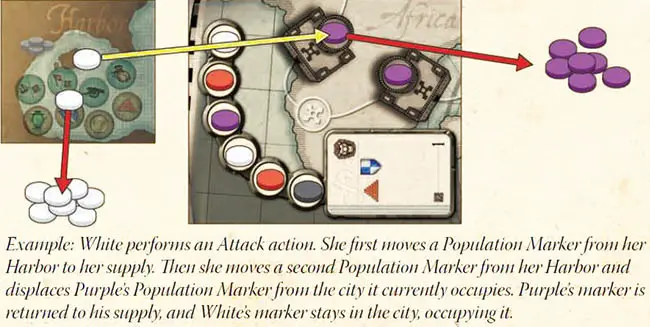
Only occupied cities can be claimed with the Attack action.
To Attack a city, a player must already have presence in that Region. This means they need to have at least one Population Marker already in the Region. (In other cities or on/beside the Shipping Track). All players are considered to have presence in Europe & the Mediterranean regardless of whether they have any markers there or not.
Controlling Connections
Connections can come under a player's control due to the Attack action. See the Controlling Connections rules in the Occupy section for details.
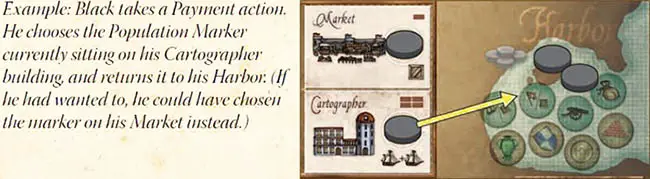
Payments
The player moves one Population Marker from the Activation Space of one of their buildings back to their Harbor. This frees both the building and the Population Marker to be used again later.
A building can not use its own Payment action on itself.
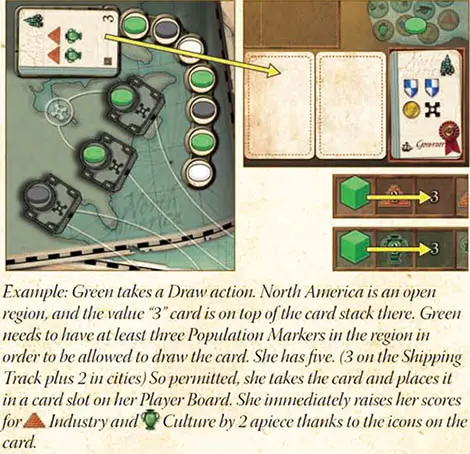
Draw
The player takes the top card from an Asset Card stack in an open region and places it face-up in one of the card slots on their Player Board. (If there are no slots available, the card is placed nearby for now). The player immediately adjusts their Status Tracks to reflect the icons on the acquired card.
-
Each region has a stack of cards. To draw a card from a region's stack, a player must have a number of Population Markers in the region greater than or equal to the value of the card. These Population Markers may be in the region's cities, or on/beside the region's Shipping Track.
-
There are two card stacks (Slavery and Europe & the Mediterranean) in the starting region of Europe & the Mediterranean, each numbered 0-5. Note that because there is no Shipping Track in this region, only the Population Markers in cities can be counted toward the ability to draw cards.
All of the cities in the region can be counted for either deck. The '0' value cards in this region require no Population Markers to draw.
-
When drawing cards during the Action Phase there is no restriction on how many cards a player may hold, and cards may be freely moved into and out of slots. Only when a player passes will they have to discard down to their Card Limit, which is determined by their Politics score.
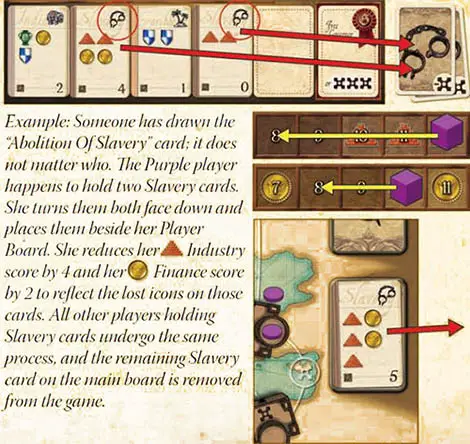
Abolition Of Slavery
The value "5" card in the Europe & the Mediterranean deck is special; it features a label that announces the Abolition Of Slavery. The first time this card is drawn by any player, all players must immediately set aside all Slavery cards they hold, reducing their Status Track scores as appropriate to reflect the lost icons.
The set-aside Slavery cards are turned face down and kept near the player's Player Board as a reminder that the player will lose 1 Glory per card at the end of the game for resorting to Slavery. These set-aside Slavery cards do not count toward the player's Card Limit.
Any Slavery cards that remain on the main board are immediately removed from the game; it will not be possible for players to draw from the Slavery deck for the remainder of the game.
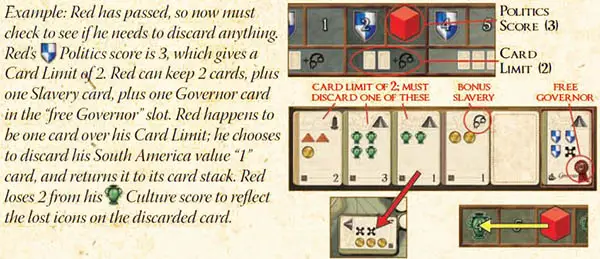
Pass / Discard
Once a player has passed, they may take no further Actions this phase.
Each player has a Card Limit, which is determined by their Politics score. A player's Card Limit determines how many Asset Cards the player is permitted to keep after passing. The absolute maximum will be 5 cards, one card per normal card slot.
-
Additionally, a player may keep one bonus Slavery card beyond their Card Limit, not to exceed the 5-card maximum. (More than one Slavery card may be kept, but only one Slavery card per player gets this special bonus).
-
There is also a special space on each Player Board where each player may keep one "free" Governor card. This free Governor card does not count towards the player's Card Limit, or towards the maximum of 5 total cards.
Players are not limited to one Governor card overall, and they are not forced to keep a held Governor card in their "free Governor" slot even if that slot is empty. Governor cards in normal card slots do count towards the card limit and the 5-card maximum.
When a player passes, they must discard cards down to their Card Limit if necessary. Discarding cards will result in the loss of the featured icons, therefore the Status Markers on the corresponding tracks must be pushed down accordingly.
Note: Loss of Politics icons in particular may result in a player's Card Limit being lowered. In such a case the player must continue to discard cards until their Card Limit is satisfied.
Discarded cards are returned to the card stack that they came from. Cards are always arranged in increasing value order from the top down, with the lowest-value card on the top of the stack.
When Slavery cards are discarded they are not returned to the Slavery stack. Instead they are turned face down and kept near that player's Player Board as a reminder that the player will lose 1
Glory per card at the end of the game for resorting to Slavery. These set-aside Slavery cards do not count toward the player's Card Limit.When Governors are discarded, they are removed from the game.
Players may reposition their cards into whatever slots they wish during the Discard process, as long as their Card Limit is obeyed when they are done.
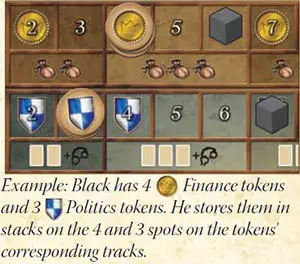
Token Storage
Your Harbor may grow crowded as you collect Trade Tokens; you may find it useful to stack your brown Trade Tokens on their Status Tracks instead.
This will clear room in your Harbor and help you to quickly count your scores, especially if you keep the stacks on the number that matches the height of the stack.
Phase Order
A different method for Phase Order could be for each player to individually complete the first three phases (Build, Growth, and Salary) in order before passing to the next player in turn order.
You may find that this method assists in individual planning, or that it speeds up the game.
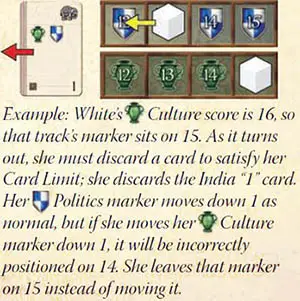
Track Limit
The maximum score on any Status Track is 15; in the event that a score rises above 15, the marker stays at 15.
Note however that if you lose icons while you have greater than 15 in a given score, make sure that your marker is positioned to reflect your actual total of held icons.
End Of The Round
Once all players have passed, the round is over. This is a good time for players to recalculate their Status Tracks to make sure that they are accurate. Once discards are complete, the player simply counts up the total number of icons held (counting icons on held Asset Cards, Trade Tokens, and Buildings) in a given category, then positions the Status Marker correctly on the Status Track if it is incorrect.
Once everyone's Status Tracks are confirmed correct, the First Player Marker is passed to the left, and the next round begins.

If it was the seventh round that was just completed, the game is immediately over! (This is easily checked: If all building spaces on the Player Boards are full, the seventh round has just ended).
End of the Game
The game ends at the conclusion of the seventh round. The buildings act as a reminder of this; once the building spaces fill up during the Build Phase, it is the seventh and final round of the game. After the seventh round ends, the game ends and Glory points are tallied.
Players earn X Glory points based on their levels of A Industry, Culture, Q Finance, and Politics, as well as from city occupation, controlling connections, holding certain cards and buildings, and for having Population Markers in their Harbor. Some players will lose points as well, if they have Slavery discards by their Player Boards.
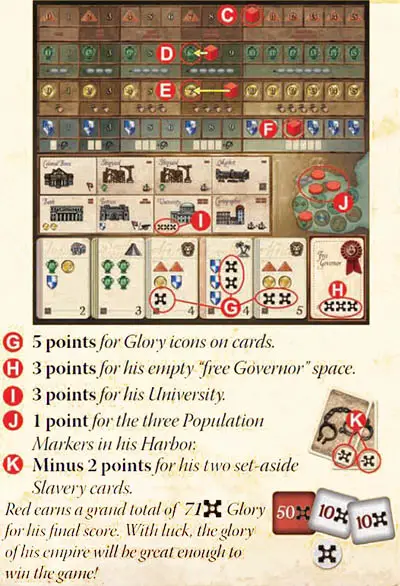
Remove any remaining Trade Tokens from the game board and the Player Boards. (Be sure that all players Status Tracks are correct before their Trade Tokens are removed!) They will be used (glory-side up) along with previously discarded tokens to help count points. Each token represents 1 X Glory point. Trade up to the larger Score Chips when you reach increments of 10 and 50.
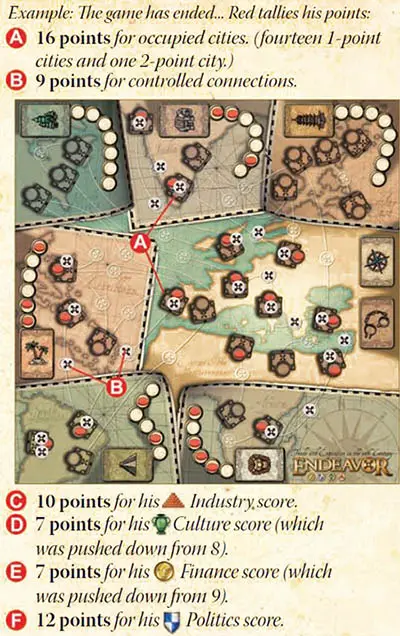
A Cities and Connections. One player at a time must do this, but other B players can assist in order to speed up the process. On each city in which the player has a Population Marker, place Jt Glory tokens to match the X Glory icons printed on those cities. (Most cities have 1X Glory icon... there are a few cities that have 2). Now place 1 X Glory Token on each connection controlled by that player. That player then takes all of those X Glory tokens. Repeat the process for each player.
C Status Tracks. Each Status Track has spaces with icons, and spaces (D) without icons. Status Markers on spaces with icons stay where they are.
E Status Markers on spaces without an icon now get pushed down to the a F first space they reach that does have an icon. These are the X Glory point v values for the Status Tracks. Each player adds up the points from their Status Tracks and takes that many X Glory tokens.
G Cards. Many of the Asset Cards feature Glory icons. Each player adds up the X Glory icons on their cards and takes that many X Glory tokens.
H Governor Space. Any player without a Governor card in their "free Governor" space takes 3 X Glory tokens.
I Universities. Any player with a University takes 3 X Glory tokens per University.
J Extra Population. For every 3 Population Markers remaining in a player's Harbor, the player earns 1 X Glory token.
K Slavery Subtraction. Any player with discarded Slavery cards by their Player Board loses 1 X Glory token per card. (Note that face-up Slavery cards on Player Boards (if any) do not incur this penalty).
Total Points and Victory
Each player adds up their X Glory tokens, and the player with the most points wins! In the case of a tie, all tied players share victory.
Continue Reading

