
Components

- 1 Game board
- 2 optional Extension boards
- 4 Player boards (one per Guild)
- 37 Location boards
- 1 Threat tower
- 1 Threat bag
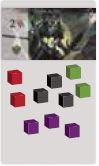
- 75 Threat cubes
- 40 Agents
- 1 First Player marker
- 1 Round marker
- 28 Allegiance slips
- 17 Neutral Starter cards
- 16 Guild Starter cards
- 50 Card Sleeves
- 286 double-sided Card advancements
- 32 Aegisian Coins tokens
- 48 Player Aid tokens
- 8 Reference cards
- 37 Randomizer cards
- 1 Scoring pad
- 28 Reputation tokens
- 26 Influence/Goodwill tokens
- 4 Defense tokens
- Player Handbook
- Rulebook
Object of the Game
In Edge of Darkness, players act as leaders of powerful Guilds in the city of Aegis which sits on the border of the Forsaken Lands, an evil realm infested by demons and monsters. Players will vie for the prestige of defending the city from the evils of the Forsaken Lands, while amassing influence and wealth.
Edge of Darkness is a shared-deck, card-crafting game. This means that all players will be playing from the same deck of cards and through their actions will be modifying cards within that deck.
At the end of the game, the player with the most Victory Points is the winner.
Setup

-
For your first game only: Before your first game you will need to sleeve all the Starter cards (Citizen and Patrician). Also, use one sleeve per Guild to hold all 7 of their Allegiance slips to keep them together and organized.
For all future games you can just leave the starter cards sleeved. Extra sleeves are included in the game in case you tear any while playing.
-
Place the Game board in the center of the table (optionally using one or both Extension boards if you have the table space) and add Coins, Influence and Reputation tokens to the corresponding spots on the board (showing the outline of the respective tokens).
-
Each player chooses a Guild and takes the corresponding Player board.
-
Then each player takes the corresponding 7 Allegiance slips, 4 Guild Starter cards (3 Citizens and 1 Patrician), 10 Agents, 10 Player Aid tokens, 1 Defense Track token, and 2 Reference cards. Each player also gets 4 Influence and 5 Coins tokens which can be placed in the appropriate spot on their Player board.
Set up your Player board as follows:
- Place 4 of your Agents in the Trained Agents pool.
- Place your other 6 Agents to the right of your Player board (or somewhere convenient off to the side).
- Place your Allegiance slips and 4 Starter cards to the left side of your Player board (or again, somewhere convenient).
- Place your Coins and Influence on the corresponding coffers (5 and 6).
- Place your Defense Track token at on the top spot of the Defense track.
-
Assemble the Threat tower then place it somewhere on the table, ideally within reach of two or more players.
-
Put all 15 black Threat cubes into the bag along with all 15 colored cubes of each of the players in the game (so for a 3-player game, there will be a total of 15+45=60 cubes in the bag).
Then, each player should pull 2 random cubes out of the bag and place them in their Threat Zone, on their Player board. Finally, pull 4 cubes at random and drop them in the tower.
When playing with less than 4 players, do not add the colored cubes of the Guild(s) not represented in the game. Leave them in the game box as they will not be used.
-
There are 17 Neutral cards (11 Citizens and 6 Patricians). Some of them have a player requirement (seen on their Blight side). With 4 players you will need all 17 Neutral cards.
With 3 players, remove the cards with a "4" indicator. With 2 players, remove the cards with a "3" and a "4" indicator. These cards can be left in the box, they will not be needed.
-
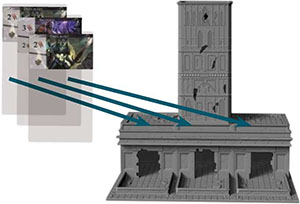
Shuffle the Neutral cards being used and then place 3 random ones into the three spots on the tower with the Blight side showing. The game will begin with a "Prologue round" during which the rest of the Neutral cards will not be needed, so for now, place them in the Discard pile space on the Game board.
-
In every game, 10 Location boards and associated advancements will be used. These should be placed above and below the Game board. The Player Handbook will help you select your 10 Locations.
For your first game, we recommend starting with Tale 1, Chapter 1 (or Chapter 2) which can be found on p.6 of the Player Handbook.
Each Location board has a set of associated Card advancements. 5 Location boards should be set along the top and 5 along the bottom of the Game board. The order in which they are placed does not matter.
If you have a large enough table you should use the Extension boards, placing the Card advancements on the Extension board beneath their corresponding Location board (for example, the University Professor is placed beneath the Guildmark University).
If you do not have a large enough playing area, you can remove the Extension boards and instead place the advancements directly on their corresponding Location board.
-
Place the Round marker on the Prologue spot on the Game board, and randomly select a player to go first. Hand them the First Player marker. You are ready to begin!
Game Play
Edge of Darkness is played over a prologue followed by eight rounds. During the rounds, play is conducted in clockwise order, starting with the first player.
In the prologue, players will draft exactly two advancements to sleeve into their Guild Starter cards. In the rounds, players will take turns during 2 phases:
- Assembly Phase
- Action Phase
After all players have completed their Action Phase, the round is over.
At the end of the 8th round, players will determine their final scores and the player with the most Victory Points wins (see "Game End" p. 17)-
Prologue
The prologue plays differently from the regular rounds and gives players a head start into the game.
-
The first player chooses any one advancement and sleeves it onto one of their four Guild Starter cards.
Important: They may then resolve the effect on the advancement they sleeved to the extent it may be resolved in the prologue. Certain effects only make sense during regular rounds and thus cannot be resolved during the prologue.
These include: effects that allow you to return Agents
 , draw cards, gain Battle Strength
  , hunt threats
  , claim Allegiance
  or manipulate cards in the tower.
Effects you can resolve include, but are not limited to, gaining Coins
 , Influence
  or Reputation
  , placing Agents
  , and training Agents
  .
.Sleeving Advancements
You may take any advancement from a stack of advancements, you do not have to take the top one. If a slot for a specific advancement runs out, however, it is no longer available.
When sleeving an advancement you may not sleeve such that you cover an advancement already sleeved. You may however cover Citizens and Patricians with top-slot advancements (if available).
If the only available slot on cards in your hand is a Citizen or a Patrician, you may choose to skip sleeving instead.
-
The next player to the left then does the same. However, that player may not choose an advancement that has already been chosen.
You can put Player Aid tokens on the Location boards to help remember which advancements have been chosen. Proceed this way until each player has chosen one unique advancement.
-
Next, repeat this process in reverse order beginning with the last player and ending with the first player (this means the last player will choose twice in a row and the first player will get the first and last choice).
Thus, in a four-player game, eight unique advancements out of the ten available will be chosen during the prologue.
Each player should now have two different advancements sleeved either on the same card or one on two different cards.
2 Player Games
In a two-player game, each will get a total of 3 advancements. To do so, the first player drafts one advancement, then the second player drafts two, then the first player drafts two more, and finally the second player drafts their third.
-
Then take one copy of each advancement that was not chosen and sleeve each on a different Neutral Citizen card in the Discard pile. One copy of each advancement should now be sleeved either on a Neutral card or a owned card.
-
Each player chooses one of their Guild Starter cards that has not received an advancement and places it in their Guild Hall (on their Player board). The other three cards should be placed in the Discard pile along with the Neutral cards that were placed there during setup.
-
Any player shuffles all the cards in the Discard pile to form a deck. In a four- player game this deck should have 26 cards; in a three-player game, 21; and in a two-player game 15 cards.
Once shuffled, place the deck City side up on the "deck" space of the board. Note on shuffling: since the cards are double-sided, shuffle (or at least cut the deck) under the table or while looking away from the deck so as not to inadvertently cheat.
-
Finally, lay out the top 5 cards of the deck one at a time into the 5 open spaces in the Street.

Rounds
Each round has two phases, described below.
Assembly Phase
The first phase of a round is the Assembly Phase. During this phase, all players:
-
Take cards from their Guild Hall and add them, City side up, to their hands.
Important: When taking cards from their Guild Hall, players get all cards from their Guild Hall even if this is more cards than their current hand size.
-
Take all cubes out of their Threat Zone and place them on top or adjacent to their hand of cards. We recommend placing them on top of your cards so that when you start your Action Phase, it is easy to remember that the first thing you should do is drop your cubes into the tower.
Remember: In the first round you should have 2 cubes in your Threat Zone from setup.
Important: A player's hand should always be kept City side up on the table and visible to the other players. There is no maximum to the number of cards a player may have in their hand.
Then in turn order each player:
-
Drafts cards from the Street until they have a hand of 3 (see "Drafting Cards" on this page). If a player already has 3 or more cards in hand, they do not draft. For example, in the first round players will be drafting 2 cards each since they drew 1 card from their Guild Hall.
-
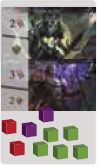
Pulls cubes at random from the bag based on the sum of all the cube icons indicated on the bottom left of all slots on the cards in their hand, placing these cubes in their Threat Zone. If the bag runs out of cubes take all the set aside cubes and put them back in the bag, then continue pulling cubes.
Example: Your hand shows 3 cubes. So 3 cubes are pulled randomly out of the bag. You place them in your Threat Zone.

After a player has drafted the correct number of cards, all the cards in the Street slide to the right to fill in the empty spots and new cards are placed from the top of the deck one at a time to fill in the blanks.
Your Assembly Phase turn is now over, and the next player takes their turn. Once each player has taken a turn during the Assembly Phase, proceed to the Action Phase.
Drafting Cards
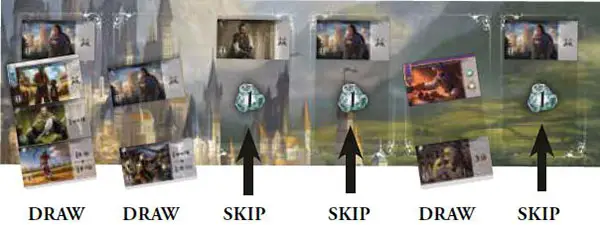
Drafting means selecting cards from the Street you want to add to your hand. A player must draft the rightmost card from the Street, unless they spend Influence to skip cards.
When drafting, a player may pay Influence to skip one or more cards and draft the next available card(s) instead.
For each card you want to skip, place 1 Influence on it. After placing tokens on all the cards you wish to skip, then draw the first available card(s) in the Street which you did not skip until you have a hand of 3 cards. If you do not have any Influence, you cannot skip cards. Skipping is of course entirely optional.
You may skip a card that another player has already skipped; a card will accumulate Influence until it is drafted. You may skip between 0 and 5 cards. If you skip 5 cards, you will simply draft cards from the top of the deck. You may never skip the top card of the deck.
If you draft a card that has one or more Influence already placed on it, you get to keep those tokens. However, you must flip them to their Goodwill side and they should be placed in the Reputation coffers on your board. These are no longer Influence.
Important: You may not spend Goodwill as Influence. At the end of the game every 4 Goodwill you have counts as 1 Victory Point.
Example: If you are drawing 3 cards and you want the 2nd, 5th, and 6th cards (yes the 6th card on top of the Deck is available) you would place 1 Influence on the 1st, 3rd and 4th cards in the Street, then draw the other cards.
Then the 3rd and 4th cards would slide down into the 2nd and 3rd positions respectively, and top 2 cards of the deck would be placed in the 4th and 5th spots respectively.
Depleted Deck
The deck is "depleted" if the only cards left in the deck are in the Street (i.e. 6 or fewer cards left).
If this happens in the middle of a player's turn, the active player may choose to immediately shuffle all cards in the Discard pile into the deck, or instead wait until the end of their turn. Generally players should wait until the end of their turn to shuffle.
Regardless, at the end of a player's turn, if the deck is depleted, the Discard pile must be shuffled and placed on the Deck space (beneath the 6th card in the Street if necessary) and, if necessary, then refill the Street.
Important: since the cards are double-sided, when shuffling you should shuffle the deck under the table or look away from the deck while you shuffle.
Action Phase
The Action Phase is when most of the activity in Edge of Darkness occurs. During this phase, players take turns, in clockwise order, starting with the player with the First Player marker. On your turn you will:
- Drop cubes into the tower.
- Resolve Blight attacks (if any).
- Sleeve any advancement onto a card in your hand. You may also use abilities of locations or resolve effects of contacts in your hand, including those of the contact on the advancement you just sleeved.
- Discard cards.
Drop Cubes (mandatory)
Take the cubes you placed on your cards during the Assembly Phase and drop them all at once into the tower. They should all come out and land in one of the three cube trays. If a cube is somehow stuck, shake the tower slightly until the cube lands in a tray.
Important: Do not drop the cubes in your Threat Zone; those will be dropped next round.
Note: these cubes should go into and come out of the tower randomly, so please do not try and drop the cubes with the goal of causing a particular outcome.
Dropping these cubes may result in a Blight attack, in which case the attack is immediately resolved. Many times an attack won't happen, and you simply proceed with your turn.
Resolve Blight Attacks (Mandatory when Applicable)
A Blight attack (or attack for short) is triggered when there is a certain number of cubes (based on the number of players in the game) in a single tray at any point in the game.
- 2 Players: 6 or more cubes
- 3 Players: 7 or more cubes
- 4 Players: 8 or more cubes
When this condition is met, the card associated with that tray attacks. The player(s) whose color has the most cubes in that tray is attacked.
This means that if a single color has the most cubes, that player is attacked, but if multiple colors are tied for the most cubes, each of those players is attacked. If black cubes have or are tied for the most, every player is attacked instead.
Important: When a card attacks, it does so as a single threat that is the sum of the threats on it, rather than as each individual threats on it.
Important: When multiple players are attacked by the same threat, it attacks each of them for its full Damage. If one player succeeds or fails at defending against the threat, that has no impact on the Damage inflicted on other players. If necessary, resolve attacks in clockwise order beginning with the current player.
Important: If multiple cards attack in the same turn, resolve each one at a time from left to right.
Examples:
The Gilded Leaves is attacked, since there are more green cubes than any other color.
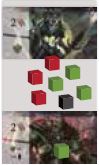
The Gilded Leaves and Carnival of Shadows players are attacked, since green and red cubes are tied for the most.
Every player is attacked, since black cubes are tied for the most.
After an attack has been resolved, the attacking card is discarded (if owned by a player it goes to that player's Guild Hall) and a new card is revealed (taken from the bottom of the deck and put in its place with its Blight side showing).
It is possible that the deck becomes depleted at this time and there are still empty spaces in the tower.
As always, the active player may shuffle the Discard pile and refill the deck immediately, thereby also allowing the immediate refill of the cards in the tower, or they can wait until the end of their turn.
If they wait, then the tower will be refilled at the end of their turn after the deck is refilled. You never put cards that are in the Street into the tower.
Resolving Damage
The whole Blight side of the card, rather than the individual threats slotted on it, is attacking the player(s). It is considered to be a single threat for this purpose. The Damage the threat deals is the sum total of the Damage of all the individual threats on the card.
First, in the tray associated with the card are set to the side. These cubes will accumulate off to the side somewhere convenient until there are no cubes left in the bag, at which point all the sidelined cubes are put back in the bag.
Next, if an attacking threat successfully inflicts 1 or more Damage to a player, that player moves the token on their Defense track down one space (this is the track on the right side of your Player board).
For example, if two cards attack, and both damage you, you will move down 2 spaces on your Defense track.

Example:
Damage = 2+3 = 5.
If you fail to reduce all of this Damage, you drop 1 space on your Defense Track.
Important: The amount of Damage of the attack doesn't matter; you only lose one space on the Defense track if you fail to defend against all of it.
Some advancements or Location boards will allow you to reduce Damage from attacking threats (For example the "Watchtower" and "The Citywatch"). If you aren't able to reduce all the Damage, then you suffer the effects of the attack.
Important: if you are attacked by a threat and you reduce all its Damage, you have successfully defended against the threat and gain 1 Reputation. You do not move your Defense Track token down 1 spot.
Important: Battle Strength does not reduce Damage. It only helps defeating threats when you "hunt" them.
Sleeving an Advancement (Mandatory When Applicable), Using Abilities and Resolving Effects (Optional)
After dropping the cubes and resolving Blight attacks (if necessary), you must sleeve an advancement (see "Sleeving Advancements" p.10). Generally you will do so before using abilities or resolving effects, but sometimes you may have a reason to wait until later in the turn.
You may also use abilities of locations and resolve effects of contacts in your hand. You are never forced to resolve a contact effect or use a location ability. You may resolve some, all, or none of them.
You may do so in any order; for example, you could resolve an effect on contact A, then use the ability of location B, then resolve the effect of contact C etc. Location abilities and contact effects on your Guild cards, or on Neutral cards, in your hand are free to resolve.
To resolve contact effects on cards in your hand that are owned by another player, you must pay them 1 Coin for each effect you want to resolve. Note, you must pay the Coin before resolving the effect you are paying for.
For example, if you have no Coins, you cannot resolve a contact effect on another player's card, even if that effect would make you gain Coins.
Example:
If you were the Gilded Leaves (green) player and you wanted to resolve both contact effects on this card, you would have to pay the Carnival of Shadows (red) player 2 Coins.
However, you could decide you only want to resolve the bottom effect; in that case, you would only pay them 1 Coin.
Using Player Aid Tokens
Player Aid tokens have no specific rules associated with them, but they can be helpful for organizing the actions on your turn.
You can use them during your Action Phase to keep track of the effects as you resolve them and the abilities as you use them.
You can also use them when it is not your turn to help plan out the sequence of abilities and effects you will use and resolve to help save time and improve the pace of the game.

Effects and Abilities
A complete list of the individual location board abilities, contact effects and threats is available in the Player Handbook (p.19). Below you will find an overview of the iconography used on them.
-
Agents

This icon represents trained Agents. If it is preceded with "untrained", it represents untrained Agents (those to the side of your Player board). On contact effects, threat rewards or location abilities, when it has no number before it, it means "1 agent".
When it does have a number (be it 0, positive or negative) before it, it means "that amount of agents".
-
Dispatch (your Agents)

This icon represents dispatching trained Agents of your Guild to the specific location associated with the effect being resolved or ability being used. To dispatch them, take your Agents from your Trained Agents pool and place them on the location.
The number after the icon indicates how many Agents can be dispatched. There is no limit to the number of Agents that can be at the same location at any given time.
Important: Agents must be dispatched to the location associated with the ability being used or the effect being resolved, (e.g. Agents dispatched by the effect of the University Professor contact can only be dispatched to the Guildmark University location).
Don't forget this rule or the game won't make sense!
Important: Only trained Agents of your Guild can be dispatched.
Example

The Commander of the Citywatch effect says "
 UP to 2
  ". This allows you to dispatch 1 or 2 trained Agents of your Guild to the Citywatch.
 -
Return (your Agents)

This icon represents returning trained agents of your Guild from the specific location associated with the effect being resolved or ability being used.To return them, take your Agents from the location and place them in your Trained Agents pool.
The number after the icon indicates how many Agents can be returned.
Important: Agents must be returned from the location associated with the ability being used or the effect being resolved, (e.g. Agents returned by the ability of the War Council location must be returned from there, and Agents returned by the effect of the Millhollow Landowner contact must be returned from the Millhollow, Farm Town location).
Important: Agents that are returned can be dispatched later during the same turn to a location if an ability or effect allows you to do so. Wise management of Agents can enable interesting and powerful combos!
-
Train (your Agent)

This icon represents training one of your Agents. To do so, if you have any untrained Agents left, move one of them from the side of your Player board into the Trained Agents pool.
At the end of the game, your trained Agents are worth Victory Points.
-
Claim Allegiance (of A Neutral Card)

This icons represents claiming the Allegiance of a Neutral card. When you do, if you have any of your Guild's Allegiance slips left, take one of them and sleeve it into a Neutral card.
Which Neutral card you claim the Allegiance of is always specified (in the Street, in your hand etc). At the end of the game, your Guild cards (cards with your Guild banner) are worth Victory Points.
Important: You can only claim Allegiance of a Neutral card. Once a card has an Allegiance slip on it, it cannot change Allegiance over the course of the game.
-
Battle Strength

This icon represents Battle Strength. Effects and abilities will make you gain Battle Strength, the simplest being Citizens who each give you 1 Battle Strength.
Battle Strength does nothing on its own, but it is needed to hunt threats. If you don't use the Battle Strength you gained, it is lost at the end of the turn. On contact effects or location abilities, when the icon has no number before it, it means " 1 Battle Strength".
When it does have a number (be it 0, positive or negative) before it, it means "that amount of Battle Strength".
-

Hunt Threats
This icon represents hunting one or more threats in the tower this turn. When a card gives you the ability to hunt threats, you may do so at any point in the turn rather than immediately; usually it doesn't matter, but sometimes it may.
When you choose to hunt threats, add up all the Battle Strength you have gained during your Action Phase from effects and/or abilities. Then, compare your Battle Strength against the combined Damage value of the
threat you wish to defeat. If you have more then you "spend" as many Battle Strength as they have Damage. Repeat until you either don't have enough Battle Strength to defeat a threat or wish to stop. For example, if you have 5 Battle Strength, you could defeat a 5 Damage threat, or a 3 then a 2 Damage threat.
Each threat you defeat gives you all of the rewards listed on the card. Defeated threats are then discarded (see "Discard" p.16) and all the cubes in their tray(s) set to the side. Finally, replace the threat with a new card from the bottom of the deck (see "Resolve Blight Attacks" p.12)
Using unresolved cards to return agents or use street effects
Over the course of the game, you may have turns - especially at the beginning of the game - during which you'll find there is no truly advantageous effect on a card in your hand.
The following options are available for these cards during your Action Phase turns.
Discard To Get One Agent Back
During your Action Phase, you may discard any 1 unresolved card from your hand (i.e. you resolved none of the effects on the card). If you do so, you are allowed to return any one of your Agents from any location to your Trained Agents pool.
You may do this action multiple times on your turn.
Important: other than effects that have the symbol, this is the only way to return Agents to your Trained Agents pool once they have been placed on a location.
Discard to get an effect from the street
During your Action Phase, you may discard any 2 unresolved cards from your hand (i.e. you resolved none of the effects on the cards).
If you do so, you may choose any one effect on any of the cards in the Street, and resolve that effect as if it were in your hand. If the effect is on another player's card, as always, you must pay them 1 Coin.
You may do this action multiple times on your turn.
Important: you do not draw the card from the Street, or discard it. You simply resolve one effect on the card as if that effect were in your hand. You do not resolve the entire card, just one effect on the card.
If you subsequently draw that card in the same turn using a "draw 1 card" effect, you may not resolve the effect on the contact again now that it is in your hand.
Discard (mandatory)
After you are done with all that you wished to do during your Action Phase, discard all the cards in your hand.
- If you discard a Neutral card, it goes to the Discard pile on the Game board.
- If you discard one of your cards, it goes to the Discard pile on the Game board.
- If you discard another player's card, it goes to that player's Guild Hall on their Player board instead of the Discard pile.
Important: this is true regardless of when you are instructed to discard one or more cards. Your cards will only go to the Discard pile when you discard them from your hand; otherwise they go to your Guild Hall.
For example, if one of your cards is in the tower as a threat and is discarded either because it attacked or was hunted and defeated, that card goes to your Guild Hall instead of the Discard pile.
End of the Round
Once all players have concluded their Action Phase the round is over. Pass the First Player marker to the player to the right (counterclockwise), and move the Round marker to the next space on the track.
Then begin the next round. At the end of the 8th round the game is over.

End of the Game
The game ends after the conclusion of the last round. Before scoring, each player gains 1 Goodwill for each slot filled on cards in their Guild Hall or on their cards in the Street.
Then sort all cards (including those in the tower) so that each player has all their cards in front of them. Then, award additional Reputation as follows, in this order:
- The player with the most Reputation tokens gains 2 Reputation.
- The player with the most trained Agents gains 2 Reputation.
- The player with the most Guild cards gains 2 Reputation.
- The player highest on the Defense track gains 2 Reputation.
In all cases of a tie for these categories, all tied players gain 1 Reputation instead.
Finally, calculate each player's Victory Points as follows:
- Trained Agents: 1 per
- Reputation: 1 per
- Slots filled on your Guild cards (including Citizens / Patricians): 1 per
- Defense Track: Current total indicated by the position of Defense Track token
- Tokens: All Coins, Influence & Goodwill are worth H of a point.
Important: you can win the game 1/4 point.
The player with the most Victory Points wins the game. In case of a tie, use the following tiebreakers in order between the players tied:
- Most Guild cards.
- Most trained Agents.
- Combined total of Coins and Influence.
Finally, if the scores are still tied, the tied Guilds form a temporary alliance to rule the city and share the victory.
To help with the scoring, you can use one sheet of the Scoring pad provided.
Continue Reading