This will be a guide for understanding the deeper strategies of the game which may be familiar to long time players and eye opening for players who have just picked it up and want to learn more.
I'm going to give you strategies and card engines using only the base set of cards as examples; this is a good thing as the base set cards will cover the gamut of most of the card types available not only in Dominion expansions but but most any deckbuilding games as well.
When Dominion was first released, DBGs hadn't existed yet and players were free to explore and evaluate cards without any idea of what was good until they could actually play a few dozen games and experiment. The first lesson in Dominion you'll need to learn is to mentally track how many Victory cards you and your opponents have gained.
The easiest way is to just keep a running tally of how many Provinces each player has purchased. You don't have to be like Rainman and know exactly how many Estates and Duchies as well, just keep an idea of where you are in the points race and how close you are to ending the game.
Do this so you can track if you need to make bold plays to catch up, slow other players down or speed your way to an end game before anyone else can catch up.
Deck Thinning
The first strategy I want to talk about is a strategy that is well known now in DBGs, but wasn't at first apparent is Deck Thinning. If you're an old hat you probably already know what I'm talking about. If you don't, then take a look a look at this card:
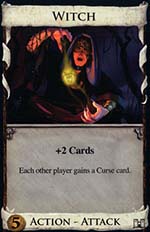
There is a very important keyword here in, "Trash". Trash removes cards from your deck all together. Watch for this type of keyword in other DBGs as well, sometimes it'll be called something like Banish or Delete. At first glance to a new DBG player the only apparent use for this card is to remove cards you don't want like Curses, which your opponents may have added to your deck using Attacks like Witch. Here's a catch though, in all DBGs some cards are definitely better than others.
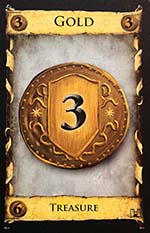
Silver is better than Copper and Gold is better than Silver. Same with Victory Points, Provinces give you more bang for your buck than Estates and if you have to have dead cards in your hand, it's better to have a few Provinces than a lot of Estates. Card economy is the key, it's more efficient to gain 3 Coins from 1 card than it is to gain 1 Coin- especially when you only start your turn with 5 cards. 5 Coppers will not buy a Province any time soon.
So here's the secret- the cards you start the game with are the worst cards in the game. This is true no matter what the name on the box is. Savvy players quickly learned that heading to the Chapel did more than just cleanse you of evil Curses, it is an opportunity to donate all of your lesser Coppers and Estate holdings for a good cause.
No, not the church, silly. I'm talking about your own gain. If you don't have Coppers and Estates in your deck you are more likely to draw the cards you really want more often.
Chapel Strategy
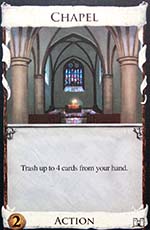
I'm going to give you the basic Chapel strategy, but first I need to explain a term that I will reference often in this article. Your first two hands of any game of Dominion will always have a Copper split of 4:3 or 5:2. So when I say you have a 5:2 split, one of your first two hands will have 5 coppers and the other will have 2 Coppers to buy with.
If Chapel is on the board and you are going to go for this strategy with a 4:3 split you will buy a Chapel and a Silver on your first two turns. You will then draw the Chapel on your 3rd, 4th or 5th turn. Hopefully you will draw it with 4 other Coppers and Estates- don't hesitate to send all 4 of them to the Trash pile.
If you unfortunately draw the Silver in the same hand as the Chapel, this process will be a little slower, but trash as many Coppers and Estates as you can and don't buy anything with the 2 coins left over from your Silver unless it will help with your overall strategy. Cellar is an example of a 2 cost card that is OK to buy, but it's best to hold off on getting until until later in the game when you can use it to cycle dead Province cards into drawing more useful Treasure cards.
On your other two turns that you don't draw the Chapel, you will look to buy more Silvers. Eventually your deck will get rich enough to move on to Buying Golds and you can Trash the Silvers away to make your deck more Gold rich. Soon your buying power will be enough to start gaining Provinces. You'll want to end the game as quickly as possible, so you don't give your opponents too much time to get their own buying engine going.
I will mention that this is sometimes a gamble as you may get bad draws, pairing the Chapel with cards you don't want to Trash just yet. Also this strategy is susceptible to some Attacks like Thief and Militia.
Thief players will love your Gold-Rich deck and Militia can really slow down your ability to thin your deck leaving only 3 cards in hand.
If you get a 5:2 split and are looking to go with a Chapel Strategy you'll want to pair it with free cards like Market and Laboratory or even Festival. Let me define what a free card is: any card that replaces itself by drawing a card and adding an Action is essentially a free play since you only get one Action per turn.
Market and Laboratory will greatly help you you in your strategy, and I will feel better about risking a Chapel strategy if I can get the lucky 5:2 split and these cards are available. Festival isn't really free but it is a Silver with benefits. Market and Festival can give you extra Buys and if you can get a little card drawing going in a Gold rich deck, you may get to the ultimate 2 Province buys in one turn.
So, your second lesson in getting better is complete. The cards you start with are terrible and getting rid of them is always a good thing. At first it may not make sense to get rid of Victory Points and money cards, but you do so to make your better cards even more useful. So now we know to keep an eye out for cards that have the word Trash in their text.
Feast
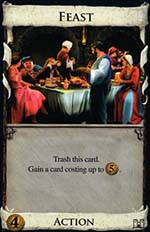
Let's start with Feast. While it does have the word Trash in its text, it Trashes itself so it's not going to help in a deck thinning strategy at all. This isn't a bad thing, though because it brings us to the opening hand splits of 4:3 vs. 5:2. If there are really powerful 5 cost cards on the board and they really outshine any 4 or less card costs, your 4:3 split can be saved by spending your 4 Copper hand on a Feast.
It's a little slow as it takes longer to draw the 5 cost card it will eventually gain you, but it's better than wasting the 4 coins on a card that may clog up your card drawing engine later in the game. Note that it's not as powerful as the next 3 cards shown, because it's a one shot deal and does nothing to thin your deck of terrible cards. You'll only want to buy this if there are 5 cost cards you'll be happy to pick up later sine you can't do it sooner.
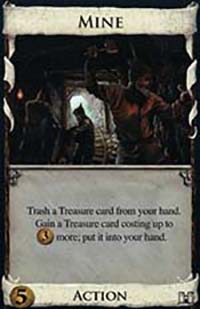
Mine
Mine has a a tiny Chapel-like strategy already built in. It will trash your Coppers for you and gain you a Silver in the same turn. It's good on its own, but better as a one-of in a deck with a card drawing engine that will draw through your whole deck in one turn. It is a dead end Action, in that it doesn't replace itself with more cards or an extra Action.
I will buy this with a 5:2 split and some times go for a Big Money strategy where I will avoid buying other Actions all together and just focus on gathering Silvers and Golds until I can buy Provinces often in the late game. I'll touch on that idea again later.
Money Lender
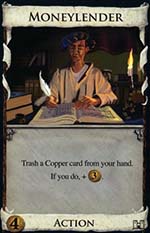
Money Lender became a card I fell in love with in my sophomore to junior stage of Dominion-zen development. It trashes the Coppers out of your deck and gives you an immediate Coin boost to buy more powerful cards.
I would actually rate this one higher than Mine because of its cost of only 4. This means you can can get into it early with your more likely 4:3 split. I'd only ever buy one of them and use them to buy Golds or more powerful 5 cost Actions whenever possible.
They are another great one-of card in a draw your whole deck engine (I've mentioned this twice now, I'll get to what that is in a little bit). They do become dead cards in the late game, but I think their explosive early game effect is worth it.
If you think about it, if you've trashed at least 4 of your 7 Coppers in a game with this card, you essentially traded 4 nearly dead cards for 1 later-game dead card. Totally worth it for the deck tuning you've done.
Remodel

Remodel is another that will trash one card at a time, but its gain is more versatile than Mine and longer acting than Money Lender. With Mine you are limited to Treasures and Money Lender will become a dead card after you've run out of Coppers.
Also Remodel is great in multiples as it can trash other copies of itself for a big gain. What you'll want to do with a Remodel strategy is use a ladder system to eventually get into Provinces.
What I mean by a ladder system is this; you'll want to ladder up to 8 cost Provinces by going through even cost cards. Basically you want to Remodel Coppers cards into 2 cost cards, 2 cost cards into Remodels, Remodels into Golds and Golds into Provinces. 2 Cost cards will most likely be Estates, but depending on the game you're playing you can grab Moats for protection or even Cellars when available.
Cellar
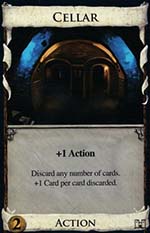
Cellar is a card that will help you greatly in a Remodel strategy, cycling away duplicate Remodels and Cellars or useless Victory cards into more money cards. Use your buys to buy more Remodels, Golds or even Provinces if you can. Remodeling is a good strategy because it's enabling you to do twice as much in a turn as you'd normally get to. Y
ou only get one Buy per turn and Remodel not only lets you gain an extra card a turn, it thins your deck of useless cards. Late in your game if you've been tracking how many Provinces all the players have and you are ahead, you can even Remodel your own Provinces into more Provinces, getting you closer to an end game.
This strategy can also be used in a draw your whole deck strategy, combining the two to do multiple Remodels in a turn.
Speaking of which, let's finally get to that draw your whole deck strategy. The idea here is to build an engine that will let you play multiple card drawing and Action gaining cards allowing you to draw and play your whole deck each turn.
You will need one of the above 2 cards for most engines, cards that give you +2 Actions enable the ability to combo multiple Action cards together. You can easily find these types of cards in other sets as well, so keep an eye out for them. Village is a steal at 3 Coins and has the added benefit of drawing a card helping you cycle into more engine cards.
Don't get caught in a loop that is commonly called the Village Idiot and only buy Villages; you need other cards to go along with the villages to enhance the engine and generate Coins and multiple Buys as well. Festival is a great card for doing both of those things and with healthy card drawing it can get you to buying multiple Provinces in a single turn.
Both of these cards need more card draw, so combo them by adding cards that have +2 or more cards written on them:
Laboratory

Laboratory can be a force all on its own, sometimes running this type of engine even without a Festival or Village. Fill your deck with these and you can combo multiples of them together to cycle through your whole deck all on their own.
You'll need to enhance the this with some other card eventually, but with Laboratory, you can concentrate on grabbing as many of these as you can early and get the enhancements later.
You can use Festival or Markets to add some buying power and even spice a Laboratory engine with one dead end card like Chapel, Militia or Witch to thin your deck of starting cards or hamper your opponents' games. Filling your deck with Golds will help give your engine and endgame so you're doing something with all your drawing power.
Council Room
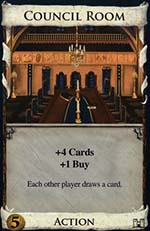
Council Room is my second favorite engine card after Laboratory. It will need Village or Festival for the extra Actions, but with them, 4 cards is gong to quickly get you through your whole deck.
The extra Buy will also make sure you aren't wasting any coins allowing you to maximize your purchasing power every turn. Your opponents all get to draw more cards as well, but I feel this drawback is easily countered by the benefits gained.
If you want to get really nasty include a single Militia in your deck. Since you will be drawing your whole deck anyway, you know you are going to draw it every turn. In a hand where you've played 2-4 Council rooms filling your opponents' hand up to 7-9 cards you can take that drawback away by making them discard down to 3 cards.
That is probably my favorite engine to build with Council Rooms and a single Militia.
Moat
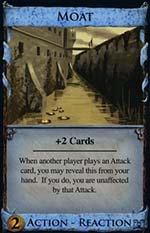
Moat is in here simply for its +2 cards, with the bonus of protecting you from Attacks should they be available to your opponents.
You can run a whole engine off of Moats with Village or Festival and it being 2 cost is helpful if you have extra Buys in early to mid game with just 2 coins left over. In a 5:2 split I will snap up a Festival and Moat to get the ball rolling even without any Attacks on the board.
Smithy
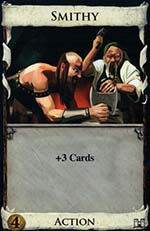
Smithy is is the optimal card draw-only card to use with Village and Festival with out any drawbacks. The price is right as well at 4, making a 4:3 Split very palatable, especially with Village available.
With just a Village/Smithy Engine, you may want to include a single extra Buy card like Workshop so you don't waste drawing more than 8 coins.
Remodel is another good card to help optimize a Village/Smithy Engine. Smithy with Festival can do fine on its own with the built in extra Buys and Coins. Adding the single Militia or Witch never hurts here either.
At the same price point as Council Room, Witch grants you the +2 Cards along with the very powerful effect of hurting your opponents as well. Probably the most devastating when you can get this going playing multiple Witches every turn. If other players are going for Witch, then a draw your whole deck engine will win out playing the most Witches in a game.
In all of these engines, don't neglect buying Gold at every opportunity. It will do you no good to draw your deck every turn if you don't have any coins to buy anything with.
Pay attention to that balance, if you're drawing all your cards and can't buy anything, you need more Gold or even Silver. If your engine stalls out from drawing too many Treasure cards and not enough Actions to keep going you need more engine pieces. Getting the feel for this will come from experience with the play-style.
Attacks And Counter-attacks
Let's touch on Attacks and Counter-Attacks, I've mentioned that peppering them in to your card drawing engines can be beneficial but they can also be strategies unto themselves.
Witch is probably the most powerful card you can buy in a 5:2 split because it will put you very far ahead of your opponents. Just like thinning your deck is good for you, fattening your opponents' decks is very bad for them. Not only are you taking away their Victory Points at the end of the game, you are filling their deck with completely dead card draws.
Witch is a dead end card, so normally you wouldn't want too many without some Village type cards to go with it, but its power level may just counter that. You want to play Witches early and often, so drawing multiples is really countered by being able to play them more often than your opponents. It's one of the few dead end cards I'd recommend going all in on.
A Witch on the board raises the value of Moat, Chapel and Remodel cards as counters to avoiding or removing Curses from your deck. Cellar works when nothing better is available to at least let you cycle away the curses into maybe drawing more useful cards.
Militia
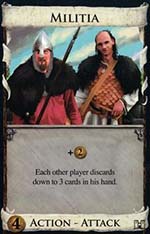
Militia is also very powerful on its own limiting what your opponents can do when it comes to their turn. Perfect as a one-of in a draw your whole deck engine, it's still good enough to buy 2 or maybe even 3 in a deck with no other Actions.
It could be useless if there are good counters to it available like Library or Moat. Library is the ultimate anti-discard, allowing you to use the discard to cycle away Victory Point cards or Coppers that are virtually dead anyway into new draws.
Library
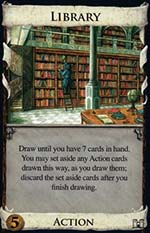
Library isn't an obvious Counter-Attack, but it is amazing against Militia. In a regular turn, Library looks like an expensive Smithy, netting you 3 more cards. Against Militia it will draw you 5 more cards.
If Library is available I will avoid buying any Militias and conversely will snap one up a.s.a.p. against an opponent's Militia purchase. It's important to note that it can be used in a draw your whole deck engine in a pinch.
It's not good with more efficient cards like Smithy, Council Room and Laboratory available as you will sometimes get to 7 cards and above anyway but it is possible to run on its own with Festivals and other dead end cards.
Bureaucrat

Bureaucrat is an interesting card. It will gain you valuable Silvers for your own better late game while hampering your opponents by putting dead cards from their hand on top of their deck hampering their next hand.
Moat is an obvious counter with Library being another good answer to anything that shrinks your hand size. This is probably also the only useful thing I can find for Spy to do.
I hate this card as I just don't find its effect valuable for anything. Most of the time I love free cards with +1 Card and +1 Action, but this one doesn't do anything (except maybe help counter what Bureaucrat just did to your deck, but even then I'm not thrilled).
I see players get excited when they reveal a Gold from the top of my deck and discard it, but what they don't realize is the top card of my deck was random before they played it and the next card is going to be just as random.
It's just not worth it to me to have no consistant effect on my opponents. If you like the psychological effect it has on messing with some players or you buy into its psychological effect yourself, more power to you. I'm going to spend my buy and 4 coins on a card that actually does something. I'm also going to view your buy and 4 coins a wasted turn if you buy it.
Thief is a very situational Attack as it depends on how many high value Treasure cards your opponents have in their decks. Early game you are actually helping your opponents as you will most likely just be trashing Coppers for them. If they go with a Big Money (Treasure only, no Action) or Chapel strategy then Thief becomes an excellent foil to their decks.
Big Deck Gardens Strategy
Now on to a strategy that is the complete opposite of the Chapel or deck thinning strategy, the big deck Gardens strategy.
If you can monopolize the Gardens and build a big deck full of cards, it's going to be very tough to beat you. My favorite card to abuse with Gardens is Workshop:
Worshop is only as good as the 4 cost cards it gains, and most games are won with Provinces that cost 8. When it comes to the base set the only 4 cost card that gains from use of Workshops is Gardens.
Almost anything else costing 4 or less is just better off being bought on its own with coins or extra buys. Workshop works with Gardens because it will give you a gain that is in addition to your Buy, and netting two cards a turn turns Gardens into a power house.
The Workshop/Gardens strategy works on auto-pilot like this:
- On a 4:3 Split buy 2 Workshops. On a 5:2 split buy a Workshop and a Copper.
- All following turns buy or gain Workshops until the Workshop pile is nearly empty with about 3-4 Workshops left.
- Then start gaining Gardens with your Workshop plays and buying buying them when you have 4 coins. If you have 3 coins, buy another Workshop. If 2 coins, buy an Estate. If 1 or less coins buy a Copper.
Keep doing this until you empty the Workshop, Estate and Gardens pile ending the game. You should easily win with the amount of points your Gardens net off of your big deck.
If at any time your opponents catch on and start trying to buy Gardens from you during step 2, switch to grab Gardens whenever you can and then switch back to Workshops, Estates and Coppers after the Gardens pile is gone.
This will be harder to pull off against experienced players and you may be stuck in a losing strategy. I've had the most success with this in 2 player games finding it more difficult to pull off in 3 and 4 player games if just one of them tries to counter me.
Cellar can be good here to cycle Garden cards into more useful draws. You can even substitute Woodcutter for Workshop, but it gets a little more difficult to grab all the Gardens if anyone else moves in. You can also combine this type of deck Gardens strategy into a draw your whole deck engine, concentrating on filling your deck with Gardens, Duchies and Estates for an end game instead of Provinces.
Big Money
I've mentioned Big Money as a strategy before. This idea leaves Actions out of the equation completely and concentrates on Buying only Silvers and Golds to fill your deck. This is a strategy to measure all others against to determine their worth. If you can't beat someone playing the most basic Big Money strategy, it may not be worth it and you should try something else.
A Chapel deck is essentially a Big Money strategy, optimizing it by removing the Coppers and Estates from your deck. Another style of Big Money can be to just buy one big card drawing Action like Smithy and then concentrating on getting Gold.
This is something you'll have to try out on your own and I've read of many programed simulations that have been run to see if it is optimal, but in my own experience I've beaten Big Money with most of the major strategies I've mentioned above.
Now I'm going to wrap up a few loose end cards that are also in the base set and how they fit in to above strategies or the strategies they have on their own.
Adventurer works as a one-of in a Chapel deck or a Big Money deck if you are rich in Golds, but it's still a random outcome that is difficult to justify for the cost of 6. It's cute when you can pull it off, but I prefer cards with effects that i can count on and cost less.
Chancellor
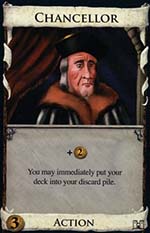
Chancellor is a card that looks completely worthless at first, but if you think about it you can shuffle your most recently bought cards in to your deck sooner than you would otherwise, increasing your odds of drawing them sooner.
This can be a good one-of in a Big Money or draw your whole deck strategy in the early to to mid game because you can get your recent purchases of Gold or Engine cards into your hands sooner.
Late games it becomes worse after you switch gears and start buying Victory cards so it's hard to justify the small early effect for the late game worthlessness of it. Use with care or just avoid it. Sometimes good against cards that punish you for having Treasures in your deck.
To Throne Room or not to Throne Room? This is one of the great questions of the ages. There is nothing more satisfying than comboing this card with any powerful Action, but that's the rub. You have to draw it and a powerful Action at the same time, otherwise it is a worthless, dead card. Y our deck is going to have to be nearly 40-50% Actions for it to be worth buying (this is not a mathematically figured out fact, it's just my gut feeling from experience).
It can be a great one-of in a draw your whole deck engine since your deck is mostly Actions. It can even grant a little turbo boost to a Workshop/Gardens build as a one or two-of. Buy them sparingly and at your own peril. Make sure your deck can support them with enough Actions. There's also a cute play with Feast, where if you Throne Room a Feast you can still gain 2 cards.
There is a Holy Grail 5 card deck possible with Throne Room that I mentioned in the Beginner's Guide.
Finally a word on Duchies. After you and your play group get more experienced, you will find yourselves tracking the Provinces and other Victory cards very closely and your games should be getting closer and closer points wise. This is when you will find the inclusion of Duchies in to your game important.
When everyone else has caught on, the swing of a game can be determined by one or two Duchy purchases. Keep this mind as you track who has the most points in a game and don't be scared to pull the trigger on a Duchy or two when the game is close to ending and the Province race is neck and neck.
Continue Reading