1. Action Spaces For Twin Tiles
At the end of the game, you will lose 1 point for each unused space on your Home board. An unused space is one that does not have a tile (or Stable) placed on it. You will now learn how to get tiles - for your Mountain and for your Forest.
Action Spaces: Excavation And Drift Mining
The "Excavation" and "Drift mining" Action spaces accumulate Stone. Take all the Stone tokens from the Action space when taking the action.
Additionally, you may place a "Cavern/Tunnel" twin tile on two adjacent empty Mountain spaces of your Home board. The new tile must connect with your cave system, i.e. you must place it (horizontally or vertically) adjacent to an already occupied Mountain space.
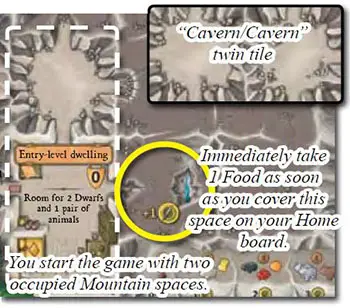
If you place the new tile on one of the underground water sources, immediately take the indicated 1 or 2 Food from the general supply.
The difference between "Excavation" and the "Drift mining" action is which side you may turn the twin tile on. With the "Excavation" action, you may choose either side, but when taking the "Drift mining" action you must use the "Cavern/Tunnel" side. The "Cavern/ Cavern" side can only be used with the "Excavation" action.
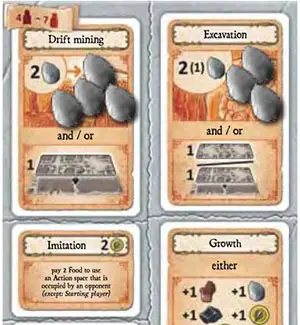
In games with 4 to 7 players, the restriction of the "Drift mining" Action space is countered by the fact that it will accumulate Stone faster than the Action space "Excavation".
Details On The "excavation" And "drift Mining" Action Spaces
If you have run out of adjacent empty Mountain spaces, you may not place any more twin tiles in your Mountain. In this case, you may not place a single tile instead when using the "Excavation" or "Drift mining" action.
In games with 5 to 7 players, there is an Action space called "Small-scale drift mining". It provides 1 Stone and a "Cavern/Tunnel" twin tile.
In 7-player games, there is an additional Action space called "Extension". It also provides 1 Stone and a "Cavern/Tunnel" twin tile. Alternatively, you may take 1 Wood and a "Meadow/Field" twin tile for the Forest on your Home board.
The twin tile with a Meadow and a Field.
The "Meadow/Field" twin tile will be explained next.
Action Spaces: Clearing, Sustenance And Slash-and-burn
Apart from the goods depicted on the "Clearing" and "Sustenance" Action spaces, you can get a "Meadow/Field" twin tile there. This tile is also available on the "Slash-and- burn" Action space.

These Action spaces provide the means to lay out Meadows and plow Fields.
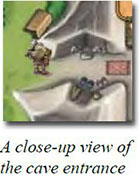
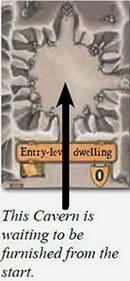
You have to place the "Meadow/Field" twin tile on two adjacent Forest spaces of your Home board. The first such tile has to be placed in front of the cave entrance (see illustration).
Any subsequent tiles have to be placed adjacent to an already existing Field, Meadow or Pasture (see the "Buildfences" action on page 19 for more details on Pastures).

Details on the "Clearing", "Sustenance" and "Slash-and-burn " Action spaces
The two adjacent Forest spaces on which you place the "Meadow/Field" twin tile do not need to be empty. One of them may already be occupied by a Stable. In this case, place the twin tile underneath the Stable such that the Stable ends up on the Meadow (see page 20 for more details).
If you have run out of adjacent Forest spaces, you may not place any more "Meadow/Field" twin tiles. In this case, you may not place single tiles instead when taking the "Clearing", "Sustenance" or "Slash-and-burn" action.
You do not necessarily need to place Fields adjacent to other Fields, or Meadows adjacent to other Meadows. (The tiles themselves, though, have to be placed adjacent to one another).
Apart from the twin tiles, the "Clearing" and "Sustenance" Action spaces provide Wood and crops, respectively.
The "Slash-and-burn" Action space, on the other hand, provides an additional "Sow" action.
You can sow crops to collect them in the Field phase of the harvest. This is one way of feeding your family in the long run.
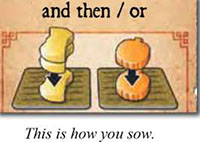
The Sow Action
You can grow crops with the "Sow" action. To sow Grain, take 1 Grain from your personal supply and put it on an empty Field. Then take 2 Grain from the general supply and put them on top of your sown Grain.
Instead of Grain, you may sow Vegetables. Take 1 Vegetable from your personal supply and put it on an empty Field. Then put 1 Vegetable from the general supply on top of your sown Vegetable.
With a single "Sow" action, you can sow Grain and Vegetables up to 2 times each.
Details On The "sow" Action
You cannot sow a crop, i.e. Grain or Vegetable, if you do not have at least one token of it in your personal supply (unless you have Rubies).
A completely harvested Field can be sown again with another "Sow" action.
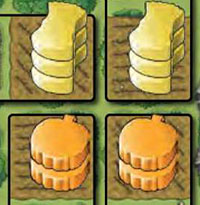
A newly sown Grain field contains 3 tokens, a newly sown Vegetable field just 2 tokens.
You can take a 'Sow' action on the 'Slash-and-burn' Action space and later on the 'Family life' Action space (in stage 3). Family life is what the next section is about.
2. Action Spaces For Family Growth
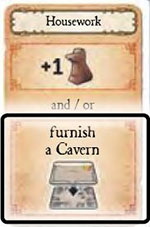
The Furnish A Cavern Action
The "Furnish a cavern" action can be found on the "Housework" Action space.
When using the "Furnish a cavern" action, choose one of the available Furnishing tiles on the supply boards. Pay the building costs indicated on the left below the of the tile (most often Wood and/or Stone) and place it empty Cavern space in your Mountain.
Every Furnishing tile has an ability which is shown at the bottom of the tile. Dwellings are special Furnishing tiles. They provide room for additional Dwarfs.
Dwellings are indicated by the red background color of their name tag
Details on the "Furnish a cavern" action
You may be able to furnish an empty Cavern as a result of an Expedition.
You cannot carry out the "Furnish a cavern" action if you do not have an empty Cavern.
You may not place a Furnishing tile on a Tunnel, Mine or empty Mountain space. (However, you may place one on the empty Cavern that is pre-printed on your Home board).
Once placed, you cannot remove, displace or build over a Furnishing tile.
Except for the ordinary Dwelling, there is only one copy of each Furnishing tile. The number of ordinary Dwelling tiles is considered to be unlimited (improvise if needed).
The next action specifically addresses the building of Dwellings.
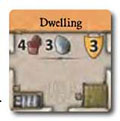
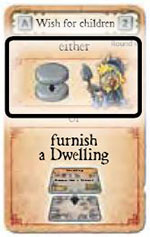
The Furnish A Dwelling Action
The "Furnish a dwelling" action is found on both sides of the Action space card for round 4 ("Wish for children" and "Urgent wish for children").
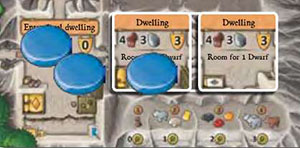
When using the "Furnish a dwelling" action, take a Dwelling tile, pay its building costs and place it on an empty Cavern.
There are 6 different types of Dwellings. Every Dwelling provides room for one or two Dwarfs.
Details On The "furnish A Dwelling" Action
You may be able to furnish a Dwelling as a result of an Expedition (see page A2 of the appendix).
For details on the special Dwellings, check the appendix on page A3.
The 'Furnish a dwelling' action prepares you for the 'Family growth' action that we will address next.
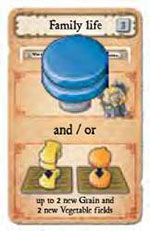
The Family Growth Action
The "Family growth" action can be found on the "Family life", "Wish for children" and "Urgent wish for children" Action space cards, and (in games with 4 or more players) also on the "Growth" Action space.
You can only use a "Family growth" action if you have more room for Dwarfs in your Dwellings than you have Dwarfs. (An offspring requires room in your cave).
When taking a "Family growth" action, put a Dwarf disc from your personal supply on top of the Dwarf taking the action.
This player's cave has room for 4 Dwarfs but only 3 Dwarfs are living in it at the moment.
The new Dwarf cannot take an action this round. (The offspring has to grow upfirst). In the Return home phase of this round, the new Dwarf has to be accommodated in an available Dwelling like the other Dwarfs.
Look at this lovely pregnant Dwarf woman!
Details on the "Family growth" action
Players taking a "Family growth" action will have one more (adult) Dwarf to use in subsequent rounds. (However, they will also have to feed more Dwarfs).
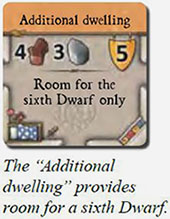
Dwarf families are limited to 5 Dwarfs. You may no longer use a "Family growth" action once you have all of your 5 Dwarfs in play (unless you build the "Additional dwelling).
You get only one "Family growth" action per Action space, but you may occupy more than one of them to grow your family faster.
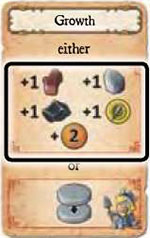
The "Family growth" action is also available on the "Growth" Action space when playing with 4 to 7 players.
The 'Growth' Action space is one of the Action spaces that provide several different goods. We will talk about Action spaces like this in the next section.
3. Action Spaces For Goods And Mines
Action Spaces: Supplies And Growth
The "Supplies" and "Growth" Action spaces are available from the start.
They provide 1 Wood, 1 Stone, 1 Ore, 1 Food, and 2 Gold. In games with 4 to 7 players, you can take a "Family growth" action instead on the "Growth" Action space (see previous section).
Action Space: Ore Mine Construction
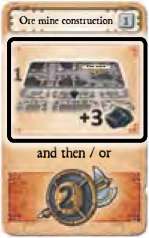
The "Ore mine construction" Action space will become available in stage 1.
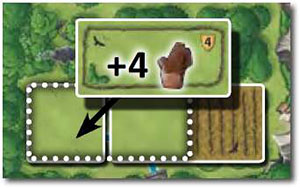
If there are two horizontally or vertically adjacent ordinary Tunnel spaces in your Mountain, you may use the "Ore mine construction" Action space to place an "Ore mine/Deep tunnel" twin tile on top of these spaces.
If you do so, take 3 Ore from the general supply. Additionally or alternatively, you may undertake an Expedition of level 2 on that Action space.
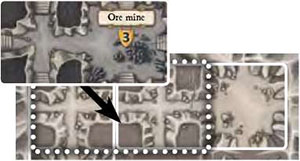
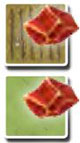
Two ordinary Tunnels are covered by an Ore mine tile.
Details on the "Ore mine construction" action
Deep tunnel tiles are indicated by a much darker background color (as opposed to the ordinary Tunnel tiles), and show staircases.
The "Ore mine/Deep tunnel" twin tiles can only be placed on top of ordinary Tunnels. You may not place them on top of Deep tunnels.
You will only get 3 Ore if you did place the twin tile on your Home board.
An Ore mine is worth 3 Gold points.
Each Mine can hold 1 Donkey (see page 20 for details on animal husbandry).
Tip for the "Ore mine construction" action
You may trade 1 Ruby for a single "Tunnel" tile at any time.
You can do so to place the single Tunnel next to an existing ordinary Tunnel in your cave and then use the "Ore mine construction" action to cover them with an "Ore mine/Deep tunnel" tile. (You can even cover two adjacent single Tunnels).
Rubies can be collected in Ruby mines which will be explained next.
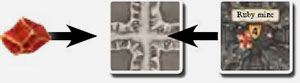
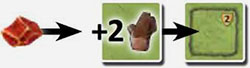
Action Space: Ruby Mine Construction
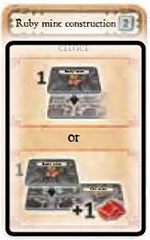
The "Ruby mine construction" Action space will become available in stage 2 (in round 5 or 6).
If you have at least one empty Tunnel space in your Mountain, you can place a Ruby mine on top of one of these spaces. If (and only if) you place the Ruby mine on top of a Deep tunnel, you immediately get 1 Ruby from the general supply.
Deep tunnels and Ore mines are on the same tiles. This is why the Action space displays an "Ore mine/Deep tunnel" twin tile.
Details on the "Ruby mine construction" action
A Ruby mine is worth 4 Gold points.
Every (Ore and) Ruby mine can hold 1 Donkey (see page 20 for details on animal husbandry).
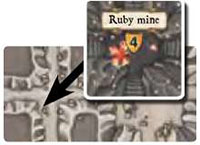
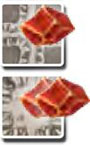
An ordinary Tunnel space has been covered by a Ruby mine tile. You do not get a Ruby for this.
Action Spaces For Mining: Ore Mining, Ore Delivery, Ruby Mining And Ruby Delivery
The "Ore mining" Action space is available from the start. The "Ruby mining", "Ore delivery" and "Ruby delivery" Action spaces will become available in stages 2, 3 and 4, respectively.
When using one of these Action spaces, take all the Ore and Ruby tokens from that space.
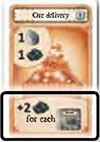
Take 2 additional Ore tokens from the general supply for each Ore mine you have when you take the "Ore mining" or "Ore delivery" action.
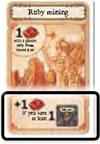
If you have at least 1 Ruby mine, take 1 additional Ruby when taking the "Ruby mining" action. (You will only ever get 1 additional Ruby. a
In the 2-player game only: No Rubies are placed on this Action space in the first two rounds).
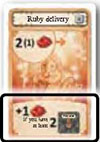
If you have at least 2 Ruby mines, take 1 additional Ruby when taking the "Ruby delivery" action. (You will only ever get 1 additional Ruby).
Rubies
Rubies can be used in a variety of ways. (There is an Overview card for quick reference).
Rubies are sort of a wild card. You can exchange them at any time at a 1:1 ratio for animals, building materials, Grain, Vegetables and Gold.
There is an exception with Cattle: You have to pay 1 Food on top of the Ruby token to get 1 Cattle (see at the bottom left of the Overview card).
You can also spend 1 Ruby to get a single "Field" or "Meadow" tile. You have to place it immediately on an empty Forest space that is adjacent to an already existing Field, Meadow or Pasture.
If you have no Fields, Meadows or Pastures in your Forest, place the single tile in front of your cave entrance. See page 20 for more details on Meadows and Pastures.
Alternatively, you can spend 1 Ruby to get a single "Tunnel" tile or 2 Rubies to get a single "Cavern" tile (see at the bottom right of the Overview card).
You have to place it immediately on an empty Mountain space (adjacent to your cave system).
Rubies can also be spent to play an armed Dwarf out of order. By paying 1 Ruby, you can ignore the "play order" for one of your Dwarfs.

Tips on Using Rubies
Changing the play order of your Dwarfs is important for Expeditions.
When taking a "Sow" action (see page 14), you can spend 1 Ruby to get a single "Field" tile before you sow crops. (You can also spend Rubies to get crops in the first place).
When taking the "Ruby mine construction" action, you can spend 1 Ruby to get a single "Tunnel" tile before you place the Ruby mine on top of it.

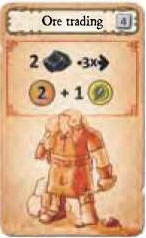
Action Space: Ore Trading
The "Ore trading" Action space will become available in stage 4.
When using this Action space, you can exchange 2 Ore for 2 Gold and 1 Food from the general supply.
You may do this up to 3 times (e.g. you can exchange 6 Ore for 6 Gold and 3 Food).
Action Space: Weekly Market
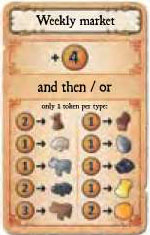
The "Weekly market" Action space is only available in games with 5 to 7 players. It is available from the start.
You get 4 Gold from the general supply. You can then spend your Gold to buy different goods if you like.
The prices are printed on the card: any building material, Sheep or Donkey costs 1 Gold; a Wild boar or Dog costs 2 Gold; Cattle costs 3 Gold; Grain costs 1 Gold and a Vegetable costs 2 Gold.
Details On The "weekly Market" Action
You can only buy one token of each type per action.
You are not limited to spend only the 4 Gold you received. You can spend as many Gold coins as you have and wish.
You may spend fewer than 4 Gold. (You may even refuse to spend Gold at all).
You can buy animals and then immediately convert them into Food.
You get change if you cannot pay the exact amount with the coins you have.
4. Action Spaces For Animals
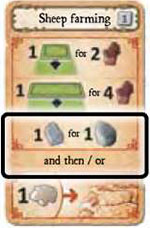
Action Spaces: Sheep Farming And Donkey Farming
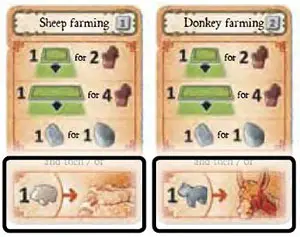
The "Sheep farming" and "Donkey farming" Action spaces become available in stages 1 and 2, respectively.
They accumulate Sheep and Donkeys, respectively. Before taking the animals, you can turn Meadows into Pastures and/or build exactly 1 Stable to make room for more animals. The exact details will follow.
You have to accommodate the Sheep and Donkeys on your Home board. (You may not place them in your personal supply, but you may convert them into Food).
There is no 'Wild boar farming' Action space. One way to get Wild boars is to build over the two preserves on your Home board. Also, there is no 'Cattle farming' Action space. You can get Cattle as well as Wild boars as loot from Expeditions (see page 21) or in exchange for Rubies (see page 17).
The Build Fences Action
Meadows can be fenced in to become Pastures on the "Sheep farming", "Donkey farming" and "Fence building" Action spaces.
When using one of these Action spaces, you can turn exactly one Meadow into a Small pasture and/or exactly two adjacent Meadows into a Large pasture. (Fenced in Meadows are called "Pastures"). Pastures can hold animals (see page 20).
You have to pay 2 Wood to fence in a single Meadow space. This space becomes a Small pasture. To indicate this, turn the Meadow tile to the other side.

Turn a Meadow tile to the other side when building fences.
If you have two adjacent Meadow spaces on your Home board, you can pay 4 Wood to turn them both into one Large pasture. To indicate this, place a "Large pasture" twin tile on top of these spaces. (Large pastures are printed on the back side of the Ore mine tiles).
You can place a Large pasture on top of two horizontally or vertically adjacent Meadow spaces.
Details On The "build Fences" Action
You cannot fence in Field or Forest spaces or any spaces in your Mountain.
Only Meadows can become Pastures. You cannot turn a Forest space into a Pasture directly.
Pastures are permanent. Once established, they cannot be combined or split up.
You may be able to build fences cheaper as a result of an Expedition (see appendix, page A2).
You can only build 1 Small and/or 1 Large pasture per action.
Tip for the "build Fences" Action
Before taking a "Build fences" action, you may spend 1 Ruby to buy a single "Meadow" tile and then turn this tile into a Small pasture with your "Build fences" action.
The Build Stables Action
You can build Stables on the "Sheep farming" and "Donkey farming" Action spaces.
Pay 1 Stone to build a Stable. You can place the Stable on any Forest, Meadow or Pasture space. Stables are permanent.
Once established, they cannot be moved or removed. You can only build 1 Stable per action. Like Pastures, Stables allow you to keep more animals.
Details On The "build Stables" Action
You cannot build Stables on Field spaces or on any spaces in your Mountain.
When you build a Stable on a Forest space, this space does not need to be adjacent to any of the landscape tiles on your Home board.
Each space on your Home board outside your Mountain can only have 1 Stable at most. (Large pastures cover 2 spaces on your Home board and can thus have up to 2 Stables).
You are limited to 3 Stables (in your color). You cannot build more than 3 Stables.
A Forest space with a Stable can later become a Meadow with Stable if you place a "Meadow" tile underneath the Stable. You cannot, however, place a Field on that space.
A Meadow space with a Stable can be fenced in to become a Small pasture, or a Large pasture if it is adjacent to another Meadow space.
Building a Stable on the water source or the Wild boar preserve in your Forest does not trigger the reward (see page 13). You have to place a tile on these spaces to get it.
Rules On Animal Husbandry
You may rearrange your animals on your Home board whenever and how often you like as long as you abide by the following rules.

Details On Animal Husbandry
You can fence in a Meadow space with Stable to get a Pasture with double its normal capacity.
Dogs can only watch Sheep; not Donkeys, Wild boars or Cattle. You cannot use a Dog to keep Sheep in a Pasture that also holds another type of Farm animal.
Dogs cannot watch Sheep on Forest spaces or Fields.
The 'Cave Farmers' has many more options to keep animals than its predecessor 'Agricola': Dogs wander around or can watch Sheep. A Stable in the Forest can hold a Wild boar, and a Mine a donkey.
Only Cattle follows the same rules in both games except for the Breakfast room. As a result, you will rearrange your animals more often to optimize the available room.
5. Action Spaces For Weapons
The Forge a weapon and Expedition actions
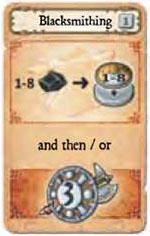
The "Blacksmithing" Action space with its "Forge a weapon" and "Level 3 expedition" actions will become available in stage 1. The "Adventure" Action space with its "Forge a weapon" and two "Level 1 expedition" actions will become available in stage 4.
Collect Ore in your personal supply so that one of your Dwarfs can then use it to forge a Weapon with a "Forge a weapon" action. Only an unarmed Dwarf can forge a Weapon.
When taking the "Forge a weapon" action, spend a number of Ore tokens but no more than 8 tokens and take a Weapon strength marker with a value equal to the number of Ore tokens spent. Place the Weapon strength marker on the Dwarf taking the action.
This Dwarf may immediately try out its new Weapon on an Expedition.

You can forge a Weapon for as little as 1 Ore.
6. Action Space: Starting Player
The Starting player token is not passed at the end of the round. In order to become Starting player, you have to use the "Starting player" action. (If no one does this, the Starting player token stays where it is).
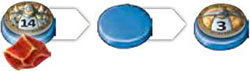
You do not only become Starting player on that Action space, but you also get all the Food tokens that have accumulated on it, as well as 2 Ore (in games with 1 to 3players) or 1 Ruby (in games with 4 to 7 players) on top of that.
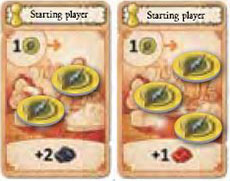
On top of the Starting player token and some Food, you will also get 2 Ore or 1 Ruby depending on the player count.
7. Action Spaces: Imitation

The "Imitation" Action spaces are available in games with at least 3 players. Imitation costs 0, 1, 2 or 4 Food depending on the Action space.
When using an "Imitation" action, pay the required Food into the general supply and choose an Action space that is currently occupied by an opponent's Dwarf.
You may use this Action space as if you had placed your Dwarf there. The only Action space that cannot be imitated is "Starting player".
Details On The "imitation" Action
Do not place your Dwarf on the Action space that you imitate. Your Dwarf stays on "Imitation".
When imitating an accumulating space, you do not get any of the accumulating goods as they have already been taken by your opponent.
You cannot imitate an Action space that is occupied by one of your own Dwarfs.
In games with 5 to 7 players, there are multiple "Imitation" Action spaces (see appendix, page A7) and they may all be used to imitate the same or different Action spaces.
Continue Reading