
Components
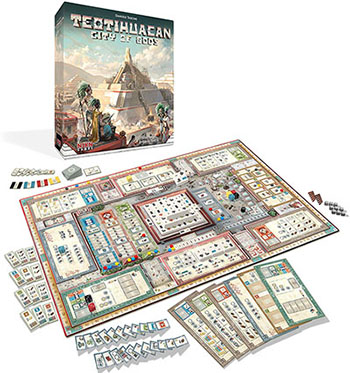
- Main Board
- 6 Action Boards
- 15 Decoration tiles
- 54 Discovery tiles
- 9 Technology tiles
- 18 Starting tiles
- 9 Royal tiles
- 7 Temple Bonus tiles
- 2 Calendar discs
- 11 Buildings
- 32 Pyramid tiles
- 4 Player Order tokens
- Player components in 4 colors
- Cocoa tokens
- 60 Resources
- 4 Multiplier tokens
Cocoa and the resources are meant to be unlimited. If they run out, use the multiplier tokens provided to show higher denominations.
Object of the Game
Players play as scions of powerful noble families trying to achieve everlasting glory while planning the construction of Teotihuacan.
Earn victory points in many ways: seek the favor of the gods, be the greatest architect of the pyramid, and have the most prestigious plots along the Avenue of the Dead! May the gods help you win!
Setup
Board Setup
-
Place the Main Board in the middle of the table.
-
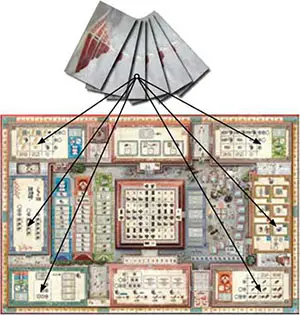
Shuffle the Action Boards numbered 2 to 7 and lay them out face up into spaces 2, 3,4, 5, 6, and 7 (covering up the printed Action Boards). Action Boards 1 and 8 are never covered by other Action Boards.
-
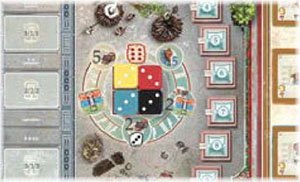
There are three categories of Royal tiles, marked with an A, B, or C in the top-left corner of the tiles. Randomly select 3 Royal tiles, one from each category, and place them face up on the indicated spots of the Palace (1) Action Board.
-
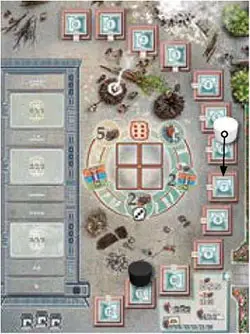
Randomly draw 6 Technology tiles and order them by the reference numbers printed in the top-right corner of the tiles. Place these tiles face up on the Alchemy (5) Action Board in ascending order, from left to right, beginning with the top row.

-
Randomly select 3 Temple Bonus tiles and place one on each temple's penultimate step.
-
Place the light Calendar disc on space 0 of the Calendar track. Place the dark Calendar disc on the Calendar track based on the player count:
- For 4 players: place on space 12.
- For 3 players: place on space 11.
- For 2 players: place on space 10.
-
Place a wooden Building on each space of the Buildings row on the Main Board, excluding the leftmost space.
-
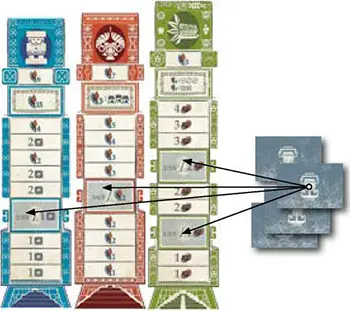
Shuffle all Decoration tiles and place them in a face-down pile on the Decorations (7) Action Board, then draw 4 Decoration tiles and place them face up on the indicated spaces of the Action Board.
-
Shuffle all Pyramid tiles and place them in several face-down piles next to the Construction (8) Action Board, then draw 3 Pyramid tiles and place them face up on the indicated spaces of the Action Board.

-
Next, draw Pyramid tiles randomly and place them on the Pyramid grid, to form the following patterns (in order: 2 players, 3 players, 4 players):
-
Shuffle all Discovery tiles and place them in several face-down piles next to the Main Board.
-
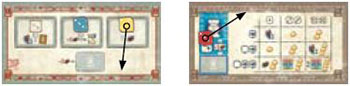
Draw 5 Discovery tiles and place them face up on the spaces near the Worship actions on the following Action Boards: Palace (1), Forest (2), Stone Quarry (3), Gold Deposits (4), Decorations (7).
-
Draw 6 Discovery tiles and place them face up on the spaces along the Avenue of the Dead: 3 on the first spot, 2 on the second, 1 on the third.
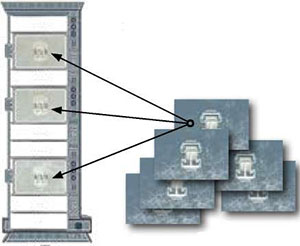
-
Draw more Discovery tiles and place them face up on the major steps of the temples, as indicated by the numbers on them: place a number of tiles equal to the first number for 2 players, second number for 3 players, and third number for 4 players.
Player Setup
-
Give each player a player color token of their choosing. Each player will use the workers (dice) of that color.
-
Randomly determine the first player. Give that player 1 cocoa and the "1" Player Order token.
-
Give the player sitting to the right (anticlockwise) of the first player 3 cocoa, and a Player Order token with a value equal to the number of players ("2" for a 2-player game, "3" for a 3-player game, "4" for a 4-player game). This token will from now on be referred to as the Last Player token.
-
Give every other player 2 cocoa, and Player Order tokens reflecting their positions in the player order (with the player sitting to the left of the first player receiving the "2", etc)..
-
Give each player all 12 colored discs matching their player color token. Each player should keep 6 of them to be used as Technology markers. Place the remaining 6 discs on the following locations:
- The 0 spot of the Pyramid track.
- The bottom of the Avenue of the Dead track.
- The bottom step of all 3 temples.
- The 0 Victory Points space on the score track.
-
If this is your first game:
Each player places one worker showing a power of 3 onto the Ascension wheel.
In addition to starting cocoa, players receive the following resources:
Player "2" receives: 5 cocoa, 4 wood, 1 stone and a single advance on the red E and the blue temples (which gives 1 Victory Point and a stone)..
In 3- and 4-player games: Player "3" receives: An advance on the Avenue of the Dead track, 4 cocoa, 3 wood, 4 stone, an advance on the blue temple (which provides an additional 1 gold)
In 4-player games: Player "4" receives: 2 wood , 5 gold, an advance on the green temple (which gives 1 more cocoa), a Technology marker on the 3rd lowest numbered Technology tile (which provides another advance on the green temple, which provides another cocoa).
The players should place the following starting workers in the general area of the indicated Action Boards.
-
If this is not your first game:
-
Each player places 1 worker showing a 3 onto the Ascension wheel, sets the other 3 workers to a starting power of 1, and places them next to their player color token.
-
Randomly deal 4 Starting tiles to each player. If any player receives Starting tiles with a Discovery
 icon on it, that player should now draw a random Discovery tile for each such icon.
 -
Each player simultaneously picks 2 Starting tiles, returning the other 2.
-
Each player gains all benefits of their chosen tiles:
Power-ups
 increase the starting power of one of their dice.
When receiving a Discovery tile
, claim the tile by paying its listed cost.When receiving temple advances


 gain the benefit of the temple immediately as normal. When receiving a Technology tile ?.|, place a marker on the Technology tile
  with the lowest reference number. No gold is spent, but the temple advance is still rewarded.
-
Finally, each player must place their starting workers onto the general area (see sidebox) of the Action Boards matching 3 unique Action Board numbers on their selected Starting tiles (no 2 dice belonging to the same player may start the game on the same Action Board).
-
-
In 2- and 3-player games only:
- In a 3-player game draw 2 Starting tiles and place 3 workers of an unused color on the first 3 (unique) Action Boards shown on the Starting tiles.
- In a 2-player game, repeat this process to place 3 workers of the second unused color.
- These "neutral" workers count as a different colored worker for all game purposes.
-
Return all Starting tiles (used and unused) to the game box.
All unclaimed Discovery tiles are shuffled back into the Discovery tile stacks.
Game Play
Starting with the first player, each player takes a turn as outlined below, then play proceeds clockwise, continuously. There are no phases and steps in Teotihuacan; each player simply resolves their turns one after another, until an Eclipse (scoring) is triggered.
On your turn you must choose one of the two options:
- Take a normal turn OR
- Unlock all of your locked workers for free.
After performing your chosen option, if you have the Last Player token, advance the light disc on the Calendar track by one. This might trigger an Eclipse.
Afterwards, proceed to the next player in clockwise order for their turn.
Taking a Normal Turn
If you are taking a normal turn, you must select exactly one of your unlocked workers and advance it by 1, 2, or 3 Action Boards in a clockwise direction.
Workers Locked and Unlocked
Workers can be locked or unlocked. A worker is locked if it is on a space with a thick border and a key inside (they are called Worship spaces).
Workers in the general area of an Action Board are all unlocked.
You may NOT move locked workers, but you may pay 3 cocoa to the supply at any time during a normal turn to unlock all of your locked workers.
Alternatively, you may select the "Unlock all of your locked workers for free" option during your turn instead. When unlocking a worker, slide it to the general area of the same Action Board.
Note: You may choose to pay 3 cocoa (or spend a full turn to unlock your workers for free) even if not all of your workers are locked.
After moving the worker, you must perform one of 3 possible actions on the Action Board your worker ends its movement on:
- Collect Cocoa
- Worship
- Perform Main action
Note: If you do not have an unlocked worker available, nor are you willing or able to pay to unlock them, you cannot take a normal turn; you must take the free unlock option instead.
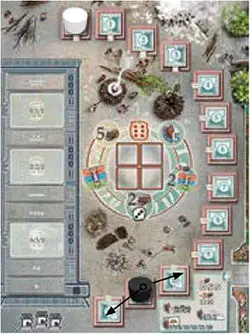
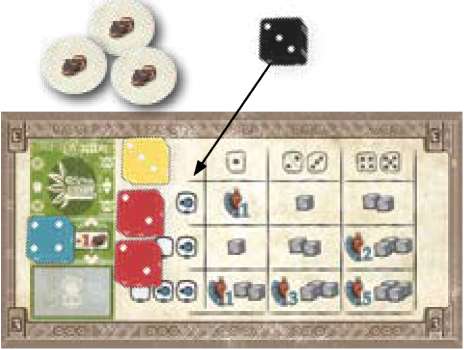
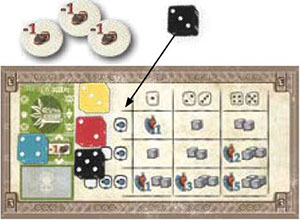
A. Collect Cocoa
You can take the Collect Cocoa action on any Action Board. Before placing your moved worker in the general area of the Action Board, count the number of different colored workers already present on the board (disregarding any locked worker in the Worship space).
You receive that much cocoa plus 1. Place the moved worker in the general area of the Action Board in question.
Example: Black moves a worker to the Stone Quarry (3) Action Board to take a Collect Cocoa action. There are 2 colors of unlocked workers present : Red and Yellow , so Black collects 3 cocoa. Neither the locked Blue worker nor the arriving Black worker are counted.
B. Worship
The Worship action can only be taken on the following Action Boards:
- Palace (1)
- Forest (2)
- Stone Quarry (3)
- Gold Deposits (4)
- Decorations (7)
The Palace (1) Action Board has 3 Royal tiles with one space each, while the other 4 Action Boards have a temple sidebar, each with one space.
-
Select a Worship space on the Action Board. If there is already a worker belonging to another player on the space, pay 1 cocoa to the general supply, and unlock that worker (move it to the general area of that Action Board). Then place your moved worker in the selected Worship space. You may not unlock your own workers this way!
-
Choose one of the following options:
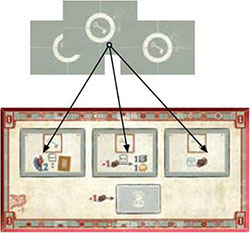
- Activate the Worship space ability OR
- Claim the Discovery tile near the Worship space by paying any costs depicted on the tile OR
- Pay 1 cocoa to choose both of these options, activated in any order.
Note: Any cocoa costs associated with unlocking another player's worker, or when choosing both options of a Worship space, must be paid before resolving any benefits associated with the Worship action.
In case of the following Action Boards: Forest (2), Stone Quarry (3), and Gold Deposits (4), advance one space on the temple shown.
In the case of the Decorations (7) Action Board, advance one space on a temple of your choice.
Exception: When placing your worker on the Palace (1) Action Board, you must choose one of the Royal tiles and activate its ability.
You may not choose to only claim the Discovery tile, though you may still pay the additional cost of 1 cocoa to both activate the ability and claim the tile.
-
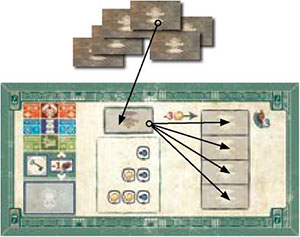
If you claimed a Discovery tile, draw a new one and place it face up in the claimed one's place.
Claiming Discovery Tile
You claim a Discovery tile by paying any resources printed in its top-left corner (if no resources are printed, the tile has no cost).
You have to pay the cost regardless of how the tile was obtained: from a Worship action or from advancing onto a major step of a temple or the Avenue of the Dead. If you are unable or unwilling to pay, you are not allowed to claim the tile.
After claiming, place the tile face up in front of you. If it is a mask, it will be scored during every remaining Eclipse.
Otherwise, you may flip it face down at any time during one of your turns (even immediately after claiming it, although you may keep it for later) to receive the benefit shown. Keep the face-down tiles in front of you, as they might matter during the final Eclipse.
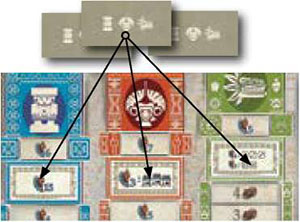
Advancing on the temples
When you advance on one of the three temples, move your marker up by one step.
If it is a minor step, immediately claim the reward shown on the step.
Note: The icon
means any resource (wood, gold, or stone).
If it is a major step, you may claim one of the Discovery tiles present on the step (if there are any present there) OR claim the reward shown on the step itself.
If it is the penultimate step, nothing happens, you simply qualify for the end-game scoring condition shown on the Temple Bonus tile on that step.
If it is the topmost step, claim the reward shown on the step. You still qualify for the end-game scoring condition.
Note: You may only advance onto the topmost step of the temple if no other player has a marker there. If for any reason you cannot advance further, you simply do not advance and do not gain any further benefit.


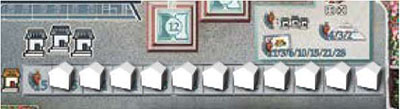
C. Perform Main Action
To perform the Main action of an Action Board, first count the number of different colored unlocked workers already present on the board (ignoring the arriving worker). You must pay this much cocoa before performing the Main action. If you cannot, you may not take the Main action.
Place the moved worker in the general area of the Action Board in question. Each Action Board has a different Main action, except the Palace (1), which does not have a Main action.
When counting how many workers you have on the Action Board, for purposes of resolving any of the Main actions, you are always limited to 3.
Therefore, even if you happen to have all 4 of your workers on the same Action Board when resolving a Main action, it still counts as having 3 workers. When counting workers for the action's effects, always include the worker you just placed there.
When taking a Main action, you must always resolve its effects, collecting or paying resources as necessary. You may not forfeit the effects of a Main action just to power up one of your workers.
Example: Black moves a worker to the Stone Quarry (3) Action Board to take a Main action there. There are 3 colors of unlocked workers present: Red, Yellow, and Black (one of Black's previously placed workers ), so the cost of the action is 3 cocoa.
The locked Blue worker does not count towards the action's cost.
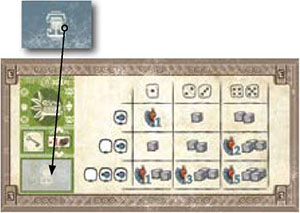
Description of the Main Actions
Click here for all detailed information about the main actions.
Ascension
Ascension triggers immediately when a worker reaches power 6 due to a power-up. When that happens, perform all of the following:
-
Advance your marker one step on the Avenue of the Dead track (thematically your worker gets a burial along the road), up to a maximum of 9.
-
Move the die representing the newly ascended worker to the Palace (1) Action Board (placing it in the general area), and reset it to a power of 1. This is a "new" worker now.
-
Select one of the rewards shown on the Ascension wheel:
- Score 5 Victory Points
- Gain 5 cocoa
- Advance your marker one step on one of the temples
- Pay 3 cocoa to advance your marker twice on temples (either once on two different temples, or twice on the same temple)
- If you have only 3 workers in play, gain your 4th worker (with a starting power of 3), placing it in the general area of the Palace (1) Action Board. Additionally, gain 2 cocoa.
-
Advance the light disc on the Calendar track by one. This might trigger an Eclipse.
Note: It is possible for more than 1 of your workers to Ascend on the same turn. If this happens, fully resolve the above procedure for each Ascended worker, but trigger an Eclipse only after you finish your turn, if applicable.
End of the Game
An Eclipse (a scoring) triggers after the light disc on the Calendar track reaches the space occupied by the dark disc. If any effect would move the light disc beyond the position occupied by the dark disc, stop the movement upon reaching the dark disc, and ignore any further movement.
If the light disc reached the dark disc space on the Last Player's turn, play one more full round (each player plays one more turn, including the Last Player), and then proceed to the scoring outlined below.
If the light disc reached the dark disc space on another player's turn (not the Last Player's turn), finish the current round (giving all players an equal number of turns), and then play another full round as described above, before proceeding to scoring.
Eclipse Scoring
During each Eclipse resolve the steps below:
-
Find the lowest visible number on the Buildings row on the Main Board. Each player scores that many Victory Points for each step they have moved up on the Avenue of the Dead.
-
The player (or players) furthest ahead on the Pyramid track scores 4 Victory Points.
-
Each player scores points for each step they have moved up on the Pyramid track:
- 4 Victory Points if this is the first Eclipse,
- 3 Victory Points if this is the second Eclipse,
- 2 Victory Points if this is the third Eclipse.
-
Reset the Pyramid track for all players, by moving all player markers to their starting position. This is the only track which resets after each Eclipse!
-
Each player organizes their masks into one or more sets, where each set is comprised of different masks. Then each set scores points, depending on the number of masks in that set:
Each set of 1/2/3/4/5/6/7 masks score 1/3/6/10/15/21/28 Victory Points.
-
Each player must now pay a salary of 1 cocoa per worker, and an additional cocoa for each worker with a power of 4 or 5. For each cocoa a player is unwilling or unable to pay, that player loses 3 Victory Points. If at any time this reduces a player's Victory Point total to 0, that player loses no more Victory Points.
-
If this is the first or second Eclipse, reset the light disc on the Calendar to its starting position, and adjust the dark disc based on the number of players:
-
2 players:
- First Eclipse: set to 9.
- Second Eclipse: set to 8.
- Additionally, draw 2 Starting tiles, and move the 3 workers of one of the unused colors onto the first 3 (different) Action Boards shown on the Starting tiles.
- Repeat this: Draw 2 more Starting tiles, and move the 3 workers of the other unused color onto the first 3 (different) Action Boards shown on the
-
3 players:
- First Eclipse: set to 10.
- Second Eclipse: set to 9.
- Additionally, draw 2 Starting tiles, and move the 3 workers of the unused color onto the first 3 (different) Action Boards shown on the Starting tiles.
-
4 players:
- First Eclipse: set to 11.
- Second Eclipse set to 10.
-
-
If this is the third Eclipse, or if this Eclipse was triggered by placing the final Pyramid tile, each player who has qualified for one or more Temple Bonus tiles (by being on the penultimate or topmost step of a temple) scores additional Victory Points based on any Bonus tiles they have reached.
After resolving the third Eclipse (or the Eclipse triggered by placing the final Pyramid tile) the game is over. The player with the most Victory Points is the winner.
In case of a tie, the tied player with the most cocoa remaining is the winner. If still tied, the tied player with the lower number on their Player Order token is the winner.
Continue Reading
