
Each player represents an African kingdom that strives to establish cultural dominance. This is done by placing craftsmen and erecting monuments. Both of these activities score victory points.
The number of victory points required to win the game depends on how many special abilities you choose to acquire: the stronger you want to be, the more points you will need to win.
The game is played in rounds, each one divided in 4 phases. In Phase I and II, players take turns. Phase III and IV are played very quickly.
Components
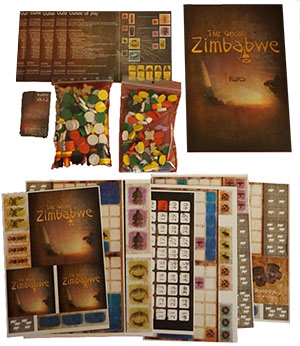
- 1 game box
- 1 rulebook
- 5 player aids
- 1 VP track
- 11 map tiles, of which 1 start tile
- 14 technology cards
- 12 god cards
- 5 specialist cards
- 16 Resource tiles: 3 diamonds, 3 ivory, 4 clay and 6 wood
- 8 Water tiles
- 42 Price markers in denominations of 1, 2 and 3 cattle
- 6 Plaques: 1 god plaque and 5 empire plaques in player colors
- 3 of each craftsman: ivory carver, throne maker, wood carver,
- sculptor, potter, vessel maker, diamond cutter
- 60 cattle: 30 silver, 30 gold
- 25 used markers (wooden cross)
- 22 wooden discs in each player color
- 2 wooden cubes in each player color
- 18 wooden shields in each player color
Setup
Creating the map: Take the central map area and place it in the middle of the table. Then, shuffle the other map tiles. Randomly select tiles and place them in a random orientation on the board in the pattern below, depending on the number of players.
Cards: Sort the technology cards into stacks by type, then order each stack with the cheapest one (least VR) on top. Place these stacks on the table next to the map. Place the specialist cards next to them.
Shuffle the god cards and randomly remove four of the gods. Put these back into the box. Place the rest of the gods next to the technology cards on the table. Place the turn and VP track on the table as well.
Stock: Place all the cattle in the common stock. Place the water markers, resource markers, and price markers within easy reach.
Player material: Give each player an overview of play, an empire plaque and the corresponding markers in his color. Empire plaques and player markers that are not used are returned to the box. Each player puts one cube on the "1" square of the VP track, and one cube on the order of play track. Give each player 3 cattle.
Determine the order of play: Each player hands in their VR marker (a round wooden marker). Shuffle these markers and draw them out one by one. Stack them on the VP track at square 20 in the order that you draw them, with the first one at the bottom.
Placing the first monument: Starting with the player whose marker is on top of the VR stack, and then going down the stack, in turn each player must place one of their monuments on one of the starting areas.
Game Play
The game is played in four phases. In Phase I and II players take turns. Phase III and IV are played very quickly. The phases are repeated until someone has won (see phase IV).
Phase I: The Generosity of Kings
In this phase, the order of play is determined. Each player gives away as much of their cattle as they can. The player who keeps giving the longest will have the highest status and move first in the next phase.
Clear The Slate
First, remove the turn order markers from the order of play track.
Order Of Plaques
Each player places his empire plaque on the table. The player with the most VR places his plaque in front, followed by the other players in descending VR order. If players are tied in VR, the owner of the bottom VR marker places his plaque first in the queue.
Bidding
Starting with the owner of the first player plaque and moving along the queue of plaques, each player now provides a gift, or passes. The first gift must be at least 1 cattle, and each subsequent gift must be at least 1 cattle larger than the previous gift. Each gift must be paid in full immediately.
Paying Your Gift.
The gift is paid out evenly to all plaques on the table. The first cattle of the gift is given to the leftmost plaque, the second to the second plaque, etc. If all plaques have received one cattle, the next cattle go to the leftmost plaque again, and so on. Each subsequent gift continues where the last one ended, so after the last plaque that received cattle. In this way the richest (leftmost) plaques will always contain at most 1 more cattle than the ones later in the queue.
Passing
If a player passes, he places his turn marker on the turn order track at the last spot that is still open.
End Of Phase
When all players except one have passed, they all take their own plaque and add all the cattle on it to their stock. The turn order track now shows the order of play for this turn.
Example.
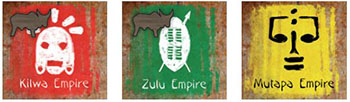
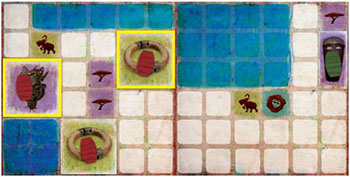
The Mutapa, Zulu and Kilwa empires are playing. Currently, the Kilwa need 23 VR to win, and the Mutapa and Zulu both need 21 VR. The Mutapa VR marker is on top of the Zulu marker.
The empire plaques are laid out in VR order: first the Kilwa, then the Zulu and finally the Mutapa. The Kilwa have to start the bidding, and decide to bid 2 cattle. These two cattle are placed on the Kilwa and Zulu plaques.
The Zulu bid 3 cattle next, the current minimum. Each of the empires plaques gets one of these cattle. The Mutapa are not that rich, and have to pass. They become third (and last) in the player order.
Next it's the Kilwa's turn again, and they have to bid at least 4 cattle. They decide to bid all 5 cattle they have left. This is distributed starting at the Mutapa plaque, so the Mutapa and Kilwa plaques get 2 cattle each, while the Zulu plaque gets only 1 cattle. The Zulu decide to pass, and become second in the turn order. The Kilwa are the last ones left, and automatically become first.
Now the cattle on the plaques are taken by each empire: the Kilwa get the 4 cattle on their plaque, and the Zulu and Mutapa each get 3 cattle from their plaques.

Phase II: Religion and Culture
In this phase, each player takes a turn following the order of play determined in phase I. During their turn, the player may do the following, in no particular order:
- Either choose a god or choose a specialist. You may only perform ONE of these two actions in a turn.
- Use a specialist.
- Either build a monument, place craftsmen, or raise monuments. You may only perform only ONE of these three actions.
Choosing A God
If the player does not have a god the player may choose a god by taking the card of that god and placing it in front of him. The player then adjusts his VR marker according to the modifier printed on the card. It is not allowed to choose a God that would take your VR over 40 points.
Each God provides certain advantages. These can be used immediately upon choosing a god. Most African cultures were monotheistic, and you are only allowed to choose ONE god in the course of a game.
You cannot change this choice later on, nor can you add more gods. See the list at the end of the rules for details on the god's advantages. You may not choose a god and a specialist in the same turn.
Choosing A Specialist
A player may choose a specialist by selecting the card from those that are still available and placing the card of that specialist in front of him. The player then adjusts his VR marker according to the modifier printed on the card.
It is not allowed to choose a specialist that would take your VR over 40 points. If you choose a specialist, you must pay and use the specialist that turn. You may have any number of specialists, but you cannot choose more than one per turn. You may not choose a god and a specialist in the same turn.
Using A Specialist
To use a specialist, the player places the required amount of cattle on the specialist. The specialist then performs his action. A player can only use a specialist that he himself possesses. Each specialist can be used only once per turn.
-

The Shaman
The shaman place one resource tile (ivory, wood, clay, or diamond) on an empty area on the board. Resources can be placed on any empty land area, but not on an area that contains water, a monument, another resource, a starting area, a craftsman, or a used cube.
If you pay the shaman, you must place a resource. If the resource tiles run out, you can no longer use the shaman.
-

The Rain Ceremony
The rain ceremony place one water area (2x1) on an empty area on the board. Water can be placed on any empty land area, but not on an area that contains water, a monument, a resource, a starting area, a craftsman, or a used cube.
If you pay the rain ceremony, you must place a water tile. If the water tiles run out, you can no longer use the rain ceremony.
-
The Nomads

You may ignore zoning restrictions for placing your new monuments this turn. This means you may place the new monument on any empty land area, even right next to another monument. You may pay the nomads and choose not to place a monument this turn.
This can be relevant if you want to choose the nomads in a turn where you are not placing a monument.
-

The Herd
You may place 2, 4 or 6 cattle on the herd. In return, you will get an additional 1, 2, or 3 cattle on the card from the common stock . You will collect all of these cattle in the revenue phase.
-
The Builder

For each craftsman you build during this round, place the first two cattle of the building price on the builder card. You will get this cattle back during the revenue phase.
Note that you must pay the builder 2 cattle before you can use his abilities, so the total amount of cattle required this turn will be higher; but you will get (some) cattle back at the end of the turn.
You may pay a builder and choose not to build anything. This can be relevant if you want to choose the builder in a turn in which you are not building.
Building A Monument
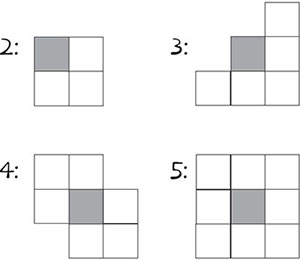
You may place one new monument of level one on any empty area on the board. An empty area is an area that does not contain water, a resource, a craftsman, a starting area, or another monument.
As a zoning restriction, the new monument may not be placed adjacent (horizontally, vertically, or diagonally) to a monument already on the board. Gain a point on the victory track for the new monument.
Placing A Craftsman
You may place any number of craftsmen in the same turn, provided all of the prerequisites are met regarding the technology, location, availability of input resources, limited number of craftsmen, and costs. Secondary craftsmen have some special rules. After placing craftsmen, you may set and/or raise prices.

Technology
In order to place a craftsman, a player must own the matching technology card. If a player does not have the right technology, he can take any available technology card and place it in front of him. The player then adjusts his VR marker according to the modifier printed on the card.
A player may take more than one technology card in a turn. It is not allowed to take a technology card without building at least one of the corresponding craftsmen.
It is also not allowed to take a technology card that would take your VR over 40 points. Note that each technology is only available twice and the second card is more expensive in VR terms. It is not allowed to take the second card of a technology you already own.
Location
The craftsman requires 2 or 4 empty spaces, depending on the form of the craftsman tile. Place the craftsman tile on the board, and put one of your ownership markers on top.
Available Input Resources
Each craftsman requires one type of resource as printed on the technology card. A craftsman may only be placed if he can reach at least one resource of the required type which is not yet in range of another craftsman of the same type. A craftsman has range 3 to reach resources. You may not use hubs to increase this range.
Only 3 Craftsmen Per Type
There are only 3 of each type of craftsman; if they have all been placed, no more are available.
Costs
Each craftsman has a cost printed on the technology card. This cost in heads of cattle must be paid to the common stock for each craftsman placed.
Victory Points
For each craftsman placed, a player advances 1, 2 or 3 points on the victory track as indicated by the number of laurel wreaths on the technology card.
Building Secondary Craftsmen

Secondary craftsmen may only be built if they can reach at least one primary craftsman of the required type (potter for vessel maker; wood carver for sculptor; ivory carver for throne maker).
They can reach the primary craftsman if it is either in range 3, or if it is in range of a hub that is in range. You do not have to pay for using hubs when building a craftsman. All other restrictions to placing a craftsman still apply.
In addition, it is not allowed to build both the first primary craftsman and the corresponding secondary craftsman in the same player's turn. For instance, you are not allowed to build both the first ivory carver and the first throne maker in the same turn. Another player may build the throne maker in the same phase though.
It is allowed to build a secondary craftsman such that he uses the same resource as the primary craftsman he depends on. In some circumstances, this may mean that it is impossible to use either of the craftsmen for upgrading a monument.
Setting Prices
If a player has acquired a new technology card this turn, he must set the price of the new type of ritual good. The price may be set at 1, 2 or 3 heads of cattle. This is indicated by placing the corresponding price marker on the card.
Raising Prices
After taking a place craftsmen action, a player may raise any or all of the prices of previously owned technologies. Prices can be raised to 2 or 3 heads of cattle by placing the corresponding price marker on the card. Prices can only be raised, not lowered.
You may raise prices even if you have not placed any craftsmen during your action. In other words, you may take a place craftsman action just to raise prices. You may not raise prices at any other time.
Example
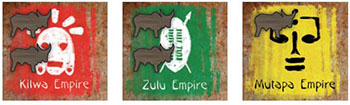
It's the Kilwa's turn, and they decide to place craftsmen. They already own an ivory carver on the map.
The Kilwa want to build an extra ivory carver next to the big water. They already own the required technology card. They pay 2 cattle to the common stock as building cost, and score 1 victory point.
Note that this build is legal, since the rightmost ivory resource could not be reached by the existing ivory carver. The Kilwa decide to leave the price of ivory carvings at 1 cattle.
Next, the Kilwa want to build a sculptor as well. They take the required technology card, adding the indicated 3 VR to their victory requirement. They pay 4 cattle to the common stock, and score another 2 victory points. The Kilwa set the price of sculptures at 2 cattle.
Raising Monuments
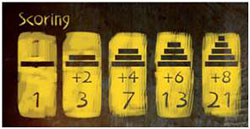
A player may raise one or more of his existing monuments. This scores victory points as indicated on the point overview chart. Each monument may only be raised by one level each turn. A monument of level 5 can not be raised further.
To raise a monument, a player must provide the correct combination of ritual goods. These are bought from craftsmen in range of the monument being raised. The player then adjusts his victory points on the track according to the current level of his monuments.
Required Ritual Goods
The number of ritual goods required is equal to the level of the monument at the start of the action. So, to raise a level one monument (to level two), you need one ritual good. To raise a level three monument (to level four) requires three ritual goods.
These goods all need to be different. It is not allowed to use the same type of ritual good twice.
Secondary Vs. Primary Ritual Goods
As soon as there is a secondary craftsman of a certain type on the board, the corresponding primary ritual good can no longer be used for rituals. For example, as soon as a throne maker is present, you may no longer use carved ivory in a ritual.
Obtaining Ritual Goods
A player needs to obtain the ritual goods by buying them from craftsmen in range (possibly using hubs). Each ritual good has to be paid for with cattle. The player raising monuments pays from his personal stock to the technology card that corresponds with the craftsman he uses (and belongs to the player who built the craftsman).
The price per good (1-3) is indicated by the price marker on the technology card. If you use your own craftsman, you still have to pay (to your own technology card).
Resource Use
For each ritual good he produces, a craftsman depletes a resource. Place one used marker on a resource in range of the craftsman. If there are no more available resources, the craftsman cannot produce any more ritual goods. Note that you may not use hubs to extend the reach of a craftsman when connecting to resources.
Using Secondary Craftsmen
To use a secondary craftsman, you must both pay the secondary craftsman and provide a primary ritual good to the secondary craftsman. To do so, you must reach and pay a primary craftsman of the corresponding type.
The primary craftsman must be in range of the secondary craftsman. You may use hubs to transport the primary ritual good. Both craftsmen use a resource (within range 3 of craftsman tile, no hubs allowed) and place a used marker on it.
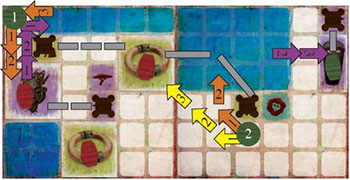
Example
The Zulu want to raise their monuments. They currently have two monuments on the map: one of level 1, and one of level 2. The price of ivory carvings is still low at 1 cattle, and sculptures cost 2 cattle each.
The Zulu decide to raise their level 2 monument with two ritual goods. For the first good, an ivory carving is used. The craftsman is in range of the monument as shown by the yellow arrows, so the Zulu player has only to pay the Kilwa ivory carver technology card (1 cattle).
The second ritual good needs to be a sculpture. Unfortunately, the sculptor craftsman is not in direct range, and can only be reached by using the top left monument as a hub, as shown by the orange arrows. To add pain to injury, the sculptor cannot reach the wood carver directly either, and again the top left monument needs to be used as a hub, as shown by the purple arrows.
The total cost for the sculpture is 5 cattle: 2 cattle for the double use of the hub is paid to the common stock, 2 cattle is paid to Kilwa's sculptor technology card, and 1 cattle is paid to the Zulu's own wood carver technology card. All together, this uses up two wood resources and an ivory resource.
To raise the level 1 monument, only one ritual goods are required. Using the water, the ivory carver is again in range, so the Zulu only have to pay 1 cattle to the Kilwa technology card and mark one of the ivory resources with a used marker on the map.
Finally, the Zulu add the 6 gained victory points to their VP total: 2 VP are gained for raising the level 1 monument a step, and 4 VP for raising the level 2 monument.
Phase III: Revenues
In this phase, all players play simultaneously.
Collect Payments
Players take all of the cattle on their technology cards, specialists and god in front of them and add these to their stock.
Collect Income
Each player collects 1 to 5 cattle as income. The amount is determined by the highest monument they have on the board. For each level in this monument, the player gains 1 cattle. The number of monuments a player has built is irrelevant for income determination.
Phase IV: Let us Compare Mythologies
This phase is used to determine if someone has won the game.
Victory Condition
If at least one player has collected victory points equal or higher to his VR, the game ends immediately. If there is only one player who has achieved this, he wins the game.
Tie Breaker.
If multiple players have achieved their VR level, the player among them who overshoots his VR requirement by the most points wins.
If this is equal as well, the tied player who has the most points in total wins. If even this is equal, the tied player who stands first in the order of play wins.
Clear Used Markers
If there is no winner, remove all the used markers from the board and play another round.
Continue Reading
