
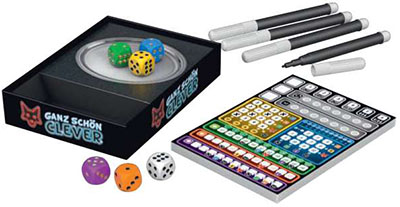
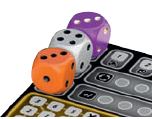
Components
- 1 Scoring Pad
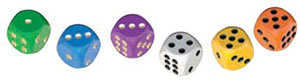
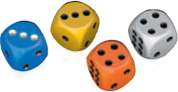
- 6 Dice
- 4 Felt Pens
Object of the Game
By skillfully using the dice in the five colored areas, the players try to score as many points as possible on their own game sheet.
The dice should be cleverly chosen in order to have sufficient options for subsequent rolls. It is also important to pay attention to the rolls of the other players. If you have the most points after a certain number of turns you win.
Setup
Each player receives a game sheet and a pen. The smartest among them takes the six dice and starts the game.
Game Play
The game is played over four rounds (4 players), five rounds (3 players) and six rounds (1 and 2 player).
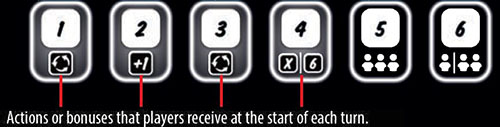
At the start of each of the first four rounds, each player gets one bonus, as shown on the round tracker on the score sheet. Players choose one of the two options in round 4.
The Active Player
The player who currently has the dice is the Active Player. He rolls once with all six dice and chooses one die, placing it on one of his three dice fields without changing the number rolled on the die.
Depending on the color of the dice rolled, the player must now enter the value in the area of that color or tick the corresponding number on his sheet (see The Game Sheet).
The white die is a joker die, and can be used to represent any color on the player sheet.

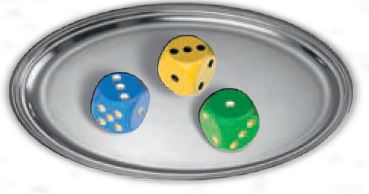
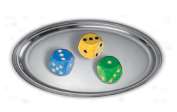
The player then places all dice that show a lower value than the currently selected die onto the silver tray printed in the box.
If a player chooses the lowest die, no die is placed on the silver tray. Dice on the silver tray can no longer be used by the active player.
With the remaining dice the player now rolls a second time. He again chooses a die, places it on a free dice box without changing the rolled value , a n d enters its value in the matching color area on his game sheet. All dice that show a lower value than the current one are placed on the silver tray.
The player then rolls a third time with the remaining dice not on the silver tray and executes the actions described above one last time. Then he places ALL remaining dice that are not on his game sheet onto the silver tray.
Important: If the active player chooses the high value dice too early in his turn, he may have no dice left for subsequent rolls (since all remaining dice are already on the silver tray).
In this situation , the active player would perform less than three throws. Of course, it is best to avoid this situation.
Example Of Play:
-
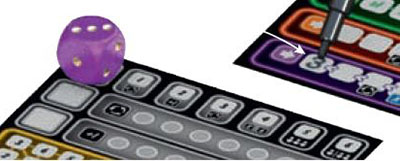
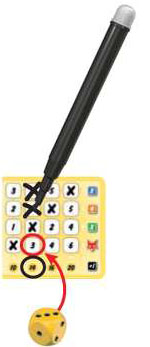
Lucas is the active player and rolls all six dice at the beginning of his turn:
-
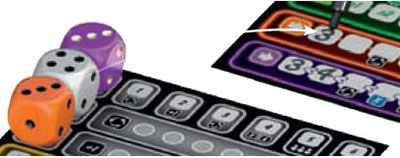
He chooses the purple die, places it on a free dice box and enters "3" in the purple area of his playing sheet:
-
Lucas places all dice with values of less than 3 on the silver tray:

-
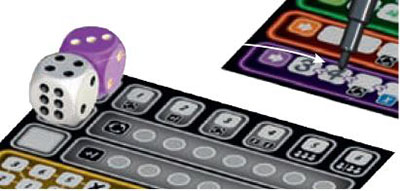
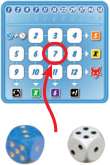
Lucas rolls his second turn with the remaining four dice:
-
He chooses the white 4-Joker, places it on a free dice box, and chooses to write "4" in the purple area:
-
He places all dice with values of less than 4 on the silver tray:
-
For his third throw Lucas has only the orange die remaining. He rolls a 3 and places it on the last free dice box. He then enters the number in the orange range of his playing sheet.
The Passive Players
Once the active player has placed three dice on his game board or can no longer roll any dice, because all remaining dice are on the silver tray, is it the turn pf the other players. These are referred to below as passive players.
All passive players now get to use the dice set aside on the silver tray. Of these dice, each player must select a die and record it on his game sheet ( in the appropriate color area).
All passive players choose a die simultaneously. The dice , however, remain on the silver tray and are not removed by the passive players when they are used. Thus, several players can choose the same die.
Once all passive players have chosen and recorded a die value on their game sheet, the player to the left of the active player is the next active player.
He now gets all six dice, rolls them and then performs the actions described above.
The round is over when each player has been the active player once.
The Game Sheet
In the five colored areas players can record dice numbers in the corresponding colored area. For each die, you can always mark off exactly one box or write a number in a box (not both).
Three areas (green, orange and purple) show an arrow on the left. This means that you must start marking off boxes or recording numbers in these three lines at the left-hand side.
These must be filled in sequentially without leaving any boxes unfilled.
In the two areas without an arrow (yellow and blue) the corresponding number can be marked, no matter where it is located.
 The White Die
The white die is a color joker and can be used as a yellow, green, orange or purple die.
Alternatively it can be added to the value showing on the blue die and recorded in the blue area (see The Blue Die).
 The Yellow Die
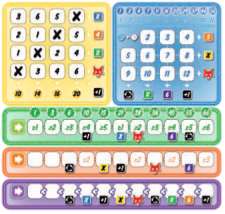
The yellow die must be entered by the player in the yellow area. For this he simply marks off the number rolled on the die in this area.
Each number occurs twice, but only one of the two may be marked per die roll. In this area, the numbers can be marked off in any order.
Once a column has been marked off completely, the player circles the black number in the star below the column. These are his points scored. The bonuses to the right of the line will be explained later.
Endgame Scoring: All circled numbers are added.
 The Blue Die
In this area, the numbers (as in the yellow area) can be marked off in any order. If the player chooses the blue die, he adds the current value of the white die to the blue die (no matter where the white die is).
The same applies vice versa: If the player decides to use the white die for the blue area, he adds the current value of the blue die to the white die!
It does not matter where the other (blue/white) die is currently located: whether it is on the silver tray, is already on one ofthe three dice boxes or is has not yet been selected by the player this turn.
This rule applies to all players (active and passive): If you are allowed to use one of these two dice correctly, then the value of the other die is used to create the sum. The player is not allowed to take the value of just one of the two dice.
If the active player chooses the blue die on one roll and the white die on a subsequent roll they could potentially fill in two blue area boxes in one turn.

Endgame Scoring: All players count how many marks they have recorded in the blue area. The point scale at the top of the blue area indicates how many points (white number in the star) the players get per marks (blue number). For four marks there are e.g. seven points and for nine marks, thirty-seven points.
 The Green Die
The number on the green die must be used in the green area, marked off from left to right. Players must start at the leftmost space, and proceed to the right, not skipping any spaces.
The green die value must always be at least as high as the specified value in the respective box, in order for it to be used.
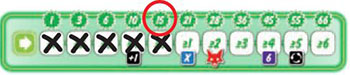
If the green die value is too low, this die cannot be selected during this turn.
Endgame Scoring: The white number in the star above the last marked box indicates the score. In this example, the player gets fifteen points.
 The Orange Dice
The orange die value is recorded in the orange area of the player's game sheet, beginning in the first box on the left.
Subsequently, the remaining boxes must be filled in sequentially from left to right without skipping any box. There are no restrictions on the die value that can be entered into the box.
However, there are four special fields (x2 and x3) that allow the player to record a value higher than the rolled value in the box. To fill in this box, he multiplies the number of points by this factor and then immediately enters the result. E.g. For a "x2" box a roll of 6 would be recorded as 6x2=12.
All entered numbers are added. In the example on the right, the player gets 5+2+3+12 =22 points.

 The Purple Die
The purple die value is recorded in the purple area of the player's game sheet, beginning in the first box on the left. Subsequently, the remaining boxes must be filled in sequentially from left to right, without skipping any boxes.
Any number can be recorded in the first box, but in the subsequent fields, the player may only record a number that is greater than the value in the box to the left of it. E.g. If a player records a 2 in the leftmost box, then only a 3, 4, 5, or 6 may be recorded in the next box.

Exception: Any number may be recorded if a 6 is in the box immediately to the left of it!
Endgame Scoring: All recorded numbers are added. In this example, the player scores 2+5+6+3=16 points.
Special Case
If a passive player has no opportunity to use a die from the silver tray,he may use one die from the active player's dice boxes. However, if the passive player can use a die from the silver tray, then he must do so.
If the active player cannot use any dice from his roll (E.g. He only has a purple die for his last roll, and the rolled value is too low to be usable, then tough luck for the active player).
Bonuses
The players can earn bonuses. These are either directly below a field (in green, orange and purple areas) or at the end of a row or column (yellow and blue areas).

As soon as a box with an X-Bonus is filled in (with a number or crossed off) the player receives the corresponding bonus. The player must then cross off a box in the corresponding color range. This can be any box in the blue and yellow range, and the next available box in the green area. The bonus cannot be saved for later and must be used immediately.
 The black X-bonus at the beginning of round 4 can be used to fill in a yellow, blue or green box as described above.

A number with a purple or orange background indicates that a player can immediately record that number in the next available space in the corresponding area. This bonus cannot be saved for later and must be used immediately.
 The black 6-bonus available at the start of round 4 can be used to fill in a 6 on either the orange or purple row.
Bonuses are also earned when a player marks the last box in row (in blue or yellow areas) or a column ( in the blue areas). He must then immediately apply the bonus (shown to the right of the applicable row or below the applicable column).
Bonuses can be chained if another bonus is triggered by the application of a previous bonus. All such triggered bonuses must be executed immediately.
Bonus Summary:
Bonus on box = Applied immediately upon filling in the applicable box.
Bonus at end of line or column = Only applied if all boxes in applicable row or column filled.
 Foxes
Foxes
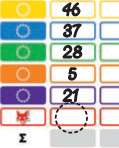
Players receive extra points at game end for foxes. Each activated fox will score the player as many points as his lowest scoring colored area.
Example: Given the colored area scores shown on the right, each activated fox will score the player five points (The number of points of the lowest scoring area - in this case, orange).
Important: If a player scores zero points in one or more of his color areas, each fox is worth zero points.
The player receives the corresponding bonus. The player box in the corresponding color range. This can be any box in the blue and yellow r;
Actions
There are two action bars whose boxes are unlocked during the game. These actions may be used immediately after unlocking, on the same turn, or in a later turn.
For some boxes, column ends, the yellow diagonal, and the round indicator (rounds one to three only) there are additional actions. Whenever a player marks a box that activates an action, he circles the next available corresponding box in the action bar on his game sheet.
Example: The player records a number in the third purple box and then immediately circles around a box in the corresponding action bar. This action is unlocked for use.
If a player uses an unlocked action, he must cross out the appropriate field. A player can perform as many actions as he wants during his turn, as long as he still has actions available.
 Re-roll Action
This action can only be used by the active player. If he does not like his roll, he may spend this action to re-roll all of his dice, except those on the silver tray. He must re-roll all of his available dice. He cannot choose to roll only some of them.
 Extra Die Action
Using this action, an extra die can be selected. This action can only be used by a player at the end of a turn. E.g. After the active player has recorded all of his dice values, or after a passive player has chosen a die from the silver tray.
The player can choose any of the six dice, even a die that the active player has taken, or that the player has already used himself!
The player can use multiple additional die actions in a turn, but he can only use each die once only in that turn, no matter how many Extra Die actions he uses.
Example: The active player has chosen three dice and placed them on his game sheet. He still has two Extra Die actions remaining.
For one action he chooses the white die again and records a yellow 4. Choosing the white die again (for example, as green 4), with the second action is not possible this turn.
However, he can choose the blue die and, together with the white die, mark a 7 in blue (blue 3 + white 4 = 7).
End of the Game
The game ends after the last active player has finished his turn in the last round, and the passive players have recorded their dice values from the silver tray. Each player then has the opportunity to use any remaining Additional Die actions. All other dice actions expire and cannot be used.
One of the player is selected to tally the individual color area scores for each players on the back of his game sheet . In addition, he multiplies the number of foxes for each player by the points of their color range with the lowest score and enters the resulting value in the corresponding field.
Now the points per player are added up. Whoever has the most total points, wins.
In a tie, the player with the highest score in a range wins. If there is still no clear winner, those players share victory.
Continue Reading
