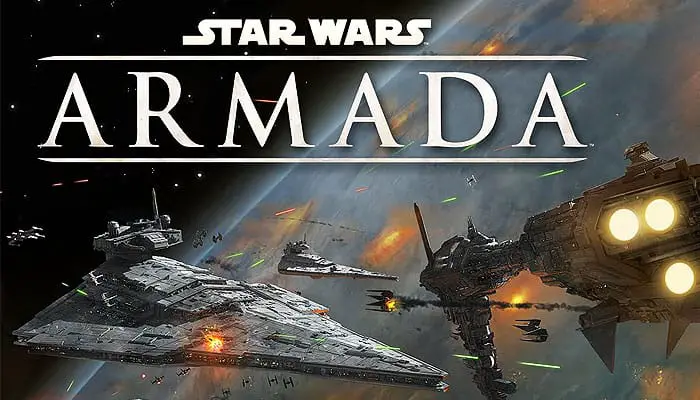
Star Wars: Armada is a competitive game of space warfare for two players. In each game, players take on the roles of Rebel and Imperial admirals, directing their fleets and countless weapons into explosive conflict. The victorious admiral will send the fiery remnants of his opponent's fleet limping into hyperspace to beg forgiveness for their failure.
Components
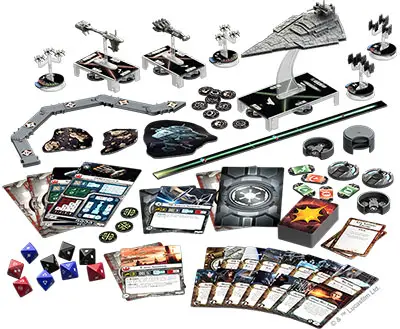
- 3 Ships
- 10 Squadrons
- 3 Ship Tokens
- 10 Squadron Disks
- 9 Attack Dice
- 10 Activation Sliders
- 6 Command Dials
- 3 Speed Dials
- 4 Squadro Cards
- 12 Objective Cards
- 4 Reference Cards
- 6 Ship Cards
- 52 Damage Cards
- 18 Upgrade Cards
- 1 Initiative Token
- 6 Obstacle Tokens
- 4 Setup Area Markers
- 13 Defense Tokens
- 12 Shield Dials with 12 Command Tokens
- 12 Plastic Connectors
- 10 Victory Tokens (Rebel on front, Imperial on back)
- 1 Maneuver Tool
- 1 Range Ruler
- 7 Objective Tokens
- 6 Ship ID Tokens
- 6 Round Tokens
- 2 Main Flagship ID Tokens
- 4 Flagship ID Tokens
- 20 Squadron ID Tokens
For Your First Game

For the first game of Star Wars: Armada, players are encouraged to play the learning scenario. This scenario is designed for new players to quickly set up and play a game using only the essential components and rules.
Before players begin the learning scenario, they must understand the basic rules presented. To play the learning scenario, set up the game by following the "Learning Scenario Setup" instructions.
After players have a better understanding of the gameplay concepts in Star Wars: Armada, they will be ready to build their own fleets and incorporate the additional game concepts described in "Expanded Rules".
Ships And Squadrons
Throughout this rules, the term "ship" refers to a fully assembled ship, complete with plastic ship model, pegs or fins, base, and ship token. The term "squadron" refers to a fully assembled fighter squadron, complete with plastic fighters, tree and support pegs, base, activation slider, and squadron disk.
Ships and squadrons are controlled by a player; therefore, when a ship or squadron is instructed to move, discard tokens, roll dice, etc., the player who controls that ship or squadron resolves those actions on its behalf.
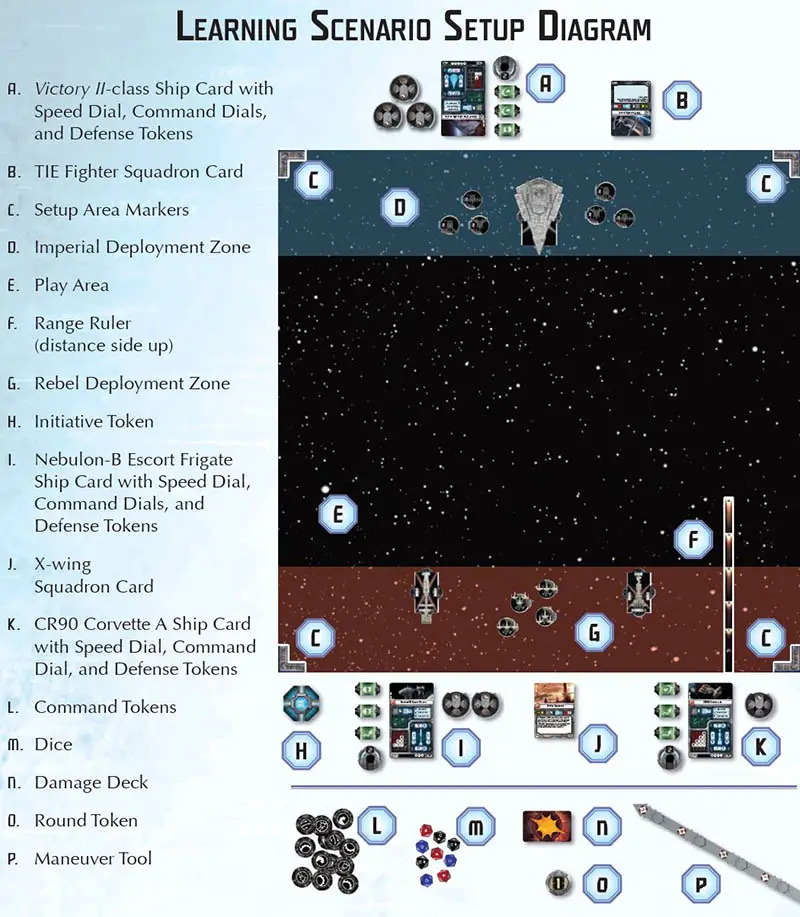
Learning Scenario Setup
-
Establish Play Area: On a flat, stable surface such as a table, establish a 3' x 3' play area. Use the setup area markers to denote the corners of this area. Players will set up on opposite edges of this play area.
-
Choose Faction: Each player chooses a faction, either the Rebels or the Imperials. If both players wish to control the same faction, assign factions randomly.
-
Place Initiative Token: The Rebel player has initiative. He places the initiative token next to his edge of the play area with the blue side faceup displaying the a
 icon.
icon. -
Prepare Ship and Squadron Cards: The Rebel player gathers the following ship and squadron cards and places them next to his edge of the play area: CR90 Corvette A, Nebulon-B Escort Frigate, X-wing Squadron. The Imperial player does the same with these cards: Victory II-class Star Destroyer, TIE Fighter Squadron.
-
Construct Ships and Squadrons: Each player gathers the ship tokens that match his ship cards and constructs his ships. Then each player constructs his squadrons as shown in the "Squadron Assembly" diagram.
-

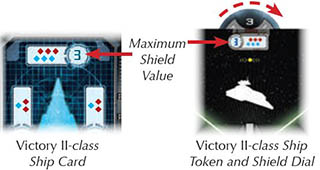
Prepare Ships: For each ship, place a speed dial set to "2" near that ship's card. Then set all four of its shield dials to the maximum values shown on its ship card. Then place one command dial near the CR90 Corvette A ship card, two command dials near the Nebulon-B Escort Frigate ship card, and three command dials near the Victory II-class ship card.
-
Prepare Squadrons: Rotate each squadron's disk to point to the maximum number on the disk and set each activation slider to display the blue side.
-
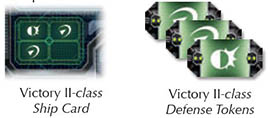
Place Defense Tokens: Place the defense tokens indicated on each ship card next to that ship card.
-
Place Ships and Squadrons: Each player places all of his ships and squadrons in the play area as close as possible to the positions shown in the diagram below, using the range ruler to guide their placement.
-
Prepare Shared Components: Place the range ruler, dice, and the round token marked "1" next to the play area. Shuffle the damage cards and place them facedown next to the play area.
+Create the Supply: Place the command tokens to the side of the play area.
Object of the Game
Star Wars: Armada is a competitive game in which each player controls a fleet of ships and squadrons. By commanding, attacking, and maneuvering with their ships and squadrons, they damage and destroy each other's fleet.
The goal is to destroy as much of the opposing fleet's force as possible by the end of the sixth round. The game ends immediately if all of one player's ships are destroyed.
Game Play
Star Wars: Armada is played over six rounds. Each round consists of the following phases:
- Command Phase: Players assign command dials to each of their ships.
- Ship Phase: Players take turns attacking with and moving each of their ships.
- Squadron Phase: Players take turns attacking with or moving their squadrons.
- Status Phase: Players ready all of their defense tokens and flip over the initiative token.
At the end of the Status Phase, the player with the initiative token places the next highest round token next to the play area. Then the next round begins. Players continue playing the game until either one fleet destroys all of the other fleet's ships or the sixth round ends.
Phase 1: Command Phase
During this phase, players secretly and simultaneously use their command dials to choose commands for each of their ships. When revealed, each command provides that ship with a powerful bonus.
To choose a command, rotate the command dial so that the desired command icon is framed by the dial's fastener. Then place that command dial facedown next to the ship's ship card, placing it under any other command dials already assigned to that ship.
Since command dials are placed facedown, each player can secretly plan his strategy and keep his commands hidden from his opponent. The effects of each command are briefly described in the "Commands" sidebar.
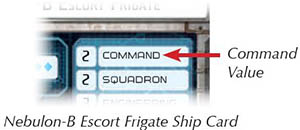
During the first Command Phase, the players must assign command dials to their ships so that each ship has a number of command dials equal to its command value. The Rebel player must choose one command for hisCR90 and two commands for his Nebulon-B. The Imperial player must choose three commands for his Victory-class Star Destroyer.
During the Command Phase of each subsequent round, players choose on [y one command for each of their ships because each ship reveals only one dial during the Ship Phase. Since newly chosen commands are placed under existing commands, the players are often planning for future rounds.
When both players finish choosing commands for their ships, they proceed to the Ship Phase.
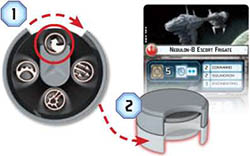
Choosing Commands
1. The Rebel player chooses acommand for his Nebulon-B Escort Frigate by taking one of the ship's unassigned command dials and rotating the disk so that the fastener frames the
2Then the Rebel player assigns the command dial to the Nebulon-B Escort Frigate by placing it next to the Nebulon- B's ship card. Since the Nebulon-B already has one command assigned to it, he must place the new
Commands
Commands assist ships in numerous ways. A brief overview is presented below:
Navigate: Change speed and increase maneuverability.
Squadron: Order nearby squadrons to move and attack early.
Repair: Recover shields and hull damage.
Concentrate Fire: Increase the power of one attack.
During the first round of the learning scenario, players might not know the game well enough to strategically choose commands.
If this is the case, they can use the following suggested commands by assigning them in the order presented so that the last command listed for each ship is on the bottom of its stack.
CR90 Corvette: Repair
Nebulon-B: Navigate M , Squadron
Victory II-class: Repair
, Navigate


Phase 2: Ship Phase
During this phase, players take turns activating their ships.
The phase starts with the player who has initiative. He chooses one of his ships and activates it by performing the following steps in order:
- Reveal Command Dial
- Attack
- Execute Maneuver
After the ship finishes its activation, the revealed dial is placed faceup on the ship's ship card; a faceup command dial on a ship card indicates that the ship has activated this round. Then the opposing player activates one of his own unactivated ships.
If a player does not have any unactivated ships, he must pass his turn. This process repeats until both players have activated all of their ships.
A. Reveal Command Dial
During this step, the player reveals the top command dial on his chosen ship's stack of command dials and places it faceup next to the plastic ship.
If the player wants to resolve the revealed command for its full effect this round, he can spend the dial at the appropriate time to do so. If he wants to reserve it for a later round, he immediately spends the dial (placing it faceup on the ship's ship card) and places the matching command token next to the ship.
Command tokens provide players with flexibility, allowing them to use chosen commands in later rounds. However, command tokens produce a lesser effect than a command dial when spent.
B. Attack
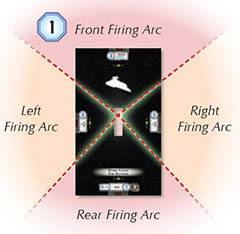
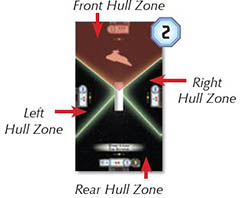
During this step, the ship can perform up to two attacks. An attack originates from one hull zone, and the target must be inside that hull zone's firing arc.
The target of the attack can be either one hull zone of an enemy ship or one or more enemy squadrons. Then the attacker rolls attack dice in an attempt to damage the enemy target.
After a ship performs its first attack, it can perform a second attack, but the second attack must originate from a different hull zone.
During the first round of the learning scenario, players can skip the "Attack" step because their ships and squadrons will not be in attack range.
C. Execute Maneuver
During this step, the ship must execute a maneuver; the player uses the maneuver tool to determine a precise position that the ship will move to. The distance the ship moves corresponds to its current speed, which is tracked on its speed dial.
To execute a maneuver with a ship, the player performs the following substeps in order:
- Determine Course
- Move Ship
I. Determine Course
First, the player resets the maneuver tool so that all of its joints are straight. Then he may click the joints of the maneuver tool to the left or right to change the final position and facing of his ship.
The speed chart on the ship's card indicates how far each joint can be clicked away from the center position. Each column on the speed chart corresponds to the speed number at the bottom of the column.
A column shows the number of times that each joint can be clicked while going at that speed.
Each row corresponds to one of the joints on the maneuver tool; the row directly above the speed number relates to the first joint, the second row relates to the second joint, etc. "I" means the joint can be clicked once in either direction, while "II" means it can be clicked twice and "-" means it must remain straight.
The player is allowed to place the maneuver tool on the play area to determine possible positions for his ship before committing to the move
FiringArcs and Hull Zones
1. Each ship has four firing arcs. Each arc is the area between its firing arc lines, which are printed on the ship token.
2. Each ship also has four hull zones. Each hull zone is the area on the ship token between two firing arc lines.
II. Move Ship
The player places the maneuver tool on one side of his ship so that the plastic guides of the tool's flat end slide into the notches on the side of the ship's base. If properly inserted, the front of the ship should be parallel with the raised line above the guides.
The player presses the maneuver tool against the table and, without moving the tool, he picks up the ship. Then he places the ship at the joint below the punchboard number that corresponds to the ship's current speed. The notches on the ship's base slide over that joint's plastic guides.
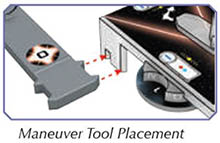
The ship's starting position and final position must be on the same side of the maneuver tool. In addition, the maneuver tool cannot be placed in such a way that the ship would overlap the tool when placed in its final position. If the ship would overlap it, the tool must be placed on the other side of the ship's base before the ship is moved.
Sometimes a ship's movement causes it to overlap a squadron or another ship.
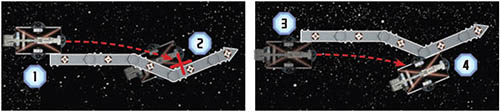
Ship Movement Example
Using the course set in "Determine Course Example", the Rebel player moves his Nebulon-B Escort Frigate.
The Rebel player places the maneuver tool's flat end on the right side of the ship.
The Rebel player realizes that if he moves the ship to the joint below the "3" speed number, it will overlap the maneuver tool at that position. He must place the maneuver tool on the other side of the ship instead.
The Rebel player places the maneuver tool's flat end on the left side of the ship.
The Rebel player presses down the maneuver tool and moves the ship to the joint below the "3" speed number. Then he moves the ship to its final position, where it does not overlap the maneuver tool.
Phase 3: Squadron Phase
After all ships have been activated, players resolve the Squadron Phase. During this phase, players activate any squadrons that were not activated by a O command during the previous phase. Each squadron that activates during this phase may either move or attack, but not both.
This phase starts with the player who has initiative. He chooses one of his unactivated squadrons and activates it. After that squadron finishes its activation, the player must activate a second unactivated squadron, if able. Then his opponent activates two of his own squadrons in the same way. This process continues until all squadrons are activated.
Squadron Movement
To move a squadron, the player places the range ruler on the table with the distance side faceup so that the distance 1 end of the ruler is in contact with any part of the squadron's base.
Then he picks up the squadron and places it at any point along the range ruler. The squadron cannot be placed with any portion of its base beyond the distance band matching the squadron's speed.

A squadron cannot be placed with any part of its base overlapping another squadron or ship.
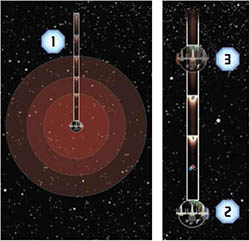
The Rebel player activates an X-wing squadron and places the distance side of the range ruler faceup.
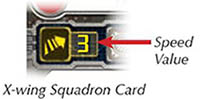
1 The X-wing squadron has a speed of "3", so it can move anywhere within distance 1-3, in any direction.
2 The Rebel player decides where he will move the X-wing squadron and places the distance 1 end of the ruler in contact with the squadron's base.
3 The Rebel player picks up the X-wing squadron and places it at the end of the distance 3 band. Then he removes the range ruler from the play area.
Squadron Attacks
A squadron can attack either one enemy squadron or one hull zone of an enemy ship. Squadrons have a 360° firing arc; a squadron can attack any target at distance 1.
Engagement
While a squadron is at distance 1 of an enemy squadron, those squadrons are engaged. An engaged squadron must abide by the following rules:
- An engaged squadron cannot move.
- When an engaged squadron attacks, it must attack a squadron instead of attacking a ship.
Engagement is an important element of strategy. Players can use a screen of squadrons to protect their ships, or they can aggressively maneuver their squadrons to pin down enemy squadron groups.
Tracking Squadron Activation
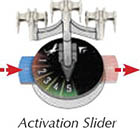
When a player activates a squad ron, he pushes its activation slider to the other side, showing a different color and icon.
Players know whether their squadrons have been activated by comparing the color and icon shown on the slider to the color and icon shown on the initiative token. If the colors and icons match, that squadron has not been activated yet.
Phase 4: Status Phase
During this phase, players ready their exhausted d efense tokens by flipping the tokens to their readied side (defense tokens are described in detail later). Then the player with initiative flips the initiative token over. The color and icon now shown on the initiative token is the color and icon of unactivated squadrons during the next round.
At the end of this phase, the player with initiative places the round token with the next highest number to the side of the play area; the number displayed on that token indicates the round number for the next round. Then players begin a new round starting with the Command Phase. The players continue playing rounds until the game ends.
End of the Game
The game immediately ends when all of one player's ships are destroyed. That player is eliminated, and his opponent wins the game.
If neither player is eliminated after six rounds, the game ends and the player with the highest score wins.
A player's score is equal to the total cost of each enemy ship and squadron that was destroyed; the cost of each ship and squadron is printed in the lower-right corner of its card.
Continue Reading


