
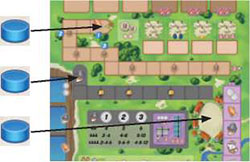
Setup
Place the Common Board in the middle of the table, and then place 3 blue dice per player (e.g. 9 dice in a 3 player game) above it. Any remaining blue dice are returned to the game box.
Place the Year Marker on space "1" of the Year Track.
Shuffle the 4 Starting Shipment Tiles (orange sails) and place them - in random order - face up next to the four docks on the common board.

Shuffle the 10 Scholar Tiles and the 6 Bishop Tiles separately. Draw 3 random tiles of each type and place them face up above the designated spaces on the common board. Remaining tiles are returned to the game box.

Shuffle the 30 Standard Shipment Tiles (white sails) and place them in a facedown stack nearby.
Roll 3 white dice per player (e.g. 9 dice in a 3 player game), sort them by value, and place them below the common board. Any remaining white dice are returned to the game box.

Place the 3 Road Tiles in a face-up stack on the designated retiring space on the common board.
Sort the Coins, Happiness Tokens and the wooden Resource Tokens by type and place them as supplies to one side of the table. Coins and Happiness Tokens are in theory unlimited. In the rare case that the supplies of coins and happiness tokens are exhausted, use any other objects to replace them.
Shuffle the 15 Double and 15 Triple Expansion Tiles separately, and randomly place 5 of each type face up along the right side of the common board. This is the display. Put the remaining tiles in facedown stacks nearby.
The 4 Town Hall Tiles "gray backside" are returned to the game box (they are only used with the advanced set-up, described at the end of this rulebook).
Each player chooses a player color and takes the following material of that color:

6 Monks, which are placed in front of the player.
3 Player Markers, which are placed on the common board: One on the starting space on the religion track, one on the starting space on the conquistador track, and one on the market square.
With less than 4 players, return any unused components to the game box.
Setting Up The Colonies
Randomly determine a starting player. For your first game, it is recommended to give each player one of the 4 Colony boards at random.
For later games, players should choose their colony boards in a counter-clockwise order around the table (with A-side facing up), starting with the player sitting to the right of the starting player. Any leftover colony boards are returned to the game box.
-
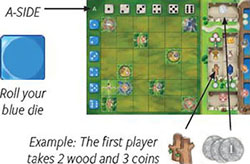
Place your Colony Board in front of you with the A-side facing up.
-
Take 2 wood and a number of coins according to your seating order:
The starting player gets 3 coins, the 2nd player (to the left) gets 4 coins, the 3rd player gets 5 coins, while the 4th player gets 6 coins.
Put the wood and coins in the corresponding storage spaces on your colony board.
-
Take 1 blue die (from above the common board), roll it, and place it to the left of your colony board (don't change its value). This blue die is your first local worker. Each player may unlock 2 additional blue dice throughout the game.
Object of the Game
At the dawn of the Sixteenth Century, colonists are flocking to the New World. Each player will lead a colony, producing resources needed to expand the colony, form shipping routes, send out conquistadors to acquire gold, and increase their religious power to recruit and train new monks.
After 3 game rounds, each of which represents a year, the player whose colony is the happiest (whomever has scored the most happiness points) is declared the winner.
Game Play
The game is played over 3 years (rounds). The starting player takes the first turn in the first year. The players continue taking turns in a clockwise order around the table until all players have decided to retire (withdrawing from the round).
On your turn, you must take one (and only one) of the following four main actions:
- Expand your colony
- Activate a single building (by using coins)
- Activate a row/column (by using a die)
- Retire (withdraw from the round)
All main actions are described on the following pages. In addition to your main action, you may do any number of free actions on your turn.
Notes:
When the rules use the term colony, it refers to the 6 x 6 grid on your colony board.
When the rules use the term pay, it means that you take the required tokens/coins from your storage and return them to the supplies.
When the rules uses the term gain, you take the required tokens/coins from the supplies and place them in your storage.
Gain points means that you gain happiness tokens and put them face down on your colony board.
Happiness points in a purple frame are gained at the end of the game (not during the game).
A. Expand your Colony

Pay 2 wood to take a double expansion tile OR

2 wood and 1 grain to take a triple expansion tile.

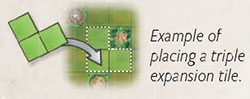
You may only buy one tile each time you take this action. When taking a tile, choose one of the face-up expansion tiles from the display and place it to cover empty spaces in your colony. You may rotate the tile as you wish. You may not cover other expansion tiles or pre-printed buildings.
Note: Do not replenish the display. Only 5 double and 5 triple expansion tiles are available each year. When all ten tiles have been taken, the players are unable to further expand their colonies in the current year.
B. Activate a Single Building

Put a number of coins on one vacant building in your colony to activate that building. The chosen building cannot already have a die or coins on it.

In a given year, the 1st building you activate costs 1 coin; the 2nd building 2 coins; the 3rd 3 coins, and so on (each activation costing 1 more than the previous one). The coins must be taken from your storage.

Note: At the end of a year, all coins will be removed from activated buildings and the prices will reset.
C. Activate a Row/Column

Take either one white die from the common pool, or one blue die lying to the left of your colony board.
Important: No player may use more than 3 white dice during one year.
You may pay coins to change the value of the chosen die: 1 coin per point of increase/decrease. The values do not "wrap around", so changing a die from 1 to 6 (or vice versa) will cost 5 coins.
If you took a white die, activate ALL vacant buildings (in order from top to bottom) in the column matching the die's value. Finally, place the die on the bottom most vacant building in this column, blocking this building for the remainder of the year.
If you took a blue die, activate ALL vacant buildings (in order from left to right) in the row matching the die's value. Finally, place the die on the rightmost vacant building.
Example: Using a white die. Anna pays 2 coins to change the die from 5 to 3.
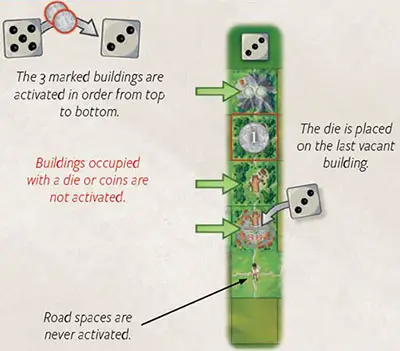
Example: Using a blue die. 2 buildings are activated in order from left to right, and the die is placed on the last vacant building.
Activating Buildings
All spaces on expansion tiles are either buildings or road spaces. The colonies also come with some preprinted buildings. Buildings can be activated for various effects as described below. Road spaces are never activated.
Storage Limit: You can never have more than 3 identical resources in your storage (i.e. your storage can hold a maximum of 3 wood, 3 grain, 3 sugar, 3 gems and 3 gold). For any excess resources you gain, you get the selling price instead: 1 coin for each grain/wood, or 2 coins for each sugar/gem/gold.
Production

Gain the shown resources, coins or points. Note that you must respect the storage limit for resources (see above).
Trading

You may pay the resource shown at the top to gain the coins/points/resource shown at the bottom. The conversion may only be carried out once each time you activate the building. When items are separated by a "/", it means you must choose one.
Shipping

You may pay the resources depicted on one of the four face-up shipment tiles lying next to one of the docks on the common board.
Then, take the shipment tile and place it face down in your own harbor, outside the dock with the same symbol as the dock where the tile was taken from.
Immediately draw a new tile from the stack of shipment tiles and fill the empty dock on the common board.
If the stack of shipment tiles runs out, no new shipment tiles will arrive this game.
Note: Shipment tiles will provide extra income/actions when you retire. Any points shown on the shipment tiles are awarded at the end of the game.
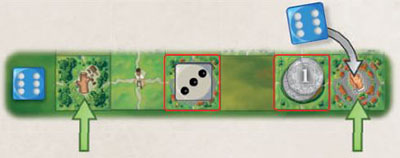
Conquistador

Advance your marker 1 space on the conquistador track. If you end up on the same space as another player's marker, place your marker on top of theirs.
If you pass a gold symbol, gain one gold token. If you reach the end of the track, any excess conquistadors you produce are lost. At the end of the year, the players who have advanced the furthest on the conquistador track will gain points.
Use of Gold: Gold is a wildcard resource that can be used to replace any other resource for any purpose, for example when shipping or when using a trading building.
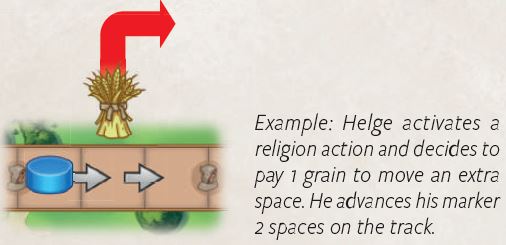
Religion

Advance your marker 1 space on the religion track.
Important: Every time you advance on the religion track, you may pay 1 grain to advance 1 extra space (i.e. you can advance a maximum of 2 spaces per religion action).
When your marker passes a monk symbol on the track, you may recruit a new monk. When you pass the 1st and the 3rd monk symbol you also unlock another blue die.
Recruting A Monk

When you pass a monk symbol you may place one of your monks on one of the 10 designated spaces on the common board (either below a scholar tile, a bishop tile, or a missionary station).
If you are the first to place a monk on this space, the placement is free. Otherwise, you must pay 2 coins to each other player that already has a monk on this space. You may not place a monk on a space where you already have one.
The effect of placing a monk depends on the tile or missionary station above the space:
-

Scholar (permanent Effect):
The monk is trained as a scholar, and for the remainder of the game you may use the ability shown on the scholar tile. See separate Reference Sheet for Scholars' eff ects. Scholar tiles also award 1-3 points at game end (shown in purple frame)
-

Bishop (end-game Scoring):
The monk is appointed a bishop, and at the end of the game you may score points depending on how well you have fulfilled the bishop's requirements. Note: For each bishop you appoint, you also lose 2 points at game end.
-

Missionary Stations (one-time Effect):
Immediately gain the shown resources/points.
Unlocking A Blue Die

When you pass the first and the third monk symbol you also unlock a blue die.
Immediately take one blue die from the reserve above the common board, roll it and place it to the left of your colony board. You now have an extra blue die to use for the remainder of the game.

When you reach the end of the religion track, your marker will not advance any further.
From now on, you instead gain 1 point for every space you are supposed to advance on the track (remember that you may spend one grain token to advance an extra space - i.e. gain 1 extra point - for every religion action).
Important Notes:
Only vacant buildings are activated (buildings covered with a die or coins are skipped).
When activating a row/column, the buildings must be activated in the correct order (top to bottom, or left to right).
The die must be placed on the last vacant building space in the row/column, even if you choose not to use that building's effect.
Road spaces are not buildings: They are not activated, and you cannot place a die on them.
You cannot take a die if you have no vacant buildings in the column/row where you plan to use it.
Some buildings pre-printed on the colony board have multiple effects. Carry out all shown effects when activating such a building.
D. Retire (Withdraw from the Round)

When you retire, you first move your player marker from the market square to a vacant retiring space and carry out the shown action. THEN you receive income from your shipping tiles.
You may also use any free actions (and possible abilities from your scholars) on the turn that you retire. After you have retired, you will take no further actions in the current year. The other players may continue taking turns, while your turns are skipped.
Note: You are allowed to choose a retiring space even if you are not able to (or do not want to) carry out its action.
To retire, first put your marker on a vacant retiring space:

Gain 2 coins.
Perform a Religion action. You may use one grain to advance one extra space. If you unlock a blue die, it cannot be used until the next year.
Perform a Conquistador action.
Perform a Shipping action.
Take a Road Tile from the common board and place it on any empty space in your colony
Then, receive income from all shipment tiles in your harbor, from top to bottom. For each shipment tile you have, take the action or gain coins/points as indicated by the symbol in the ship's dock.
Free Actions
In addition to your main action, you may perform the following free actions as often as you like on your turn:
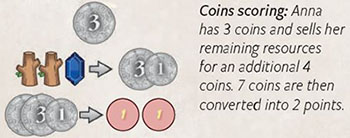
Sell resources: Pay one basic resource ( ) to the supply to gain 1 coin, or pay an advanced resource (
 ) to gain 2 coins.
Buy basic resources: Pay 3 coins to gain 1 basic resource (). You may not buy advanced resources, and you must of course respect the storage limit (see page 4).
Example: At the beginning of her turn, Anna sells 2 sugar and 1 gem to gain 6 coins. As her main action, she activates a shipping building (choosing the action "Activate a single building"), using some of the coins. She then pays 3 coins to buy one grain from the supply, which she uses to fulfi l the requirement of a shipment tile.
End of Year
When all players have retired, the year ends.
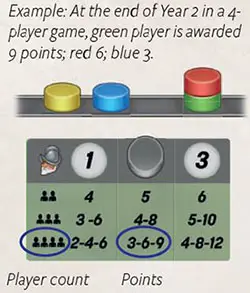
Now, players gain points according to their relative positions on the conquistador track. Use the scoring table for the current year (below the year marker) and for the correct number of players.
The player who have advanced the furthest on the track gains the highest number of points. The player who is last, or players that have not produced any conquistadors this year, do not gain any points.
If two players are on the same space, the player whose marker is lower in the stack (the one who arrived first in the space) is considered to be ahead.
Then, move all player markers on the conquistador track back to the starting space.
Note: Player markers on the religion track are not moved back.
Any coins and dice lying on buildings in the players' colonies are returned to the supply/pool.
After the 1st year and after the 2nd year, do the following:
Any remaining face-up expansion tiles in the display are discarded. Draw 5 new double and 5 new triple expansion tiles from the stacks and place them face up on the table.
Collect all white dice, roll them, sort them by value, and place them below the common board. Then, all players reroll their blue dice (all blue dice they have unlocked) and place them to the left of their colony board.
The player who used the retiring space closest to the
 symbol (above the retiring spaces) becomes the starting player for the next round. The other players will follow in a clockwise order, regardless of which retiring space they used. Move all player markers from the retiring spaces back to the market square.
Advance the year marker one space. Then, the next year begins.
End of the Game
The game ends at the end of the 3rd year. Players then score additional points for the following:
-
Resources and coins: Sell your remaining resources for coins (1 coin for each basic resource; 2 for each advanced resource), and then gain 1 point for each 3 coins you have (rounded down).
-
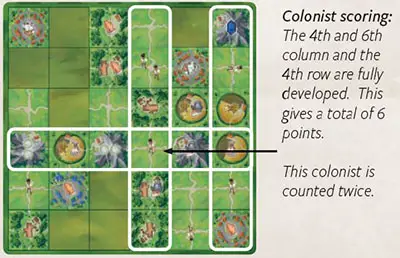
Colonists (on road spaces): A row/column on your player board is fully developed if it is filled with buildings and/or roads (from expansion tiles or preprinted buildings).
For each fully developed row/column, gain 1 point per colonist in that row/column. Note: A colonist will consequently be scored twice if both its row AND its column have been fully developed.
-
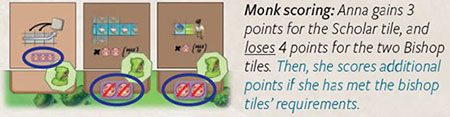
Monks: Score the points shown on every Scholar Tile where you have a monk. For each Bishop tile where you have placed a monk, you first lose 2 points as indicated on the space. Then, you score points according to the bishop tile's requirements.
-
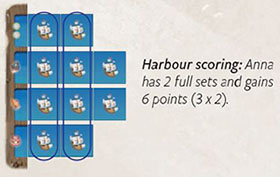
Harbors: Gain 3 points per set of shipment tiles you have (a set = one ship in each dock).
-
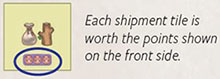
Shipment tiles: Flip over your shipment tiles and add the points shown on all tiles to conclude your final score.
The player with the highest total happiness points wins the game.
In case of a tie, the tied player who, in the final year, used the retiring space closest to the 1st symbol is declared the winner.
Advanced Rules for Setting up the Colonies
Set up the game components as described on page 1 and at the top of page 2. After having determined a starting player, each player takes a colony board and places it in front of them with the B-side facing up (all B-sides are identical).
Each player receives 2 wood, and coins according to their seating (3, 4, 5 or 6 coins respectively). Then, each player rolls one blue die, which is placed to the left of their colony board.
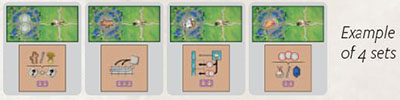
Now, place the 4 Town Hall tiles face up on the table. Place 1 Scholar Tile face up below each town hall (the scholar tiles are drawn randomly from those not used on the common board).
In a counter-clockwise order (starting with the player sitting to the right of the starting player), each player in turn chooses one of the four sets of two tiles. After all players have chosen a set, any remaining tiles are returned to the game box.
When you choose a set, you must immediately place the Town Hall anywhere in your colony, covering two empty spaces (tip: since dice already have been rolled, you may take the dice' values into consideration).
You may rotate the tile as you wish. Place the scholar tile face up next to your colony board. This scholar is considered trained by you, and you may use its effect from the start of the game. No other player may train this particular scholar.
Variant: Common Pool Of Blue Dice
If you want less randomness and more player interaction, try this variant with the following changes to the standard rules: Instead of players adding and keeping their blue dice to the left of their colony board, blue dice are drafted from the common pool (like the white dice).
During set-up, one blue die per player is rolled and placed together with the white dice in the common pool. Whenever a player passes the first or the third monk symbol on the religion track, take 1 blue die from above the common board, roll it and add it to the common pool.
On your turn, as your main action, you may take a blue die from the common pool and use it to activate a row on your player board. In a given year, you can never take more blue dice than the number of blue dice you have unlocked (apparent from your position on the religion track).
Before a new year, roll all unlocked blue dice and place them back in the common pool.
Continue Reading
