
In the kingdom of Myrmes, the ant colonies have been fighting for centuries to dominate their neighbors.
To put an end to this war, the council of the queens has decreed that a final battle will decide the issue of the final victory. Send your sol- diers and your workers to assault of the kingdom. Fill up your larder, hunt down insects and wisely place your pheromones to conquer the territory. But most importantly, don't forget to prepare for winter!
Components
- Main game board
- 4 Individual boards
- 3 Dice
- 1 First player token
- 1 Year token
- 20 Objective tiles
- 30 Larva cubes
- 15 Earth cubes
- 20 Food cubes
- 18 Prey tokens
- 8 Sub-colony tiles
- 8 Aphid farm / Scavenging tiles
- Rulebook
For each player:
- 8 Workers/Soldiers
- 4 Tunnel Exit discs
- 1 Marker disc (ant colony level)
- 8 Nurses
- 1 Event cube and 4 cubes to mark special tiles
- 17 Pheromone tiles
Object of the Game
Each player leads an ant colony from the world of Myrmes struggling to establish its supremacy over the kingdom.
During the game, the players will score points by placing pheromone tiles, hunting prey, feeding the Queen and completing objectives. At the end of the game, the player with the most points will be declared the winner.
Setup
The main board is placed in the middle of the table. The resource cubes, larvae and special tiles are placed near the game board. The Year token is placed on the space which marks the first year of the game.
The Season dice are rolled and each die is placed on its space on the season track. The Prey tokens are randomly placed on their spaces. Two objectives each of level 1, level 2 and level 3 are randomly chosen and placed on their respective spaces.
Each player chooses a color and takes: 1 individual board, the ants, the octagons (nurses), discs, cubes and pheromones of the chosen color, which they place near their individual board.
Each player places 3 nurses in the nursery, 2 workers in the worker rook, and a larva in the larvae room. A Tunnel exit token, indicating the initial tunnel exit of each player, is placed on each of the starting spaces.
A colored disc is placed at level O of the ant colony and the Score token is placed on the starting space of the score track (1O points). The event cube is placed on the event track, according to the event indicated by the Season die.
The other elements are placed near individual boards. The shortest player is chosen to be the first player, that player gets the first player token. The game begins.
Game Turn
The game takes place over a period of three game years, with each year being divided into four seasons (spring, summer, fall, winter). The first three seasons are normal turns, but the last (winter) is a maintenance phase during which the players must spend food in order to pass through winter.
During spring, summer and fall, the players perform a normal turn, which is divided into 6 phases.
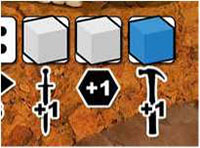
1. Event
This optional phase is played simultaneously by all players. By using the larvae at their disposal, the players can modify the seasonal event determined at the beginning of the year. Each larva spend allows them to move the Event cube one space to the right or to the left. There are no limits to the number of larvae a player can spend. Once a player has performed this phase, that player can move on to phase 2 without having to wait for the other players.

If a player chooses the VP+1 event, then as soon as that player scores victory points during the current season (for example by placing a pheromone, by feeding the queen or by completing an objective), that player scores 1 extra victory point.
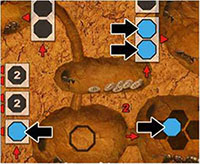
Example: it's spring and the rolled event is Soldier+1 (as the green die indicates a 5).
Blue wishes to change that event to replace it with Worker +1. The player thus spends 2 larvae to move the Event cube two spaces to the right.
2. Births
This phase is played simultaneously by all players. Each player uses their nurses to place them:
Either in one of the three birth tracks, to give birth to new ants OR in the atelier so that they can be used during phase 5 (Atelier).
A player can spread their nurses between the birth tracks and the atelier as they please. They do not have to use all of their nurses (though we recommend that they do).
Birth tracks: the player can use their nurses to give birth to three different types of ants.
Larvae: the player can use up to 3 nurses in this track. The first nurse gives birth to a single larva. The second and third nurses can give birth to 2 larvae each.
Soldiers: the player can use up to 3 nurses in this track. The first two nurses give birth to one soldier. The third nurse gives birth to an extra soldier.
Workers: the player can use up to 4 nurses in this track. Two nurses are needed to give birth to a worker, and eventually two more to give birth to a second.
If a player has chosen the Larvae+2/Worker+1/Soldier+1 event, that player's nurses give birth to an extra two larvae/one worker/one soldier as long as the player has used enough nurses to give birth to at least one of the ant type concerned.
For example, to benefit from the Larvae+2 event, a player must use at least one nurses to give birth to a larva.

As soon as all player have finished placing their nurses on the birth tracks (and possibly the atelier), they simultaneously proceed to the birth of the ants. The ants thus created are placed in the respective rooms on the players' individual boards.
The players then move on to phase 3.
Note: in the game, the workers and soldiers are not differentiated (it would be pointless as the soldiers never go out into the garden). Each player has a reserve of 8 soldiers/workers. This limit can under no circumstances be broken by a player, and a player who, for example, has 5 soldiers and 3 workers will not be able to gain any new ones until some of their ants are discarded.
Example (cont'd): Blue has 4 nurses. The player places one in the atelier, two in the worker track and one in the larvae track. When all players have finished placing their nurses, they proceed with the birth of the ants.
Blue thus gets one larva which the player places in their larvae room and two workers (one thanks to their nurses and an extra one as they benefit from the Worker+1 event) which they place in the worker room.
3. Workers
This phase is played by each player in turn, starting with the first player and going clockwise. In turn, each player will use a worker to either send it outside, or to send it to work in the ant colony. Players are not allowed to pass.
Note: depending on the choices made by the players during phase 2, it is possible that some players may have more workers than others. In that case, some players will play more often in this phase than other players.
-
Ant colony: the player can decide to send the worker off to work in the colony. The Colony is made up of 4 levels and at the beginning of the game, only the first level is avail- able (see further).
At each level, one and only one worker can work. To use the colony, the player simply places the worker on a space where he or she wants it to work and gains the indicated bonus, then the next player begins their turn.
The used worker remains in place. No other worker can come work at that level and the worker will not be able to be used again for the turn.
Level 0 (gestation room): the player gets a larva which is immediately placed in the larva room.
Level I (larder): the player gets a cube of food which is immediately placed in their stockpile.
Level II (quarry): the player gets a cube of earth or stone (of their choice) which immediately gets placed in their stockpile.
Level III (queen's room): the player spends 1 cube of food from their stockpile to feed the queen and immediately gains 2 victory points.

If the player has chosen the Level+1 event, they can send one of their workers to work at a higher level. For example, if the player has a level 0 ant colony (as is the case at the beginning of the game), they can send a worker to work at the larder (level 1) if they've chosen the Level+1 event.
Example: Red decides to use their first worker to go work in the ant colony. The player thus takes a worker and places it in the gestation room (the only level to which they have access for the moment). The player gains a lar- va which is placed in the larva room. It's time for the next player to play.
-
Sortie: the player can decide to have the worker go outside. To do that, the player takes their worker and places it on one of their tunnels exits in the garden area (at the beginning of the game the players only have a single tunnel exit).
The workers which leave will never come back into the ant colony, as the worker will be discarded as soon as it has placed a tile (pheromone or special tile) or at the end of its movement if the player does not want to place a tile.
The worker has 3 movement points outside of the ant colony, and does not have to use all of these points. By using these movement points, it can explore the surrounding area, which will allow it to perform multiple actions:
- Hunt a prey
- Place a pheromone
- Place a special tile
- Clean up a pheromone
Movement: for 1 movement point, a worker can either move through an empty space (without pheromones), or cross an entire pheromone tile (which is considered a single empty space). Spaces containing water cannot be crossed. Spaces containing prey can only be crossed if the prey is hunted.

If the player has chosen the Move+3 event, that player has 6 movement points for the turn instead of 3.
Opposing tiles: a worker can cross opposing tiles. However, this action costs a soldier. Thus, for each opposing tile in which the worker enters, its player must spend a soldier, which is removed from the soldier room and returned to the reserve.
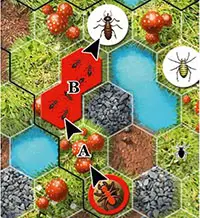
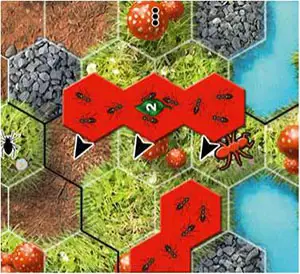
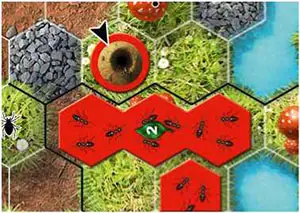
Example: Red makes a worker go out by putting it on their tunnel exit.
For 1 movement point, the worker is moved to hexagon A, for another movement point, it crosses friendly pheromone B.
For its last movement point, it reaches its prey's space.
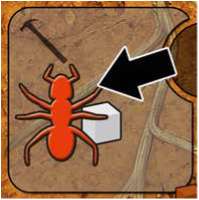
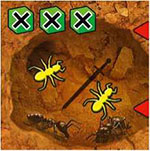
Hunt a prey: if the worker enters a space containing a Prey token, it immediately lets the soldiers know and this prey must immediately be hunted (thus a player may not enter a space containing a prey if that player does not have the soldiers allowing the prey to be hunted or if the player does not wish to hunt that prey). To hunt the prey, the player must discard soldiers according to the prey.
The discarded soldiers are returned to the reserve. The player then takes the Prey token, places it next to their individual board and earns victory points and food cubes according to the prey hunted (the food cubes are placed in their stock). The worker can then continue its movement if it still had points remaining.
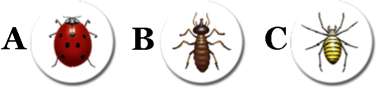
- Ladybug: discard 1 soldier. Worth 2 food cubes.
- Termite: discard 1 soldier. Worth 1 food cube and 2 victory points.
- Spider: discard 2 soldiers. Worth 1 food cube and 4 victory points.
Example (cont'd): Red discards 1 Soldier (taken from the soldier room) to hunt the termite. They gain lfood cube and 2 victory points. The player places the Prey token next to their individual board. The worker no lon- ger has any movement points left but can still place a tile.
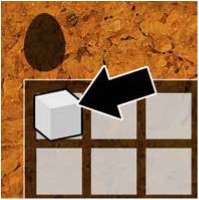
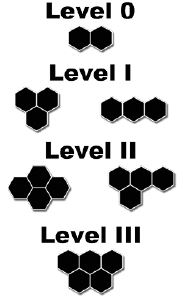
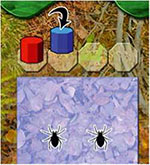
Place a pheromone: if the worker is on an empty space (with no Prey token and with no pheromone or special tile), the player can decide to place there a pheromone from their reserve. The maximum size that the player can place depends on the level of their ant colony:
The player must respect a few placement rules:
- One of the hexes of the pheromone must be placed on the space on which the worker is,
- The pheromone cannot cover another tile, token or ex- tend beyond the garden area,
- The pheromone cannot be placed on a water space.
Example (cont'd): Red, whose ant colony is of level I decides to place a size 3 pheromone to end their action. The player places that pheromone on the space in which the worker is.
Once the pheromone is placed, the player then places on it the resource cubes (food, earth and stone) depending on what the pheromone covers.
Spaces containing mushrooms are sterile and produce no cubes. If the pheromone scores victory points (all pheromones of a size greater than 2), the player immediately scores the points indicated on the pheromone. The worker is then discarded and the next player, going clockwise, begins using a worker.

Example (cont'd): Red places 1 food cube and 1 earth cube on the pheromone and scores 2 victory points, then discards the worker.
Placing a special tile: if the worker is on an empty space (with no Prey token or pheromone or special tile), the player can decide to place a special tile there. The kind of special tile a player can install depends on the level of their ant colony:
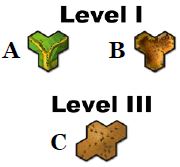
- Aphid farm
- Scavenging
- Sub-colony
The placement rules for special tiles are the same as those for pheromones. However, to be built, these special tiles require resource cubes.
- Aphid farm: one cube of stone
- Scavenging: one cube of food
- Sub-colony: one cube of earth, stone and food.
Once the special tile is placed, the player places one of their cubes on it. This cube simply indicates that the special tile belongs to the player. Then the player scores the points cor- responding to the placing of the tile and discards the worker. It's then the next player's turn to use a worker.

If the player has chosen the Level+1 event, they can use pheromones, power (storage, see End of turn) or special tiles of the higher level (for example, if their ant colony is at level 0, they can use pheromones of size 3 with the event or build a scavenging).
If the player has chosen the Hexagon+1 event, they can use pheromones of a level one higher. Moreover, if their ant colony is at level 3, they could potentially use the sole size 6 pheromone at their disposal.
Clear a pheromone: a worker who moves over an empty pheromone (one containing no cube) can decide to clear it. To do so, the player must discard one earth cube from their stockpile. The pheromone is then removed from the board and is removed from the game. The points indicated on the pheromone are not lost by the player.
Opposing pheromones: the empty pheromones of the other players can also be cleared (once again, the worker must be on a space of the pheromone the player would like to clean up). The cost is the same (one cube of earth).
The action of cleaning up an opponent's pheromone is worth any points printed on it. The player whose pheromone is cleaned loses no points.
Once the pheromone is cleared, the worker can resume its movement normally.
4. Harvest
Once all the players have played all of their workers, they move on to the harvest phase. The harvest phase is played simultaneously.
On each of their non-empty pheromones on the board, the owner of that pheromone picks up a cube of their choice. This action is mandatory. The cubes thus picked up are placed in the players' stockpile. Moreover:
- Each Aphid farm earns one cube of food for its owner,
- Each Scavenging earn the choice of one cube of earth or stone for its owner,
- Each Sub-colony earns 2 victory points for its owner.

Harvest+3: if the player has chosen the Harvest+3 event, that player can, after their normal harvest, pick up to 3 extra cubes of their choice present on their pheromones. These cubes are placed in their stockpile. This action is not mandatory.
5. Atelier
Once all the players have performed their harvest, play moves on to the atelier phase. This phase is played by each player in turn and only concerns players who have put one or more nurses in the atelier during phase 2.
The players who have done so take the nurses in their atelier and place them in the atelier spaces of the main board. A player cannot place more than one nurse per space in the atelier (they will thus only be able to perform each action once per turn).
If a player has placed multiple nurses in the atelier, the player freely chooses the order in which their actions are resolved.
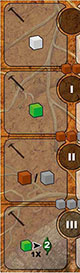
The atelier has 4 spaces, which are:
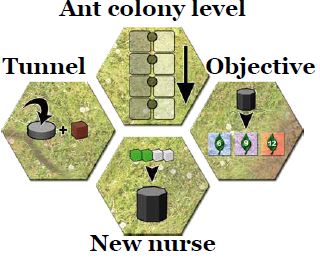
Tunnel: the player who has placed a nurse in this atelier can place a new tunnel exit in the garden area and earns a cube of earth which they place in their stockpile.
The new tunnel exit is represented by one of the 4 tokens of the player's color and must be placed on an empty hexagon adjacent to one of the player's elements on the board (pheromone, tunnel exit, special tile). This new tunnel exit will offer the player a new option when having workers leave the colony during subsequent turns.
Note: a player cannot have more than 3 tunnels exits in addition to the starting one over the course of the game.
Example: Red places a new tunnel exit. It is placed on an adjacent space to one of their pheromones. More- over, the player gets a cube of earth which is placed in their stockpile.
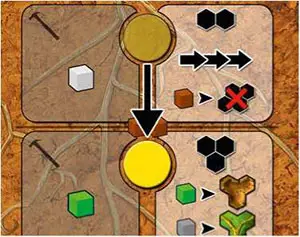
Ant colony levels: the player who has placed a nurse in this atelier can improve their ant colony. To do that, they must spend cubes of earth or stone.
- Level 0 to 1: 2 cubes of earth,
- Level 1 to 2: 1 cube of stone and 2 cubes of earth,
- Level 2 to 3: 3 cubes of stone.
To indicate the new level of their ant colony, the player moves their ant colony disc to the new level reached. A player cannot skip a level (for example going from level O to level 2) or dig 2 levels at once (even if that player has enough cubes to do so).
Example: Yellow improves their ant colony. They spend two cubes of earth from their stockpile and move the ant colony disc from level 0 to level 1.
New nurse: the player who has placed a nurse in this atelier makes a new nurse. To do that, they must spend 2 cubes of food and two larvae from their stockpile and takes a new nurse from their reserve and places it in the nurse room of their individual board.
This new nurse will be able to be used starting on the next turn. A player cannot make 2 nurses, even if they have the resources to do so.
Objective: the player who has placed a nurse in this atelier can complete an objective. The objectives are divided into 3 levels (2 for each level). As their first objective, a player must complete a level 1 objective.
This will give them the ability to complete an objective of level 2 (or lower) from then on, and once that objective is completed a level 3 objective (or lower). During the game, it is not possible to complete a given objective twice.
Most objectives require that the players discard certain elements.
A player who completes an objective places their nurse on the first free space next to that objective and immediately scores the victory points indicated on that space (6 points for level 1 objectives, 9 points for level 2 objectives, and 12 points for level 3 objectives).
Moreover, if other players have completed that same objective in previous turns, these players each score 3 points (this does not happen if the objective has been completed during the same atelier phase).
Example: Blue completes the "2 Preys" objective, the player discards 2 Prey tokens, places their nurse on the first free space and scores 6 points.
As Red had already completed that objective in a previous turn, that player scores 3 points.
6. End Of Turn
The players perform this phase simultaneously. They discard larvae which may have been used during phase 1.
They discard any excess cubes in their reserve: if their ant colony is of level 0 or 1, they can store up to 4 cubes of their choice and must discard any over that amount. If their ant colony is of level 2 or 3, they can store up to 6 cubes of their choice and must discard any over that amount.
They regain the workers which have worked in their ant colony and return them to the worker room. They regain their nurses and return them to the nurse room of their individual board. However, the nurses used to complete objectives are not recovered.
The die of the season which has just finished is removed from the main board. The first player token is given to the player to the left of the current first player.
If they've just finished playing spring or summer, the players then return the event cube to the space corresponding to the result of the die given for the upcoming season. If they've just played through fall, they then move on to the winter phase.
Winter
During winter, each player will have to spend food from their stockpile:
- The first year, each player will have to discard 4 cubes of food,
- The second year, each player will have to discard 5 cubes of food,
- The last year, each player will have to discard 6 cubes of food.
If a player doesn't have a sufficient amount of cubes, that player loses 3 victory points for each missing cube.
Soldiers: each soldier a player has during winter allows that player to reduce the amount of cubes to be spent by 1. Soldiers are not discarded.
Example: It's the winter of the second year, the players must thus discard 5 cubes of food.
However, Yellow, who has two soldiers, only needs to discard 3.
After winter, the year is over and a new year is begun. The Season dice are rerolled and the players replace the event cube according to the number shown by the spring die. A new turn begins.
End of the Game
The game ends after the winter of the third turn. The player with the most victory points wins the game. In case of a tie, the tied players share the victory.
Continue Reading
