When being attacked in Close Combat, the defender may announce the unit is going to Evade instead of staying and fighting in Close Combat. Note: An attacking unit may not Evade if the defender Battles Back. If the die roll against the evading unit eliminates the evading unit one Victory Banner is gained.
The attacking unit determines and rolls the proper number of Close Combat battle dice against the evading unit before it Evades, but only symbols that match the evading unit will score a hit. All other unit symbols, leader, swords, and flags rolled are ignored.
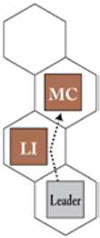
If the evading unit receives a hit and has an attached leader, a leader casualty check is made to see if the leader is hit, using normal rules.
Evade Eligibility
The following units may Evade:
- Light units (light infantry, light sling infantry, light bow infantry, light cavalry, light bow cavalry, barbarian chariot) may always Evade.
- War machine units may (almost) always evade. See War Machine Evade.
- A leader must Evade if he is alone in a hex (see Leader Evade).
- Medium cavalry, camel and cataphracted camel units may Evade all foot and heavy mounted units.
- Heavy cavalry, Heavy cataphracted cavalry and heavy chariot units may Evade all foot and elephant units.
- Auxilia, medium infantry, warrior, heavy infantry, and elephant units may never Evade.
Evade Procedure
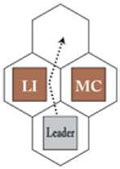
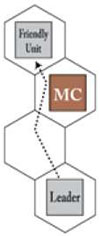
An Evade movement is a 2 hex move towards the unit's own side of the battlefield. An Evade move of 1 hex is possible and is permitted, but only if it is the only possible hex available. A unit may not Evade if both hexes towards its side of the battlefield are occupied by impassable terrain hexes, units (regardless if friend or foe) or a lone enemy leader.
If the first hex a unit evades to includes a lone friendly leader, the unit stops in that hex and the leader is attached to the unit. (This counts as a legal Evade).
An evading unit may not Battle Back, even when it ends in a hex that is adjacent to the unit making the attack.
The attacking unit may not occupy the defender's original hex, regardless of the result of the attacking unit's die roll on the evad- ing unit. Even if the evading unit is eliminated by the attacking unit's die roll, the attacking unit may not enter the hex.
note: Evasion is not simply "running away". Evading usually represents a fighting withdrawal that hinders the enemy advance, but at some risk to the unit.
War Machine Evade
The attacking unit rolls normally against the evading war machine unit. If the war machine unit is eliminated, the attacker gains a Victory banner. If not eliminated, the war machine unit executes a valid one or two hex evade move, and then the war machine unit is removed from the battlefield. The war machine crew has escaped and does not count as a Victory Banner.
Leader Evade
Leaders Evade somewhat differently from units. A leader's Evade movement is 1, 2, or 3 hexes back towards his own side of the battlefield.
When a leader is attached to a unit and the unit loses its last block by Ranged Combat or Close Combat, make a leader casualty check on the leader by rolling one die. To score a hit on the leader, you need to roll one leader symbol.
If the leader is not eliminated, the leader must evade. If this occurs in Close Combat, the attacking unit may take a Momentum Advance because it eliminated the defending unit.
When a leader is alone in a hex (unattached), and is attacked by Ranged Combat or Close Combat, the unit attacking the leader determines the normal number of battle dice to roll. To score a hit and eliminate the leader, you need to roll one leader symbol.
If the leader is not eliminated, he must evade. The attacking unit may not make a Momentum Advance after Close Combat against an unattached leader, whether the leader is eliminated or not.
When a leader Evades he must follow these rules:
- A leader's Evade movement is 1, 2, or 3 hexes back towards his own side of the battlefield. The player who controls the leader determines the number of hexes he will move, and which path he will take as he Evades.
- An Evading leader may move through friendly units, friendly units with an attached leader and friendly leader alone in a hex.
- A leader may not end his Evade movement in a hex that contains another friendly leader, impassable terrain, an enemy unit or enemy leader. However, a leader may Evade through a hex that contains a friendly unit or another friendly leader.
- An Evading leader may move through an enemy unit, but this is governed by the rules for Leader Escape.
- After completing his move, if the leader is on a hex with a friendly unit, he is considered attached to that unit.
- Units are not affected by a leader Evading through their hex.
- You may choose to Evade your leader off your side of the battlefield. This saves the leader from becoming a Victory Banner for your opponent but you lose a strong command piece by doing so.
- If the leader cannot Evade a minimum of one hex (due to Impassable terrain) the leader is eliminated and the opponent gains one Victory Banner.
Leader Escape
If enemy units occupy one or two hexes of a leader's designated Evade path, the evading leader must attempt to escape through those hexes.
Leader Escape Procedure:
- Move the leader onto one of the enemy hexes. Allow the enemy unit in the hex to battle the leader. The attacking unit uses its normal number of Close Combat dice. The leader does not benefit from terrain.
- To score a hit on a leader trying to escape, you need to roll one leader symbol.
- If the leader is not hit, his escape is successful and he continues with his Evade move by moving onto the next hex. If this hex is also occupied by an enemy unit, the leader must again undergo the Escape procedure listed above. If his third hex of movement is also onto a hex with enemy units, he is eliminated and the opponent gains a victory banner.
- If the leader ends his Escape move on a hex with a friendly unit, he is attached to the unit.
Examples Of Leader Evade And Escape:
1. An enemy light infantry unit and medium cavalry unit occupy the two hexes behind a lone leader who must evade. The hexes behind these two enemy units are vacant.
The leader chooses to evade through the hex with the light infantry because the opposing player will roll only two dice instead of the three dice the medium cavalry unit would roll.
The opposing player rolls two dice and gets one sword hit and one red square. Since no helmet symbols were rolled, the leader successfully escapes and finishes the Evade move after moving one or two more hexes.
2. The hex behind a lone leader is vacant. The next hex is occupied by a medium cavalry unit. A friendly unit without a leader occupies the hex behind the medium cavalry unit.
The leader could make a one hex Evade onto the vacant hex, but elects to Evade three hexes, ending on the hex with the friendly unit.
Upon entering the second hex containing the medium cavalry unit, the Evade move is halted, and the opposing player rolls three dice, obtaining two flags and a green circle.
Since no helmet symbols were rolled, the leader successfully escapes and continues the Evade move onto the third and final hex containing the friendly unit.
3. The only available Evade path has an enemy light infantry unit on the first hex and an enemy medium cavalry unit on the second hex.
The evading leader moves onto the first hex and halts while the opposing player rolls two dice for the light infantry unit, obtaining a flag and a sword.
The escape succeeds, but the leader now must undergo another escape attempt as the leader is moved onto the second hex.
The opposing player rolls three dice for the medium cavalry unit, and obtains a blue triangle hit and two helmets.
Only one helmet is needed, and the leader is removed, one hex short of safety. The opposing player earns one banner for the eliminated leader.
Continue Reading